

For over a decade, EasyArmy has been the de facto army list-building tool for Bolt Action. Although not the most intuitive or snappy system, it gets the job done with its old-school charm. Over the years, I’ve grown accustomed to the little quirks and idiosyncrasies of the platform, and after you spend some time building a list, it all becomes second nature.
Before we start the tutorial, I’d like to take a moment to thank Gregg, the developer of EasyArmy, for his ceaseless work. EasyArmy remains free to use, and I hope that anyone who finds the platform helpful will consider making a donation to keep it up and running.
Creating a New Army List
Step 1 – Access wg.easyarmy.com.
Step 2 – Click the Bolt Action logo.
Step 3 – Click New Platoons.
Step 4 – Use the –All Countries– drop-down menu to pick the country you’d like to build an Army List for. In this example, I’ve picked British.
Step 5 – This list is showing every Third Edition Platoon and Second Edition Theater Selector for the British. It’s overwhelming, a bit confusing, and easy to get lost. What we want is the **v3 Armies of Great Britain – Rifle Platoon (All). To explain further, this selection is for:
- v3 – we are using Bolt Action Third Edition.
- Armies of Great Britain – the current Army List for Great Britain. We are not using the Army List from the Bolt Action Rulebook, as it has been overwritten by the Army List in Armies of Great Britain: Third Edition.
- Rifle Platoon – The Rifle Platoon is the required Platoon for any Army List, so it’s good to start here.
- All – We are not limiting this Army List to a specific Force Selection (Early War, Mid War, or Late War) so we will have access to all the units in the British Army List.
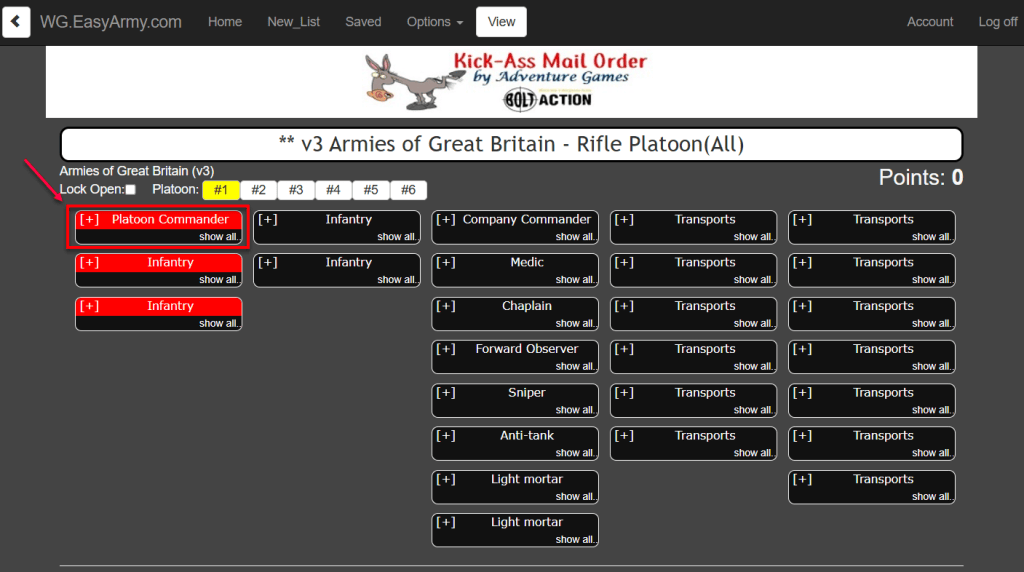
Step 6 – And now we have our Army List screen. From here, we can populate the slots in the Rifle Platoon with units. As all Rifle Platoons must include a Platoon Commander, let’s begin there. Click the red Platoon Commander heading and click Platoon Commander to open the Platoon Commander unit options.
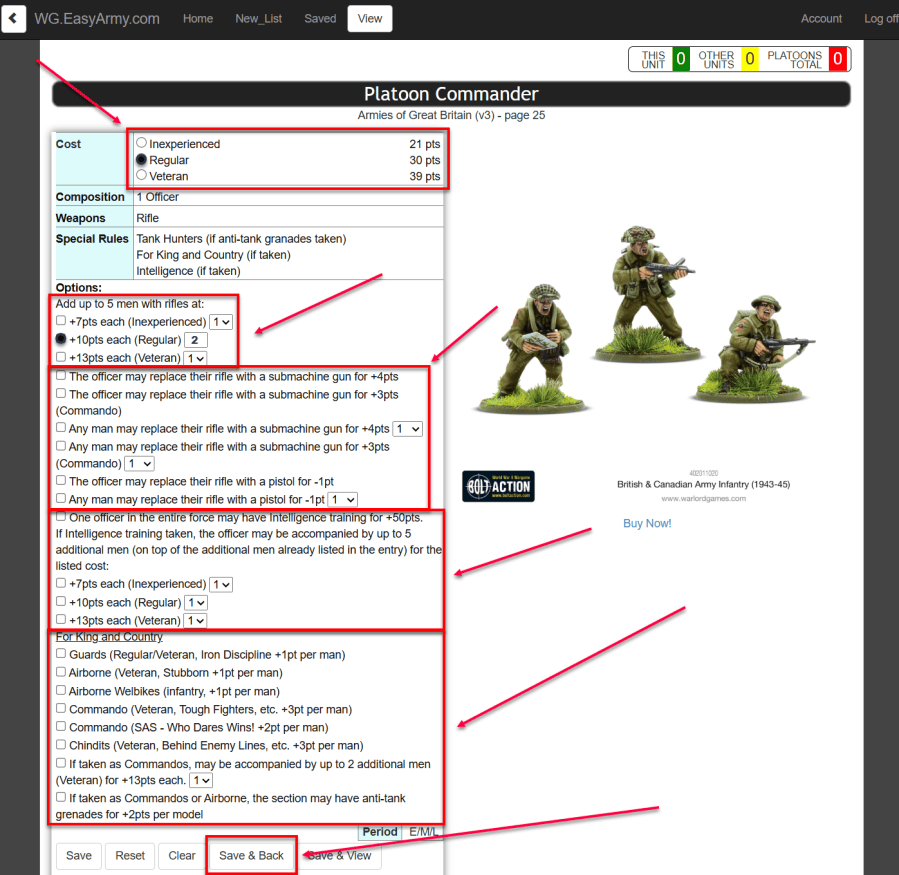
Step 7 – Select the options you want for your Platoon Commander. This screen shows the:
- Cost – 21pts Inexp, 30pts Reg, 39pts Vet
- Composition – 1 Officer
- Weapons – Rifle
- Special Rules –
- Tank Hunters (if Anti-tank Grenades are taken)
- For King and Country (if taken)
- Intelligence (if taken)
- You must:
- Pick their level as Inexperienced, Regular, or Veteran. The points costs are listed next to the level.
- You can:
- Add additional men to the Platoon Commander. We can add up to five additional men. Remember, the additional men must be the same level as the Platoon Commander. If your PC is Reg, the additional men must also be Reg.
- Change weapons options. The PC comes with a rifle and can swap to an SMG for +4pts, a pistol for -1pt, or if they are a Commando, an SMG for +3pts.
- Change the weapons options for the additional men. The additional men come with rifles, and any man may replace their rifle with an SMG for +4pts, a pistol for -1pt, or, if they are Commandos, an SMG for +3pts.
- If you select the Intelligence option (+50pts), you can add up to five more additional men.
- Select from one of the four For King and Country options: Guards, Airborne, Commando, and Chindit. Each For King and Country option includes the specific point cost as well.
Once you make your selections, in our case we are selecting a Regular PC with a Rifle and two additional men, click Save & Back to return to the Army List screen.
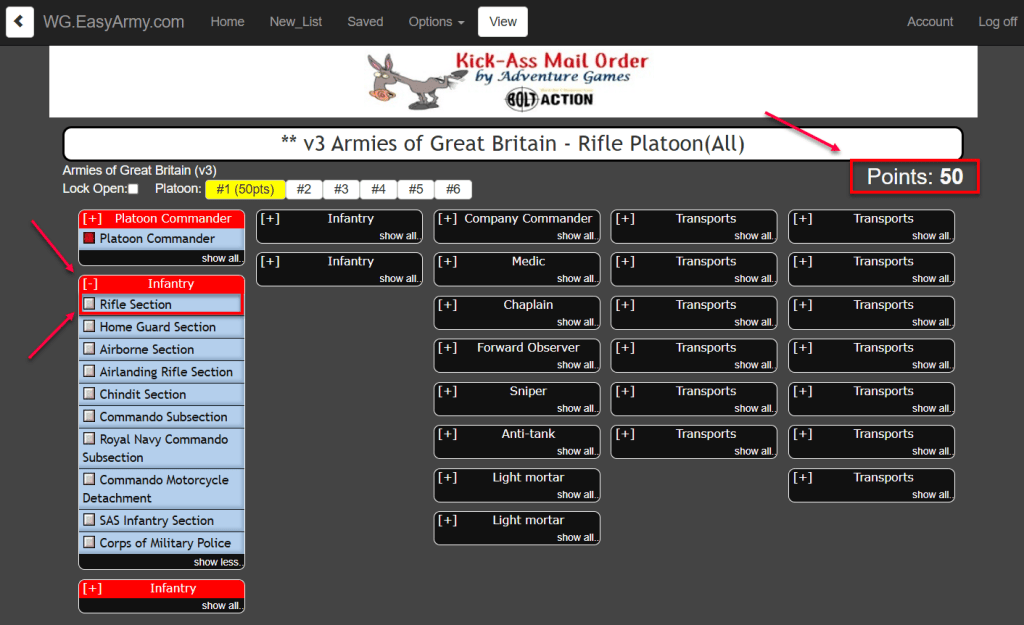
Step 8 – Back at the Army List screen, we now see Points: 50 displayed (that’s the 50pts our Regular Platoon Commander with two additional men). The next step is to add our two compulsory Infantry units. Click the red Infantry heading to display 10 Infantry unit options. Let’s add a Rifle Section. Click Rifle Section to open the unit options.
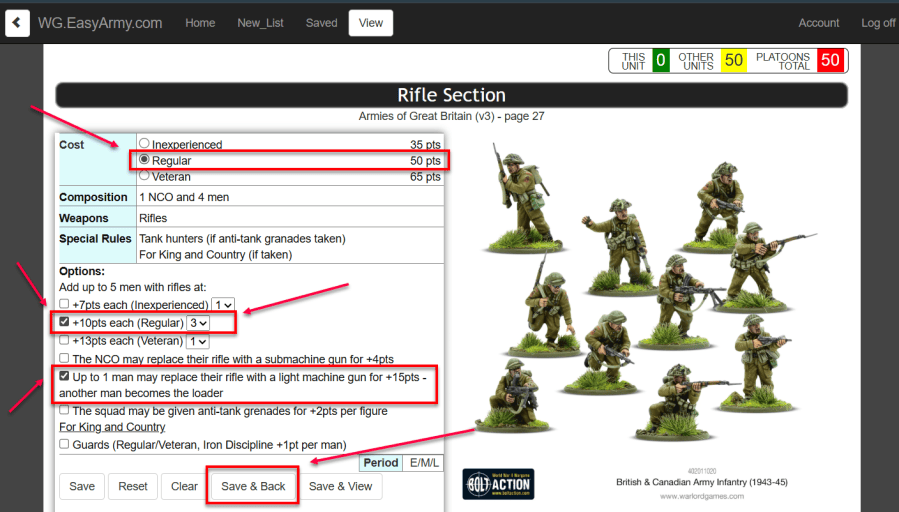
Step 9 – Select the options you want for your Rifle Section. This screen shows the:
- Cost – 35pts Inexp, 50pts Reg, 65pts Vet
- Composition – 1 NCO and 4 men
- Weapons – Rifles
- Special Rules –
- Tank Hunters (if Anti-tank Grenades are taken)
- For King and Country (if Guards is taken)
- You must:
- Pick their level as Inexperienced, Regular, or Veteran. The points costs are listed next to the level.
- You can:
- Add additional men to the unit. We can add up to five additional men.
- Change weapons options. We can give the NCO an SMG for +4pts, give one man an LMG for +15pts, and/or give the entire squad Anti-tank Grenades for +2pts per model.
- Pick a For King and Country option. For Rifle Sections, the only available option is Guards for +1pts per model.
Once you make your selections, in our case we are selecting a Regular Rifle Section with three additional men (at +10pts each) and an LMG (for +15pts), click Save & Back to return to the Army List screen.
Step 10 – Back at the Army List screen, we now see Points: 145 displayed (50pts our Platoon Commander and 95pts for the Rifle Section). Let’s add the second required Infantry unit. Click the second red Infantry heading to display all 10 Infantry unit options. For the second unit, how about some Commandos? Click on Commando Subsection to open the unit options.
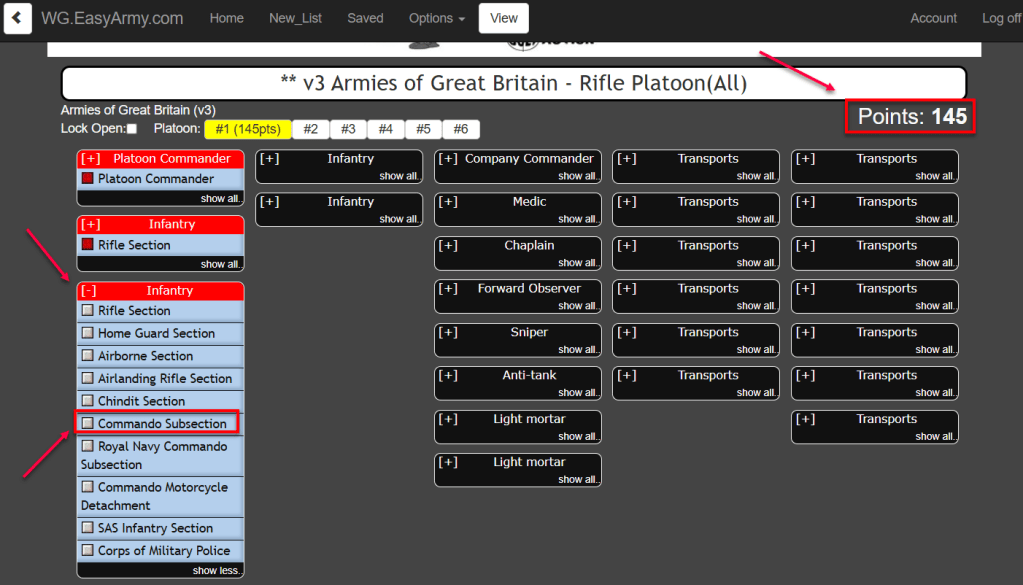
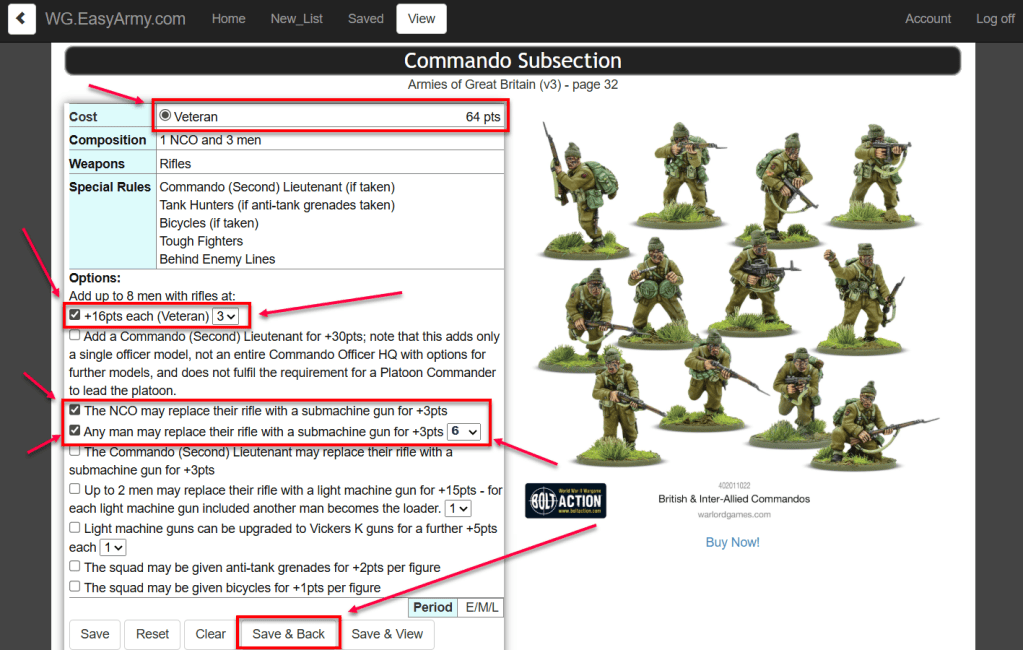
Step 11 – Select the options you want for your Commando Subsection. This screen shows the:
- Cost – 64pts Vet (the only option)
- Composition – 1 NCO and 3 men
- Weapons – Rifles
- Special Rules –
- Commando (Second) Lieutenant (if taken)
- Tank Hunters (if Anti-tank Grenades are taken)
- Bicycles (if taken)
- Tough Fighters
- Behind Enemy Lines
- You must:
- Pick their level as Veteran. It’s the only option. The points costs are listed next to the level.
- You can:
- Add additional men to the unit. We can add up to eight additional men.
- Change weapons options. We can give the NCO an SMG for +3pts, give any model an SMG for +3pts, give up to models an LMG for +15pts, upgrade any of the LMGs to Vickers K Guns for +5pts, give the entire squad Anti-tank Grenades for +2pts per model, and/or give the entire squad Bicycles for +1pt per model.
Once you make your selections, in our case we are selecting a Veteran Commando Subsection with three additional men (at +16pts each), an SMG for the NCO (for +3pts), and six SMGs (at +3pts each). Click Save & Back to return to the Army List screen.
Viewing Your Army List
Step 12 – Back at the Army List screen, we now see Points: 278 displayed (50pts our Platoon Commander, 95pts for the Rifle Section, and 133pts for the Commando Subsection). Before adding any additional units, let’s take a look at what we have put together. Click View at the top of the screen.
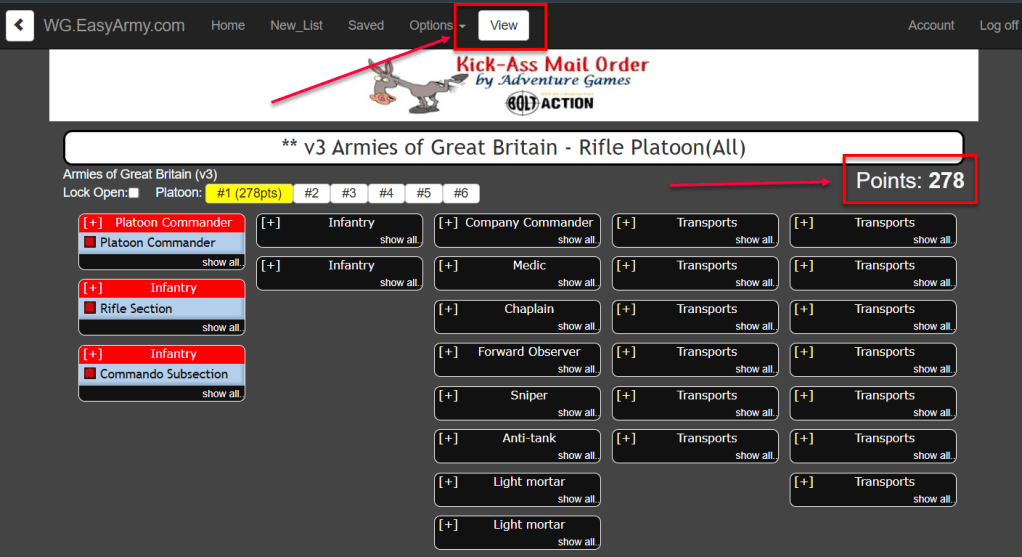
Step 13 – This is your Army List!
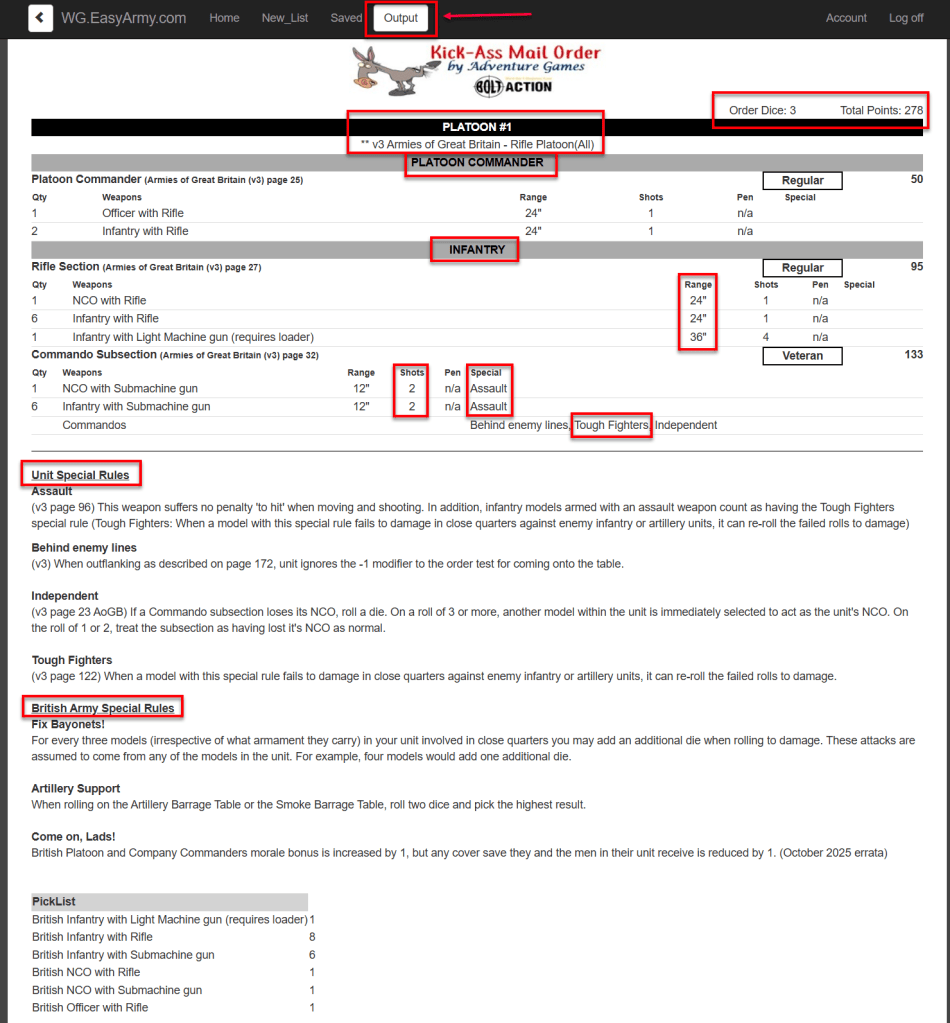
A few items to highlight:
- The Order Dice and Total Points are in the top left. Our current list sits at 3 Order Dice and 278pts.
- The type of Platoon is listed in the top middle: v3 Armies of Great Britain – Rifle Platoon (All). A reminder:
- v3 – we are using Bolt Action Third Edition.
- Armies of Great Britain – the current Army List for Great Britain. We are not using the Army List from the Bolt Action Rulebook as it has been overwritten by the Army List in Armies of Great Britain: Third Edition.
- Rifle Platoon – The Rifle Platoon is the required Platoon for any Army List, so it’s good to start here.
- All – We are not limiting this Army List to a specific Force Selection (Early War, Mid War, or Late War), so we will have access to all the units in the Army List.
- Each unit is listed in the appropriate category: the Platoon Commander under Platoon Commander, and the Rifle Section and Commando Subsection under Infantry. Each unit entry includes:
- The number of models in the unit.
- The weapons those models are armed with.
- The range, number of shots, Pen, and Special Rules for each weapon.
- Any unit Special Rules such as Behind Enemy Lines and Tough Fighters.
- The full list of Unit Special Rules and Army Special Rules is listed below the unit entries for quick reference.
- The Pick List shows a breakdown of each model in the army list.
Step 14 – Click on Output at the top of the page. This option allows you to pick how you want to export your Army List.
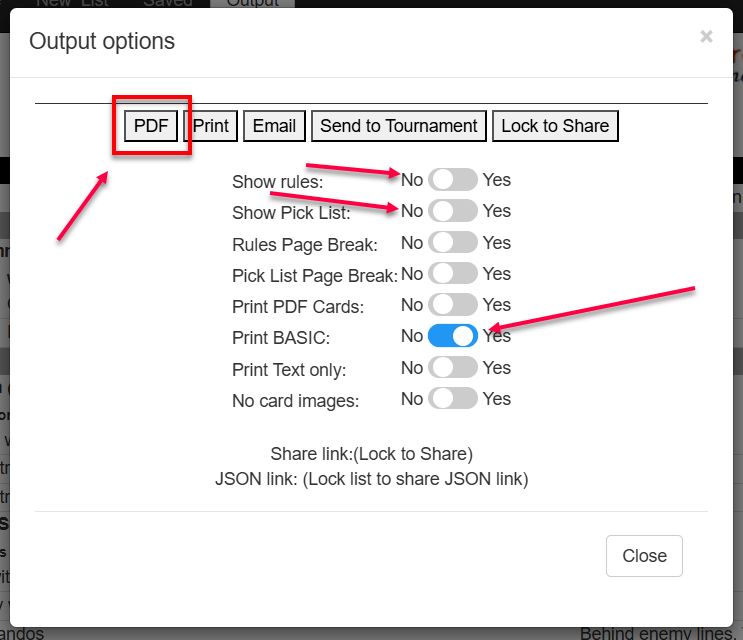
These are the Output options that I prefer, but you are free to use whatever format you like! I set both Show rules and Show Pick List to No and set Print BASIC to Yes. Then, click on PDF. These settings create a copy of the Army List in a minimalist format without all the full rule explanations. Play around with the settings and use the ones you like best. From here, you can download, print, and share a copy of the PDF Army List. Very helpful when an event requires list submissions.
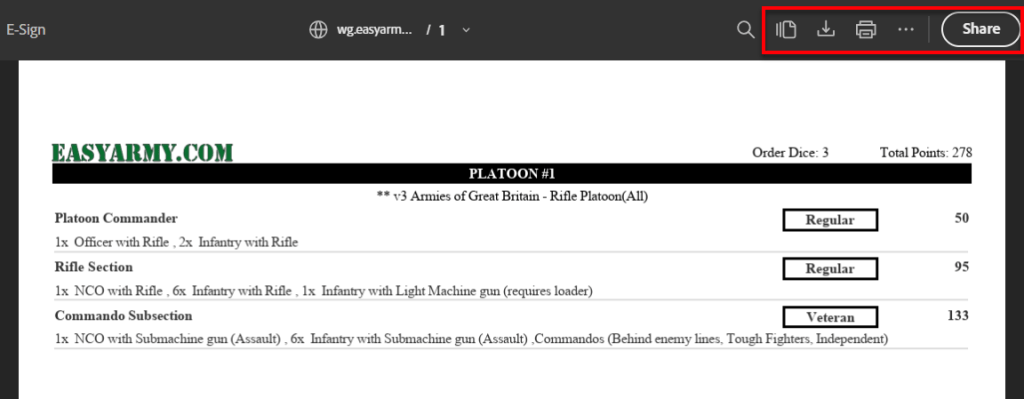
We’ve done it! You’ve now created a simple, three-unit Army List in EasyArmy. The interface is clunky and can be confusing at first glance. It’s a “click-heavy” system, but it’s one I’ve come to know and love. With your Army List saved, we can move to making further updates like adding an Armored Platoon.
Adding a Second Platoon to your Army List
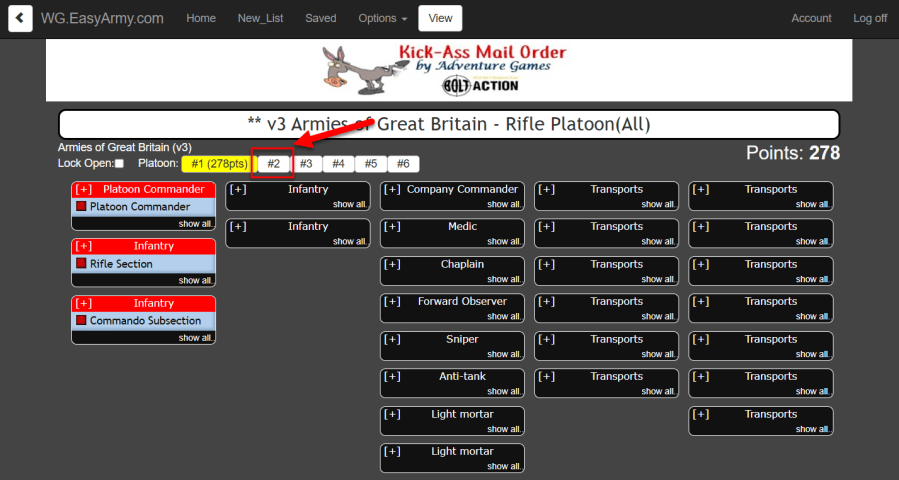
Step 15 – Click the back arrow to return to your Unit and Platoon selection screen. Click on #2 – this will give you the option to add a new Platoon to your existing Army List.
Step 16 – You are now seeing this same, overwhelming list of Platoons. What we want is the *v3 Armies of Great Britain – Armored Platoon (All). To explain further, this selection is for:
- v3 – we are using Bolt Action Third Edition.
- Armies of Great Britain – the current Army List for Great Britain. We are not using the Army List from the Bolt Action Rulebook as it has been overwritten by the Army List in Armies of Great Britain: Third Edition.
- Armored Platoon – We are adding an Armored Platoon to your existing Army List.
- All – We are not limiting this Army List to a specific Force Selection (Early War, Mid War, or Late War), so we will have access to all the units in the Army List.
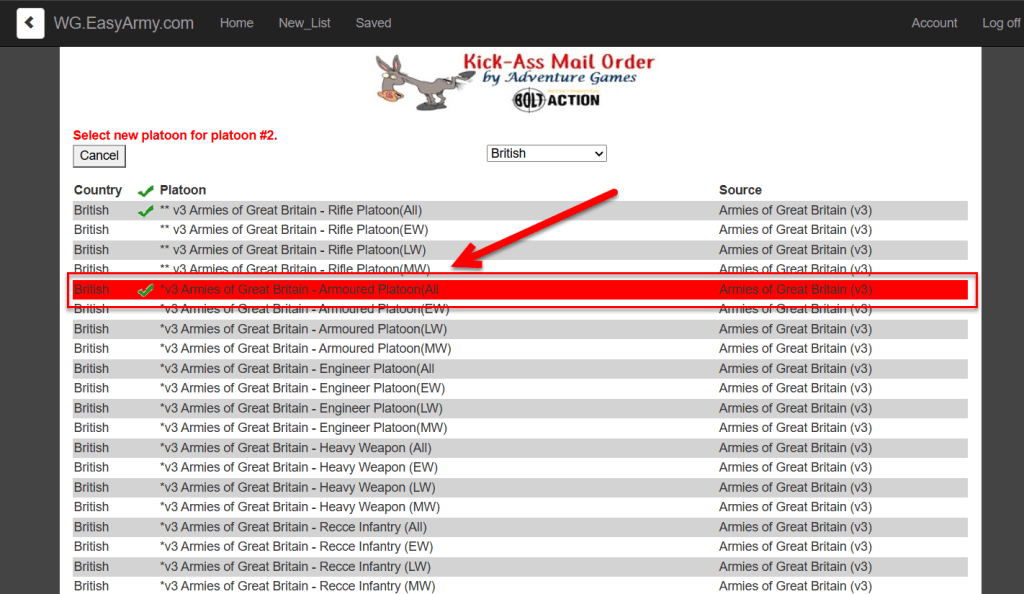
Clicking *v3 Armies of Great Britain – Armored Platoon (All) will automatically add the Armored Platoon as Platoon 2 on your Army List. You can toggle back and forth to Platoon #1 (your Rifle Platoon) at any time.
Step 17 – And now we have our Army List screen for the Armored Platoon. From here, we can populate the unit slots. You must have a Command Vehicle, so we will start there. Click the red Command Vehicle heading and click on the unit you want to use as your Command Vehicle to open the unit options. For this example, let’s go with a Cruiser Tank Mk VIII Cromwell.
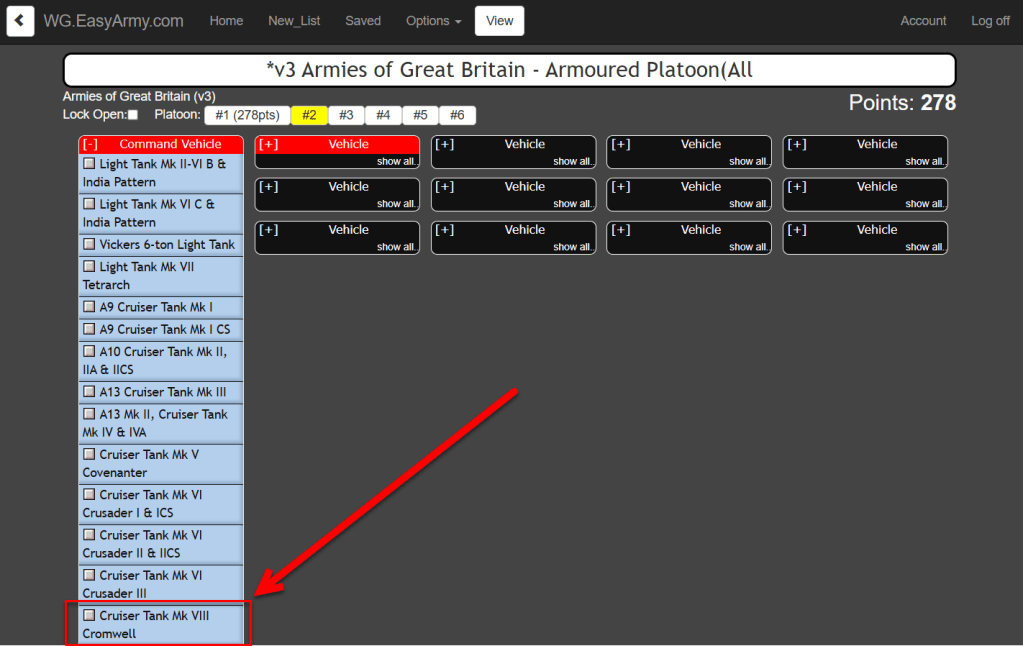
This will open the unit options for the Cromwell.
Step 18 – Select the options you want for your Cromwell. This screen shows the:
- Cost – 176pts Inexp, 220pts Reg, 264pts Vet
- Weapons – 1 Turret-mounted 75mm Medium Anti-tank Gun with co-axial MMG and 1 hull-mounted, forward-facing MMG
- Damage Value – 9+ (Medium Tank)
- Special Rules –
- Improved HE
- Fast
When making the selection,
- You must:
- Pick the level as Inexperienced, Regular, or Veteran. The points costs are listed next to the level.
- You can:
- Replace the 75mm AT Gun with a Medium AT Gun for -15pts. This will remove the Improved HE special rule
- Replace the 75mm AT Gun with a Medium Howitzer for +5pts.
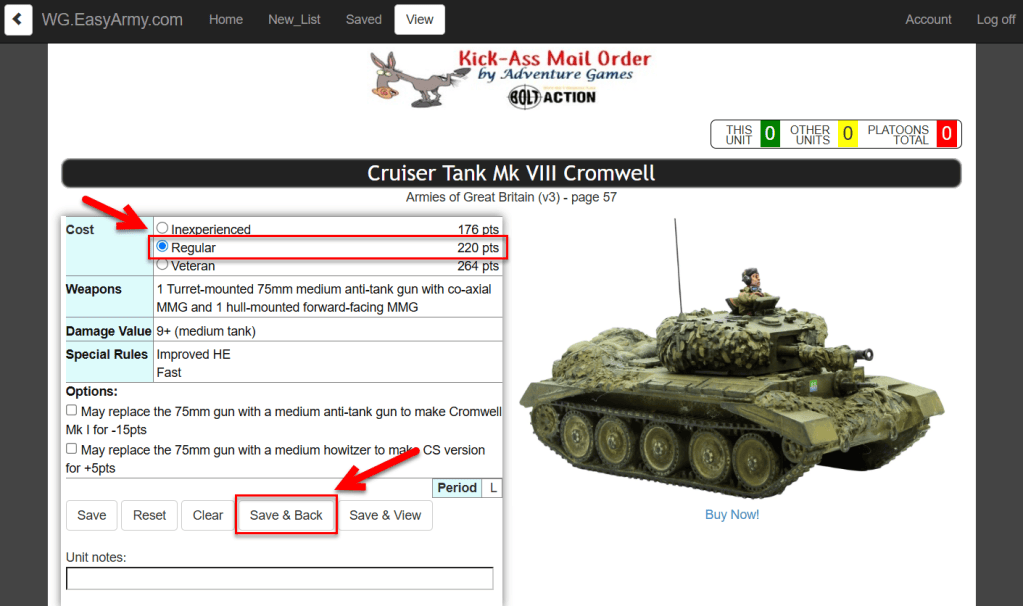
Once you make your selections, in our case we are selecting a Regular Cromwell without any further options, click Save & Back to return to the Army List screen.
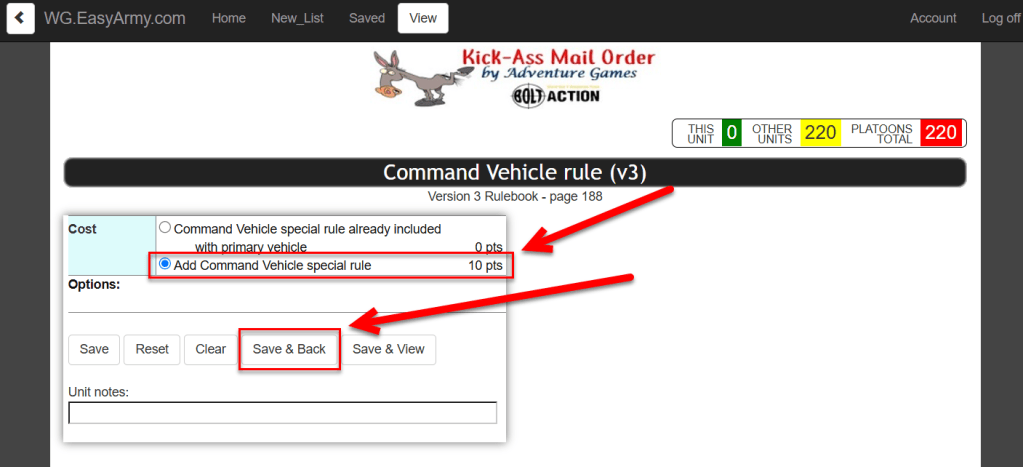
Step 19 – Unique to the Armored Platoon, you must now give the Command Vehicle special rule to your Command Vehicle. Click on the red Cmd Vehicle Options heading, then click Command Vehicle rule (v3). As the Cromwell does not come with Command Vehicle, we must select the option to Add Command Vehicle special rule for +10pts. Select this option and click Save & Back.
Step 20 – Back at our Army List screen, we need to add an additional vehicle to meet the minimum Armored Platoon requirements. To keep things simple, let’s add a second Cromwell. Just like we did for the Command Vehicle. Click the red Vehicle tab and click Cruiser Tank Mk VIII Cromwell. Once the unit screen opens for the Cromwell, let’s swap out the 75mm AT Gun for a Medium Howitzer (turning this one into a Cromwell CS) for +5pts. After you have made this selection, click Save & Back.
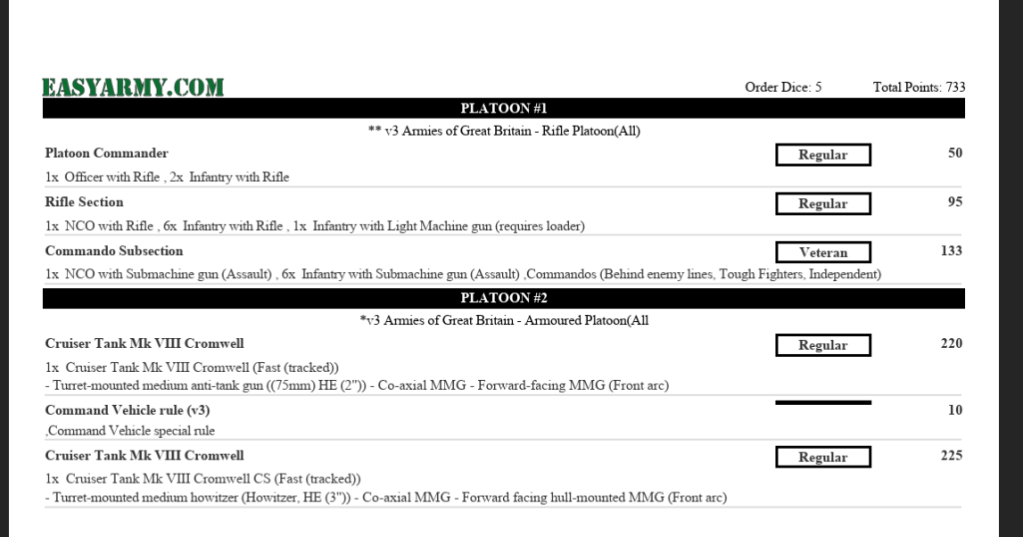
Step 21 – And now we have our updated Army List sitting at 733pts with two Platoons – one Rifle and one Armored. You can also see the Rifle Platoon (#1) at 278pts and the Armored Platoon (#2) at 455pts. Let’s click View to get a more detailed look.
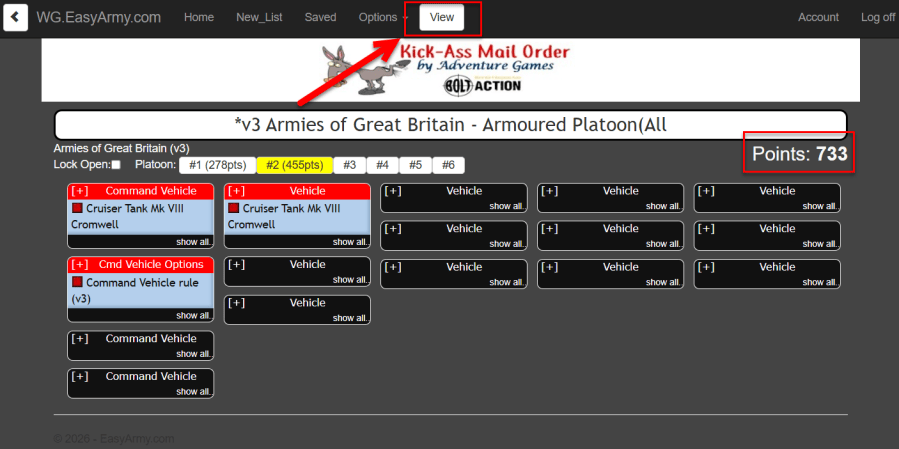
I did the same Output options as before in Step 14 to give us this Army List:
Naming Your Army List
Step 22 – The last item to address is adding a Custom Name. This will make your Army List much, much easier to locate in the future. Especially once you start creating all kinds of lists to test different builds. Go back to the Army List screen and click Options – Custom Name.
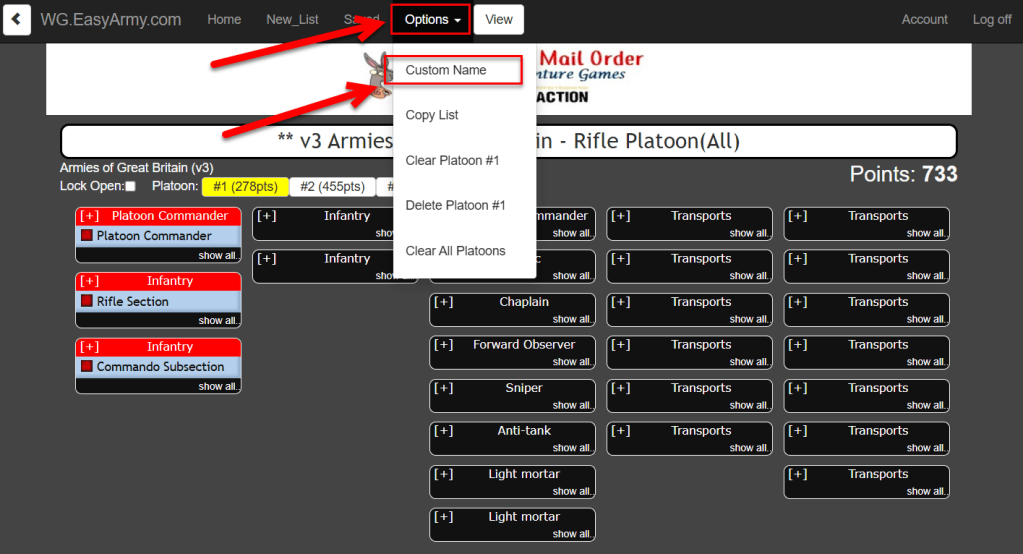
In the new popup box, enter your custom name. I went with “Demo List – Commando Cromwell”.
Step 23 – Our final step. And it’s more of a navigation reminder. Click Saved at the top to view all your saved Army Lists. With the addition of the Custom Name, you can easily find the one you are looking for. You can always go back to a previous Army List to edit, print, email, even duplicate or delete as needed.
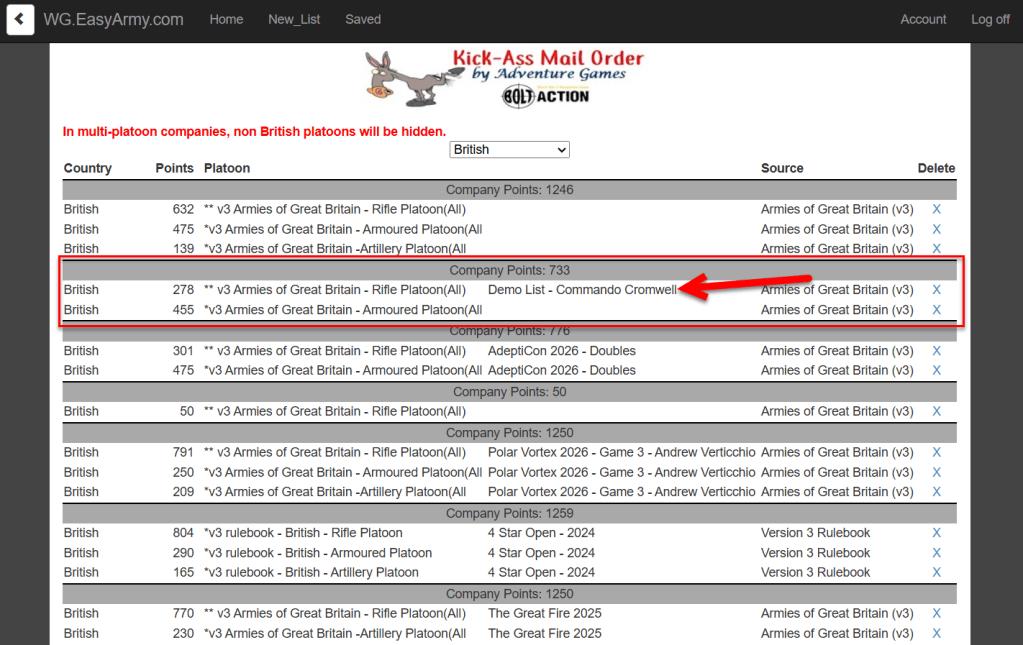
And we are done. It may seem like a lot of steps, but it moves quickly once you have become used to the system.
I hope you found this article helpful and makes the venerable EasyArmy more approachable. If, like me, you end up using the tool on an almost weekly basis for years, consider tossing a donation to Gregg to support this work in keeping EasyArmy online.


very helpful , as ever ! I’ve been recommended easylist for a few years but this makes it all the easier for newbies . Thanks !
LikeLiked by 1 person
Cheers Henry! I’ve been meaning to write this article for a while. EasyArmy is still the king, after all these years.
LikeLike