

Over 16 missions, Joe & Andrew will battle through the full campaign – each trying to secure victory in a desperate fight for control of Fortress Budapest.
The momentum was with the defenders for another urban brawl! Back for more action at the new home of Campaign: Fortress Budapest – Michigan Toy Solider – Game 8 promised to be a bloody one. This game was played on a 4×4′ table (like Game 7) between two 750pt forces. Andrew set his defense using the Budapest Pocket Defenders and would be able to deploy another set of d3 Defensive Barriers. Joe, for the first time, brought forth the deadly Urban Assault Group. Would the insane amount of SMGs and dedicated fire support units (three Light Howitzers and a ZIS-3!) be enough to crack the Axis defense?
For the Siege Assets, Andrew picked Frontline Aid Post and selected the large, central building. This building now acted as a Medic for all friendly units in the building and within 6″ of the building. Joe went with Big Push and received a free unit of Guards Infantry. This was the first game with Siege Assets and both Commanders were excited to see how they would play out.
Andrew had to deploy half his units within 24″ of the Axis table edge with the rest of the force in Reserve. No Outflanking allowed. Joe, in true Soviet fashion, decided to put his entire force into First Wave.
Our Commanders could score VPs by:
- Soviets:
- 2 VP per Table Quarter on the Soviet Side
- 4 VP per Table Quarter on the Axis Side
- Axis:
- 2 VP per Table Quarter on the Soviet Side
- 4 VP per Table Quarter on the Axis Side
To hold a Table Quarter, you needed to have Infantry or Artillery units within the Table Quarter with no enemy Infantry or Artillery units within the Table Quarter. If any enemy Infantry or Artillery is present, the Table Quarter is contested.
The Pre-Game
The Axis Strategy
I like the look of this mission. It’s a twist on Attacker/Defender as it forces the Defender to push up and contest the Soviet zones. If I sit back in my own zone, all Joe needs to do is walk in and contest. It’s not enough to simply hold the defenses, I need to be aggressive and strike at the right time to have a chance at victory. This Budapest Pocket Defenders Theater Selector includes several assault options and I’ll be sure to make use of them. I want to use the Hungarian Assault Pioneers to create a gap in Joe’s line and exploit it. The StuH 42 was an MVP last game and I see no reason to leave it behind. Two units of Vet. German Grenadiers to provide 10-shot LMG support and a single squad of Green Honved to round out the infantry. For support, it’s just a Sniper Team. I knew Joe would bring forth at least two Howitzers so I didn’t want to have any static units for the indirect fire to rain down on.
With a Frontline Aid Post right in the middle of my defensive line, I felt confident that my two Vet. units could handle any small arms fire. And if not? I have the StuH and two more infantry units in Reserve to fill the gaps. This is our second 4×4′ urban assault game and I have a chance to bring the Campaign back to a tie score. No matter the outcome, this is already shaping up to be an excellent game. – Andrew
The Soviet Strategy
This was the game I was most looking forward to, mainly for Urban Assault Group Theater Selector. This selector is wild. Compulsory squads are SMG Squads, but must be taken at Full Strength! 24 SMGs running around causing chaos sounds like fun to me! But the best part is the option to take up to three Light Howitzers on top of your normal Artillery slot! Having four guns on a board is wild! With this game being the first to be able to take a Siege Asset, I choose Big Push, gaining a free squad identical to the cheapest I already had. My plan for the mission was to use my artillery batteries to pin down his units while my SMG and flamethrowers would route his infantry. It was simple. – Joe
The Game
Deployment
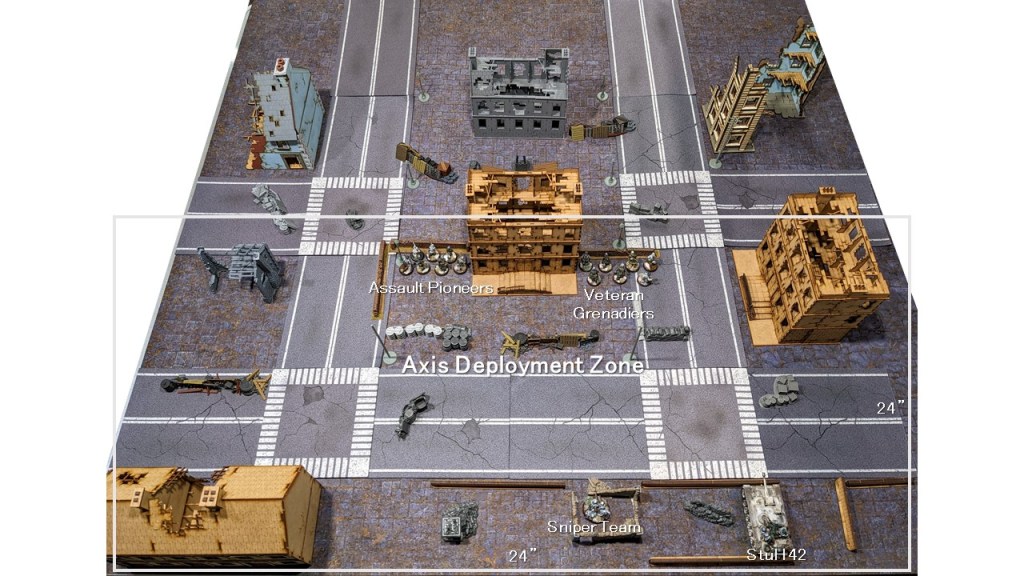
- Half the Axis defenders stared on the table with the other half held back in Reserve.
- The large building in the middle of the table was designated the Frontline Aid Post and provided a 6″ Medic bubble to all Axis units.
- Andrew’s platoon also granted d3 6″ linear obstacles (hard cover) set up anywhere in the Axis Deployment Zone. Those walls were set up on the immediate left and right of the Frontline Aid Post.
- Axis deployment from left to right:
- German Veteran Grenadiers
- Hungarian Assault Pioneers
- German Sniper Team (back center)
- StuH 42
- No Soviet units started on the table, all would arrive via First Wave or Reserve.
Turn 1

- The Soviet First Wave arrived in a truly overwhelming fashion. The sheer number of assets Joe moved onto the battlefield was staggering:
- 12-man SMG Squad
- Light Howitzer
- ZIS-3
- Guards Squad
- 12-man SMG Squad
- Lt
- Light Howitzer
- Guards Squad
- Light Howitzer
- Flamethrower Team
- Even with this horde of Soviets charging across the table there was barely a shot fired. Not a single model was killed during the first turn. This would not be the case for long.
Turn 2
- The Soviets continued to establish their positioning and the artillery began to open up.
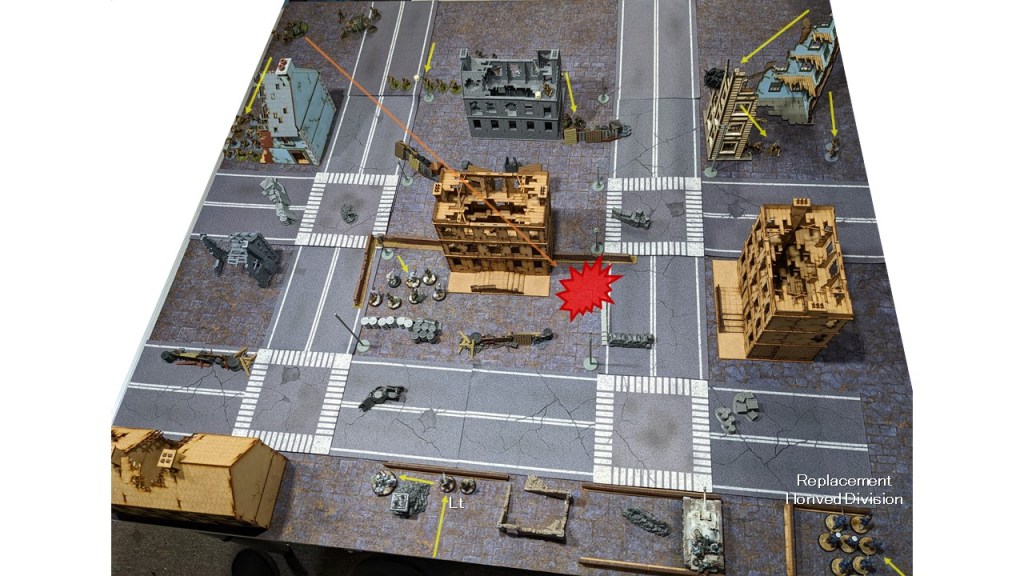
- The Light Howitzer in the deep left corner landed an indirect hit on the Grenadiers, killed four (the Frontline Aid Post was powerless against the HE), applied three Pins and the remaining three squad members fled the field of battle. First blood to the Soviets.
- The first of the Axis Reserves arrived – a German Lt from the middle and a Hungarian Replacement Honved Division Section on the right.
- The Assault Pioneers fell back in an attempt to shake the ranging in from multiple indirect shots.
Turn 3
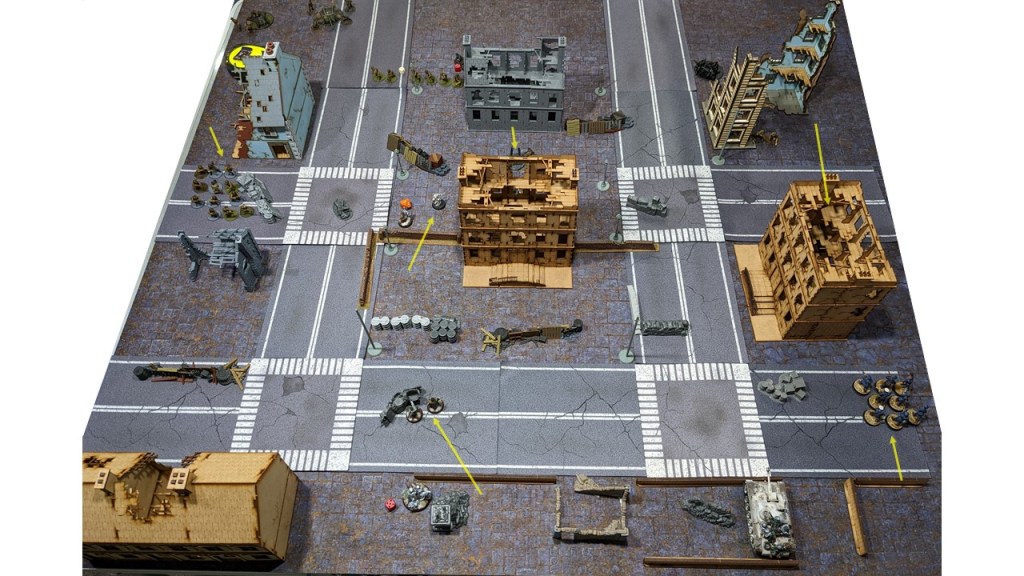
- Seeing an opportunity, the Assault Pioneers advanced up and over their defensive barrier to engage the SMG Squad in the middle. The Flamethrower missed, but the small arms put down three of the Soviets.
- The StuH 42 missed a shot against the Guards holing up in the building on the upper right.
- The same Light Howitzer as before hit the Pioneers over open sights and killed five of the seven. The two remaining troops (NCO and Flamethrower) held their nerve.
- Soviet Flamethrower Team advanced to behind the building on the right flank, and the Honved moved to counter.
- The second units of Grenadiers failed to arrive from Reserve for the second turn in a row.
- Soviet SMG Squad on the left continued to advance, while the Guards in the middle failed to activate.
Turn 4
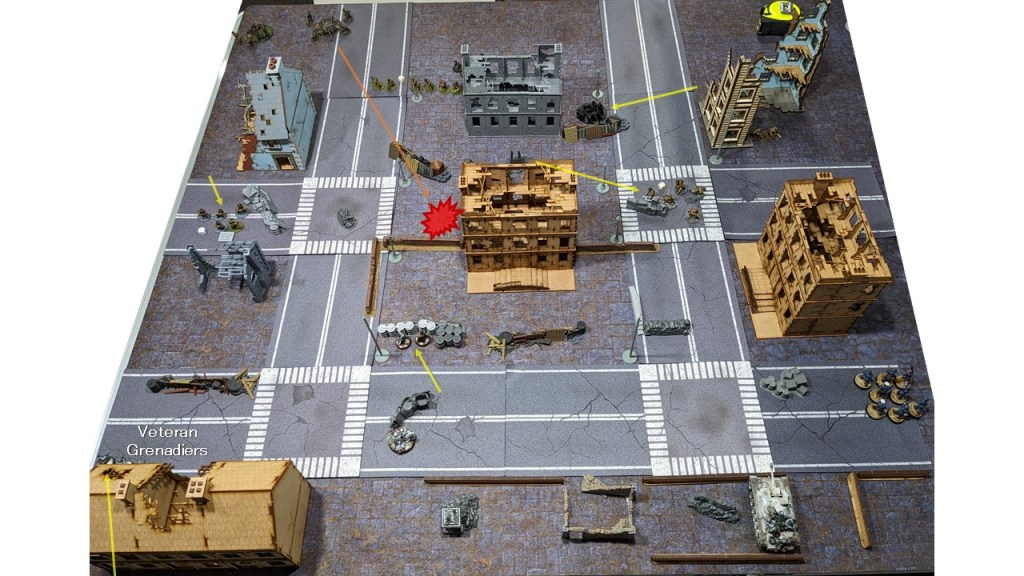
- First Order Die, the SMG Squad above the Frontline Aid Station attempted to activate and FUBARs away from the Assault Pioneers, directly into the open.
- Before they had a chance to react, the ZIS-3 hits and craters the two Pioneers.
- StuH 42 misses the building with the Guards inside, again.
- The left flank Grenadiers finally arrive and put some fire onto the still advancing SMG Squad. The Sniper Team added additional fire and sniped out the NCO.
- The Soviet Flamethrower and Honved stared each other down on the right flank.
Turn 5
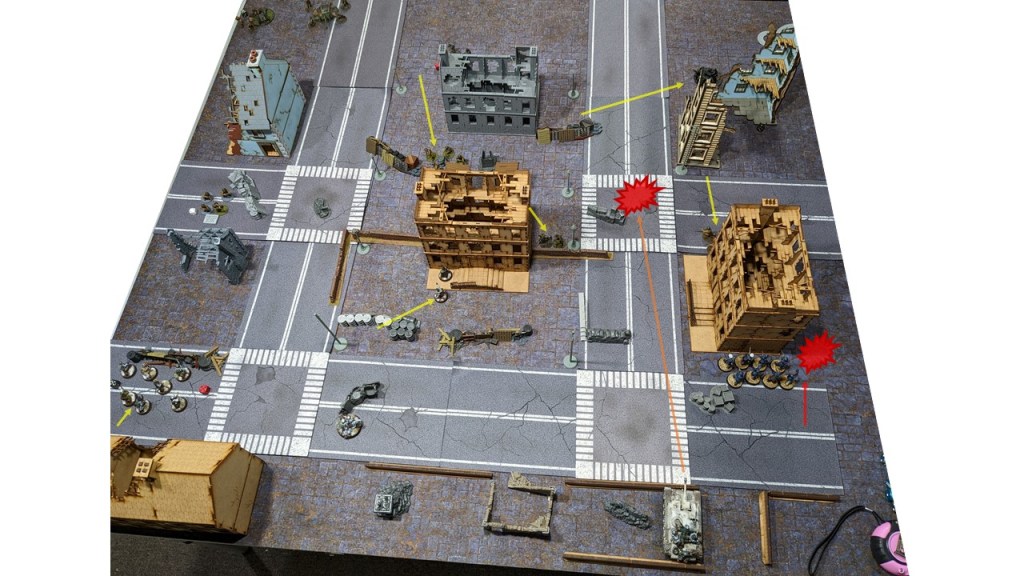
- A new target of opportunity presented itself to the StuH 42 – the fleeing SMG Squad. Caught in the open the squad took a 3″ HE template direct hit. Three were killed, and the rest failed their Morale Test and fled.
- Joe pulled the left side Light Howitzer back to secure the Soviet Table Quarter and get outside of the StuH line of sight.
- The Soviet Flamethrower swings around the building, fired and missed the Honved. In direct response, the Honvet assaulted the two-man team and cut them down.
- No longer under pressure from the StuH, the Guards on the right abandon their building and move up into the Axis zone.
- On the left, the Grenadiers continue to advance and apply more Pins and another kill onto the SMG Squad.
- The middle SMG Squad finally passed their Order Test and pushes up towards the Frontline Aid Station.
Turn 6

- Turn 6 – possible final turn!
- It was looking desperate for the Axis. Joe and the Soviets had moved too far into Axis territory, it was time to drive them back.
- The StuH 42 rumbled forward for the first time in the game and hit the Guards Squad hiding behind the building on the mid-right. The shot was Neigh Impossible but that didn’t stop the ace gunner from blasting four for the remaining seven.
- The Honved Division rushed forward in support of the StuH on the other side of the building in a flanking move against the Guards.
- The left flank SMG squad remained pinned down and the middle Guards Squad moved up and into the Axis zone.
- If there was any hope for an Axis victory, Andrew would need a Turn 7.
Turn 7
- It all came down to Turn 7.
- The Axis defenders surged forth to push the Soviet invaders back.
- The StuH 42 could not be stopped. It rolled forward and blasted the Soviet Lt off the table with another Neigh Impossible Shot.
- The remaining three Guards Infantry on the mid-right launched a desperate assault against the Honved Division but were cut down by the Hungarians.
- The left flank Veteran Grenadiers advanced and unleashed a full volley at Point Blank resulting in the destruction of the Soviet SMG Squad.
- With few options left, Joe pushed his last Guard Squad forward into the Axis Table Quarter to force a contest.
- The Soviet firebase held back in their initial Table Quarters hoping to hold the ground.
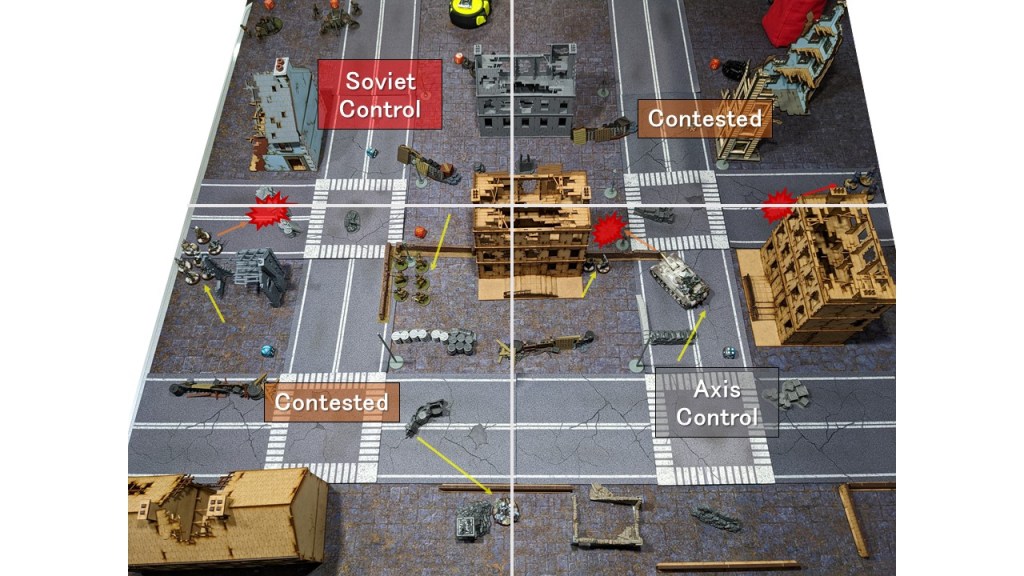
- At the end of Turn 7, the game score was:
- Soviet VPs:
- Control of 1 Table Quarter on the Soviet Side – 2 VPs
- Axis VPs:
- Control of 1 Table Quarter on the Axis Side – 4 VPs
- Soviet VPs:
| Soviet VPs | Axis VPs |
|---|---|
| 2 | 4 |
Soviets: 1 Table Quarter on the Soviet Side | Axis: 1 Table Quarter on the Axis Side
2 Table Quarters Contested
Final Result – Axis Win
A second Axis victory in a row for Andrew! Once again, the victory was by the most narrow of margins
Here we are at the halfway point of the Campaign and it’s a dead heat! After eight games of Bolt Action, Andrew and Joe both hold a record of 3 wins, 3 losses and 2 draws. As a reminder, of those wins, they were each by a margin of only 2 VP – the minimum required for a win. It’s worth repeating; this Campaign couldn’t be any closer.
The Post-Game
The Axis Conclusion
Thank goodness for Turn 7s!Another tense game! Joe’s dice turned cold at a critical moment right when mine started rolling absolute fire. In the beginning, I was completely on the back foot. Joe launched a full-court press and I was barely holding on. He was hitting multiple indirect shots on 6s and I had nowhere to run. But as the game reached the mid-way point, the tide started to turn in my favor. A few failed Order Tests stalled Joe’s advance and my Reserves brought forward the needed weight of fire. Once the StuH rolled out and hit not one, but two shots on 7s I knew I had a chance. That little tank put the team on its back and carried the defenders to victory. As a reminder, I somehow killed three Soviet units on Turn 7. That’s more than the rest of the previous six turns combined!
The Frontline Aid Station never even had a chance to activate. I took plenty of casualties within 6″ of the building, but they were all from HE and the Medic ability is only against small arms. It’s a bummer that my chosen Siege Asset didn’t play out. Joe and I are both all in to continue using the Siege Asset and City Fighting rules, they really add some additional factors to these games.
And so here we are at the halfway point of Campaign: Fortress Budapest and the score is tied (the Axis have a slight lead in overall kills). There are still eight more games to play and a lot could happen. Only time will tell if the defense can hold out against the continued Soviet assault. – Andrew
The Soviet Conclusion
Wow. Two games in a row I faltered at the end and my cunning opponent swooped in and took the game. Comrade Stalin is likely to throw me into the gulag for this poor showing! The lack of effective anti-tank firepower in my list was apparent from the get-go. Andrew’s StuH 42 ruled the battlefield and he knew it. I did get some good hits on his infantry early with my artillery battery, but late on with key units failing checks and a point-blank flamethrower miss caused my left flank to collapse. Overall, I feel like my strategy for this game was sound and I had a strong deployment, but I couldn’t close the game out.
This was a very fun mission to play. Probably the best 4×4 city battle we’ve played to date. The uniqueness of the Urban Assault Group makes the match feel so different while not game-breaking or overpowered. I would definitely recommend any Soviet player mess around with building a list with this Selector and trying it out, as it is so much fun and different. – Joe
| Soviet Campaign Score | Axis Campaign Score |
|---|---|
| 4 | 4 |
| 3-3-2 | 3-3-2 |
| Soviet Campaign Kills | Axis Campaign Kills |
|---|---|
| 32 | 40 |
Game 7 – Back Door Left Open | Game 9 – Withdrawal Across the Danube

Those 750 pts games on 4’x4′ can be quite brutal. Great battle report.
LikeLiked by 1 person
Cheers! And we’ve certainly found that to be the case! Game 9 is another 4×4 street fight, should be intense.
LikeLiked by 1 person
[…] Game 8 – Street Fighting in Pest | Game 10 – Operation Konrad I […]
LikeLike