

Over 16 missions, Joe & Andrew will battle through the full campaign – each trying to secure victory in a desperate fight for control of Fortress Budapest.
Down but certainly not out Andrew and the Axis defenders have been pushed all the way back to Budapest itself. The time for holding defensive lines out in the countryside has ended, and the time for brutal house-to-house urban combat has begun! Our commanders set the battlefield at Michigan Toy Solider for the first of many city fights. As this was their first City Fighting game on a 4×4′ table, Joe and Andrew agreed on 750pts for the game. They also added the Roads and Open Ground rules per the campaign.
Andrew set his defense using the Budapest Pocket Defenders and Joe looked to punch through with the Forward Detachment Reconnaissance Party. Because the Axis defenders were caught on the back foot, Andrew had to deploy his HQ and two compulsory infantry units (both University Assault Battalion Sections) with the rest of the force held in Reserve until Turn 3. The defenders are granted d3 Defensive Barriers and could start the game Hidden, in Ambush.
Joe would bring half his force onto the table via First Wave and hold the rest in Reserve. No Outflanking was allowed.
Our Commanders could score VPs by:
- Soviets:
- 1 VP per kill
- 2 VP per friendly unit within 12″ of the Axis table edge
- Axis:
- 1 VP per kill
- 3 VP per Soviet unit on the Soviet half of the table
The Pre-Game
The Axis Strategy
The Soviets have made it to the city proper. No more Tank Wars games out in open fields, we now turn to urban combat. This first city mission makes special note that the buildings should still be intact, no ruins just yet – those will future heavily in the future. I assembled my defenders as best I could. The Budapest Pocket Defenders Theater Selector is unique and has a ton of options to pull from but I was limited to just two different infantry units – the University Assault Battalion Section and the 8th SS Cav. Two units I don’t think I’d ever willingly take into battle, but the mission must be followed! The Fanatic rule should help my defenders hold although I am paying a significant premium for it (+3pts per model!).
I needed to have some potent AT options. I knew Joe would be rolling up with multiple armored transports so the Heavy Autocannon was a must. The StuH 42 would serve as both HE (look at all those buildings) and AT. Additional AT would be the two Panzerfausts in each of the 8th SS Cav units. Hopefully, that would be enough to hold the line. – Andrew
The Soviet Strategy
Finally! Some city fighting! Taking the Forward Detachment Reconnaissance Party again, I opted for two M3 White Scout Cars, two Universal Carriers, and an M17 MGMC. The plan was to blitz the four Transports forward toward Andrew’s defended positions and take them out before the Axis reinforcements arrived. I would split 50/50 on the two roads – left and right – and bring the M17 in where needed or to exploit a breakthrough. Now I made a calculated risk in my list to not take a Tank, thinking it would take up too many points, especially since I had to pay almost 300pts just for Mounted Recon Squad transportation, and I felt I was already lacking infantry. The M17 MGMC proved effective before and I decided to take it again as it would be great at killing any of that Veteran Infantry that Andrew loves taking. – Joe
The Game
Deployment
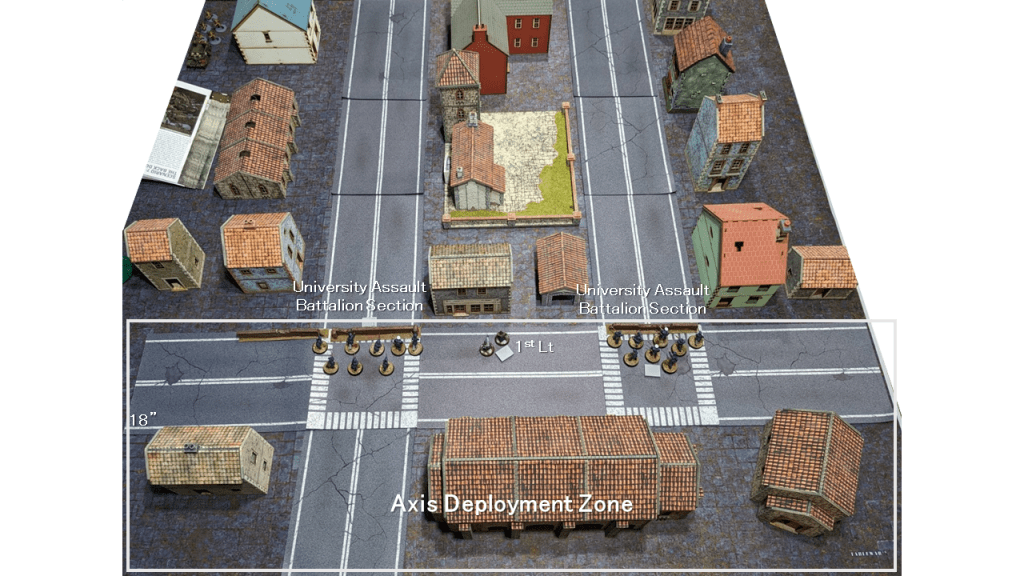
- The mission called for the Axis to deploy just the Lt and two compulsory squads within the Axis Deployment Zone. The rest of the defenders were held back in Reserve but would not be able to arrive until Turn 3.
- Andrew’s platoon also granted d3 6″ linear obstacles (hard cover) set up anywhere in the Axis Deployment Zone. Those walls were set up on the roads, at the front of the Deployment Zone.
- Axis deployment from left to right – all three units both Hidden and in Ambush:
- Hungarian University Assault Battalion Section
- German 1st Lt with a buddy
- Hungarian University Assault Battalion Section
- No Soviet units started on the table, all would arrive via First Wave or Reserve.
Turn 1

- Joe wasted no time to press the attack! He threw an M3 White Scout Car forward with both a five-man Mounted Reconnaissance Squad and a Soviet Lt aboard. That road movement bonus is significant!
- In an attempt to wrap around the defensive line, Joe jumped his Lt out of the M3 but met a volley of rifle fire from the University Assault Battalion who popped their Ambush. The Soviet Officer was cut down – first blood to the Axis.
- In direct response, the Mounted Recon Squad advanced to within Point Blank range and cut down half of the Assault Battalion. However, being Fanatic, no Morale test was needed.
- A second Mounted Recon squad followed up with an advanced out of their Bren Carrier transport and also fired at the Assault Battalion. Left with one man standing, he pasted his Morale Check and kept his revere.
- The Soviet attack was in full swing down the left approach, but it remained quiet on the right.
| Soviet VPs | Axis VPs |
|---|---|
| 0 | 1 |
Turn 2

- The action started to really heat up in Turn 2
- Joe started the turn with an assault on the lone University Assault Battalion soldier with a Mounted Recon Squad. The Hungarian was able to cut down one of his attackers.
- Both the Bren Carrier and M3 Scout Car advanced to the barriers looking to provide the additional weight of fire onto any Axis reserves entering the next turn. The M3 fired and killed the German Lts buddy.
- On the right, two more Soviet transports made a quick entrance. An M3 White Scout Car advanced directly down the road and the Mounted Recon Squad aboard hopped on and fired at the University Assault Battalion Section behind the barrier. They only managed to kill two of the Hungarians and, being Green, they actually upgraded to Regs!
- In the return fire. the six (now Regular) Hungarians killed four of the five Recon troopers leaving just the NCO alive who failed his Morale and fled the table.
- The Soviet M17 MGMC with quad HMGs, AKA, The Meatchopper, failed to arrive from Reserve.
| Soviet VPs | Axis VPs |
|---|---|
| 1 | 2 |
Turn 3

- The German Reserves begin to arrive!
- At the start of the Turn, Joe quickly poured Point Blank fire into the lone German Lt from the M3 Scout Car and gunned him down.
- A squad of 8th SS Cavalry entered from Reserve and took up position in the building on the left flank. The squad lost one man on the way in due to Ambush fire from a Soviet Bren Carrier.
- The M17 MGMC advanced straight down the right road and fired at the Assault Battalion Section. 12 HMG shots, only 1 hit, and no kills.
- On the right flank, a Mounted Recon Squad advanced out of their Bren Carrier and fired at the remaining Assault Battalion Section members, and killed one.
- German StuH 42 arrived and missed its Med. Howitzer shot onto the M3 (it needed a 3+ to hit…).
- German Heavy Autocannon and the second squad of 8th SS Cav both failed to arrive from Reserve.
- The game was now tied at 2 VP each.
| Soviet VPs | Axis VPs |
|---|---|
| 2 | 2 |
Turn 4

- M17 MGMC advances again but only managed to put a single Pin onto the Assault Battalion Section.
- Looking to finish the job, the Mount Assault Battalion assaulted the defended position and destroyed the Hungarian unit.
- StuH 42 fires again at the M3, hit, and set it On Fire. The Soviet Transport passed its Morale.
- Germany Heavy Autocannon arrived on the back right flank.
- 8th SS Cav on the left, with 1 Pin on them, rolled a FUBAR for their Order Check and fled directly backward!
| Soviet VPs | Axis VPs |
|---|---|
| 3 | 2 |
Turn 5
- The Mounted Recon Squad in the middle of the table ran into the large building in the heart of the Axis Deployment Zone and the M3 Scout Car followed up behind.
- The StuH 42 again failed to hit the Scout Car.
- Heavy Autocannon hit but failed to damage the M17.
- With just a single Pin, both the M17 and the 8th SS Cav squad failed to activate.
- Both a Bren Carrier and Mounted Recon Squad made a dash across the road toward the back of the Axis Deployment Zone.
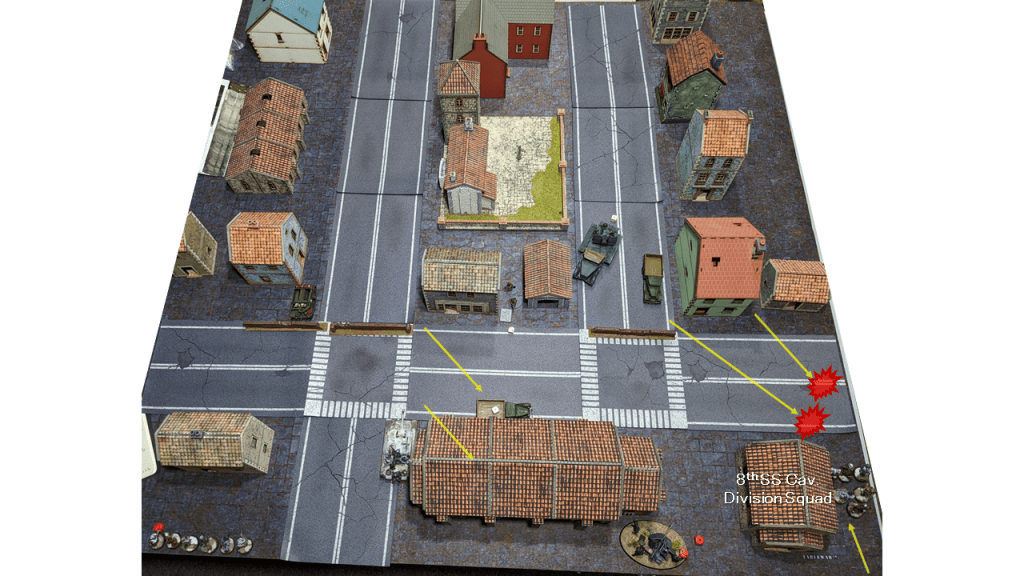
- On the right, the second and final Axis unit arrived from Reserve with ill intent.
- The squad fires its two Panzerfausts into the Bren Carrier (needing 3s) and missed with both.
- Unloaded the rest of their small arms into the Soviet Mounted Recon Squad and wiped them out.
- This triggered a chain reaction that resulted in the Bren Carrier being removed at the end of the turn for being closer to an enemy than a friendly. A big swing for the Axis.
- It was at this point that Andrew realized he should have saved the Panzerfausts and just fired everything into the infantry.
| Soviet VPs | Axis VPs |
|---|---|
| 3 | 4 |
Turn 6

- Turn 6 – possible final turn!
- The Autocannon once again fired at the M17 but, again, failed to cause any damage.
- The Soviet Mounted Recon Squad within the central building fired and destroyed the Heavy Autocannon.
- Critically, the M17 again failed to activate.
- Hilariously, the StuH 42 missed the Scout Car, again!
- In a desperate move to seal the victory, the 8th SS Cav on the left make a mad assault into the building where a Recon Squad was holding their ground. The Germans eliminated the Soviet Infantry and trigged a second chain reaction that destroyed the M3 Scout Car (empty transport closer to the enemy than friendly).
- This assault not only destroyed two Soviet units, it also removed those units from within the Axis Deployment Zone.
- At the end of Turn 6, the game score was:
- Soviet VPs:
- Killed 4 units – 4 VPs
- Axis VPs:
- Killed 6 units – 6 VPs
- Soviet VPs:
| Soviet VPs | Axis VPs |
|---|---|
| 4 | 6 |
Soviets: 4 Kills | Axis: 6 Kills
Final Result – Axis Win
Andrew secured an Axis victory by the slimmest of margins! If Joe had killed one more unit or ended the game with a unit in the Axis Deployment Zone, the result would be a Draw.
The Post-Game
The Axis Conclusion
It came down the wire and the Axis defenders held! The game was filled with both clutch and shocking moments. I had multiple failed Order Tests on a 9 and Joe had a few as well. You really never get over that feeling of your troops not following orders. At the end of Turn 1, I was legit terrified with how quickly Joe was able to assault my defensive line. He wasted absolutely no time putting on the pressure. I started the game with only three units on the table and would have support until the begging of Turn 3 at the earliest. I needed those units to hold the line. In hindsight, Joe might have moved too hard too fast and it left his forces a bit exposed to counter-attack. However, his Soviets needed to get within my Deployment Zone and time was not on their side. I cannot believe that an assault on the big building is what sealed the deal. I saw an opportunity at the top of Turn 6 and I took it. So many tiny moves and decisions led to that final turn and it couldn’t have been closer.
Because the mission called for a 4×4′ table we agreed to give 750pts a go. I really enjoyed the smaller forces on a smaller table. It added to the claustrophobic feel of urban combat. Putting a 1k army onto that table really would have been just too many units. I did feel limited in my unit selection though. The Infantry options I had all came with Fanatic (an insane and scary rule) but were very pricey. Joe had a Transport Tax, and I had a Fanatic Tax.
With this victory, I’ve brought the campaign back to within one point. This campaign has been incredibly close through seven games. Each win has been secured by the bare minimum of points. No major wins or losses. Everything is hanging in the balance. Neither side will go down easily and we haven’t even reached the halfway point (there are 16 missions total). It was a thrill to play the first City Fight game. I must admit, I was getting a little worn out of tank clashes out on the open tundra. The real battle for control of Budapest has begun! The Soviets are at the gates and desperate defense is the only option available.
– Andrew
The Soviet Conclusion
Well, what a mixed bag of a game for the Soviets. Turn 1 was wild. Losing an officer and almost clearing the Axis left flank, I felt in great shape! Turn 2 saw the Soviets finish off the Axis left and then fail miserably on the right. My flamethrower embedded in the Recon Squad missed and as a result, the entire squad was either killed or fled. Then a couple failed Reserve rolls and Axis fire left me dangerously low on infantry. With Andrew missing shots with his StuH, and failing to bring on the Heavy Autocannon, I made a dash for the back building and made it. It was the middle of Turn 6 when I realized I had lost. My lack of infantry (which Andrew wisely made priority targets) wasn’t enough to protect my Transports which were stuck behind walls and move into the 18″ deep Deployment Zone. I tried to gain a few more kills but it was too little too late for the Soviets.
This is definitely an interesting scenario! We used the City Fighting Roads and Open Ground rules and wow are they powerful! Gaining extra Pen if your infantry are in the open or on roads is brutal, and we both learned that the hard way. Add to this the delayed Axis Reserves and how easy it is for the Soviets to fly up the table and get on top of the defenders. This scenario felt similar to the ones previously in the fact that the Soviet player has too much to do in too short a time: advance, fight, get to a certain area of the board to score, and survive. While it’s fun, it’s also frustrating and made even more difficult when every time the defender is in a hidden setup. All that aside, the main problem I have with this mission is the list selector. At first glance, the Forward Detachment Reconnaissance Party seems interesting and fun to play, but as I alluded to, with transports taking up almost half of your force, it really limits your list-building options. That being said, I still had fun and it was a good game, especially when playing against Andrew and losing by the closest amount of VPs. Overall I’m not sure I would play this again, maybe if it was on a 6×4 and at 1,000 points, but at 750 on a 4×4 with this selector, probably not. – Joe
| Soviet Campaign Game Score | Axis Campaign Game Score |
|---|---|
| 4 | 3 |
| 3-2-2 | 2-3-2 |
| Soviet Campaign Kills | Axis Campaign Kills |
|---|---|
| 30 | 35 |
Game 6 – Counter-Attack at Pestszentimre | Game 8 – Street Fighting in Pest
