

Over 16 missions, Joe & Andrew will battle through the full campaign – each trying to secure victory in a desperate fight for control of Fortress Budapest.
Joe’s Soviets broke the stalemate and dealt Andrew’s Axis the first major loss of the Campaign. Tonight was a chance for the Axis Commander to strike back! Operation Konrad I took our players outside of the city and back into the rural Hungarian hinterland. The table was almost enterally covered in trees with several unobstructed dirt roads running from the Axis side to the Soviet sides. After several brutal urban battles, a Tank War game out in the country promised to be a nice change of pace.
Andrew had to draw his forces from the IV SS Panzer Corps (Fortress Budapest) Theater Selector and Joe took two Platoons of the Operation Bagration (Armies of the Soviet Unit) Theater Selector. Andrew had 1,500pts of German steel ready to punch through the 2,000pts of Soviet defenders. Joe wisely brought as many Panzerfausts as he could muster, and doubled up on AT with multiple Zis-3 and M-42 AT Guns as well as a pair of ISU-122s! Andrew hoped the combined might of three Panzer IVs, a Panther, StuG III and two Light Autocannon half-tracks would be enough to weather the impending AT barrage.
The table was set for more action at the home of Campaign: Fortress Budapest – Michigan Toy Solider – Game 10 already had the makings of a brutal battle.
Joe had to deploy half of his force (10 units) onto the table with his other 11 units held back in Reserve. No Outflanking allowed. Andrew would roll in all seven of his units during First Wave. Seeing all those Soviet units deployed and being outnumbered 3:1 did not fill Andrew with much hope. However, the mission special rule, Complete Tactical Surprise, would give the Axis a fighting chance on the opening Turns. This rule meant that Joe started the game with the same number of Order Dice as Andrew (seven) and then added one additional Order Die each turn (Joe would have 13 Order Dice on Turn 7). Because of this shortage, Joe would be unable to activate all of his units each turn. But would this advantage be enough for the Axis to secure victory?
Our Commanders could score VPs by:
- Soviets:
- 2 VP per Axis unit destroyed
- 2 VP per Axis unit on the Axis half of the table at the end of the game.
- Axis:
- 1 VP per Soviet unit destroyed
- 2 VP per unit within the Soviet Deployment Zone at the end of the game
- 4 VP per unit that escapes off the Soviet table edge
The Pre-Game
The Axis Strategy
At first, I wasn’t thrilled to see another Attacker/Defender mission. But then I read that I would be the Attacker and I was immediately more interested. And then I read the mission special rules and now we are talking! I once again impressed with the unique mission design to add another interesting twist to the numerous Attacker/Defender missions in this campaign.
Down by just one point in the overall campaign, I needed a win to bring the Axis back into contention. Joe has continued to be unrelenting in the attack, but now the tables had turned and he would be forced to hold the line against an all-out Panzer assault. I built my force with a mix of both speed and armor. The 250/9 and 7/2 would be my fast flanking element supporting a core of three Panzer IV (always dependable) with both a StuG III and a hulking Panter to bring serious firepower to bear.
Without question, the table lent an advantage to my attacking force. Not only the long roads running the entire width of the table but all the woodland provided some line of sight blocking terrain to cover my advance. I was certain that Joe would outnumber me at least 2:1 on Order Dice and would need a bit of luck to weather the Soviet AT fire and get into scoring position. – Andrew
The Soviet Strategy
With a win in Game 9, the Glorious Red Army was back in the lead over the dreaded fascists, I was feeling good until I read the mission. I would be facing off against a Panzer force and the number of Order Dice I had in the bag was extremely limited! It wouldn’t matter that I had a 25% points advantage as Andrews’ lower number of dice would essentially nullify my edge. This was to be a tricky mission. I tried to build an army with lots of Veteran units, Panzerfausts, Veteran Artillery/AT Guns and of course, the best bang for my buck when it came to the armor I would field. After building my first Platoon it became evident that I wouldn’t be able to make a good list at 2,000 points in a single Platoon. So I went with the two Platoon approach. Two ISU-122s, four Artillery pieces, large amounts of Panzerfausts and to top it off, 5 ATRs in an attempt to just put Pins on the armored fascist attackers.
With my big assault guns in Reserve, I would have to just try and survive the Panzer’s initial onslaught. I set all four AT Guns along my deployment zone, fairly even across as I was first to deploy so I was at a tactical disadvantage. I had all my AT teams out and in good cover to try and blunt the Germans, and an infantry squad with Panzerfausts on each flank. Being spread out meant I wasn’t in a strong position at first, but it would allow me to flex towards any direction that the Panzers might come from. I needed to just make it to turn two where my heavily armed and armored assault guns could come in and halt the fascist pigs.
I knew this would be an uphill battle for me. Despite what seemed like a large amount of AT in the Soviet Force, I would have an extremely limited number of dice to pull from and it was spread out. Also, Andrew is a very skilled player and I knew he would have some nasty tricks up his sleeve. He has continuously proven against me time and time again that he is never out of a game, and this game would be no different. With the fate of the 2nd Ukrainian Front tottering on the edge, this game would be crucial for the Glorious Red Army! – Joe
The Game
Deployment
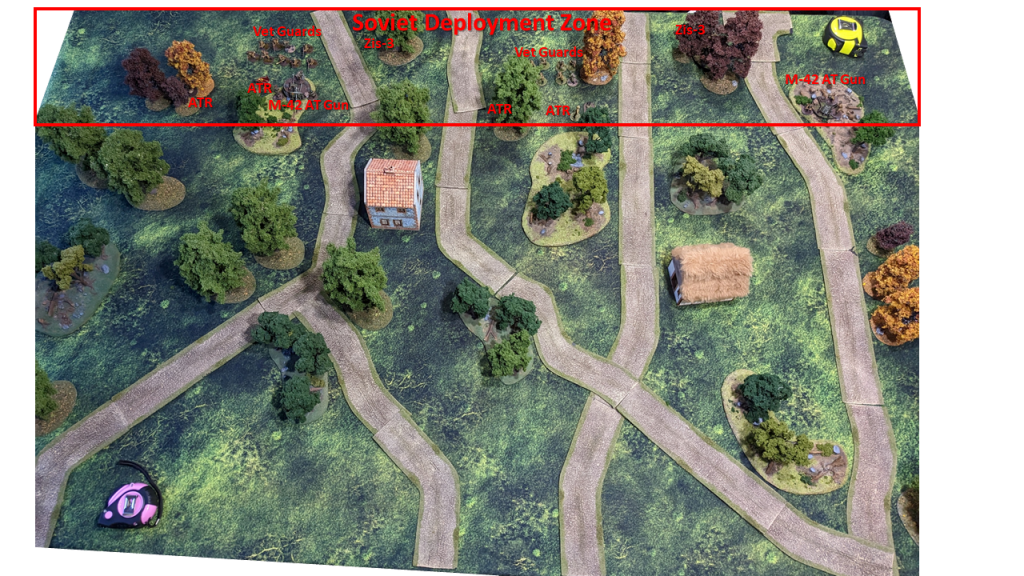
- Half the Soviet defenders stared on the table (10 units) with the other half held back in Reserve.
- Soviet deployment from left to right:
- AT Rifle
- AT Rifle
- Vet Guards
- M-42 AT Gun
- Zis-3
- AT Rifle
- Vet Guards
- AT Rifle
- Zis-3
- M-42 AT Gun
- No Axis units started on the table, all would arrive via First Wave.
Turn 1
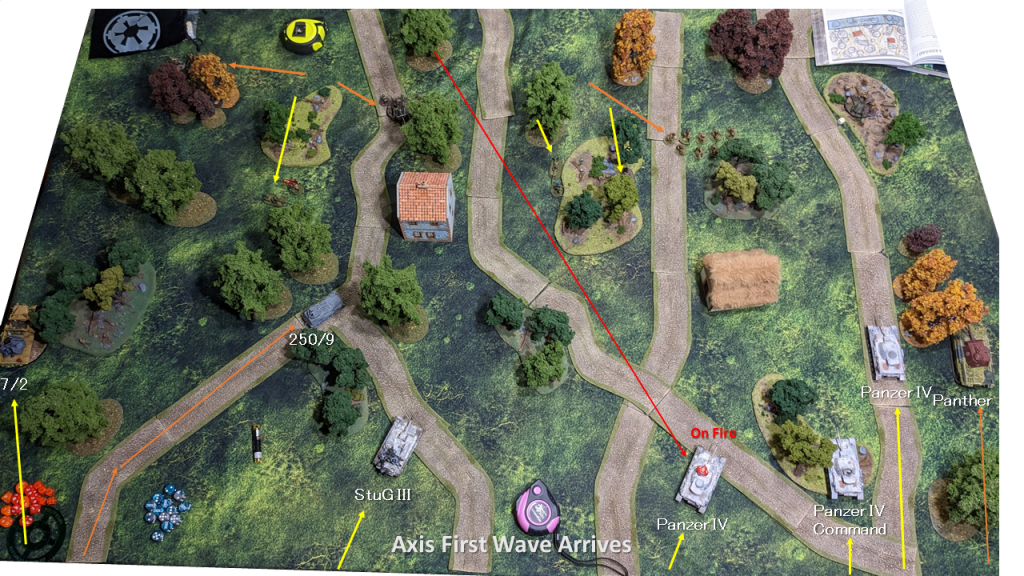
- Andrew rolls out the Axis steel, all 1500pts of IV SS Tank Platoon arrived on the table:
- Panzer IV – Command Vehicle
- Panzer IV
- Panzer IV
- Panther
- StuG III
- Sd.Kfz 250/9
- Sd.Kfz 7/2
- The tanks made use of the roads where they could in a wide frontal assault against the Soviets.
- Two of the Panzer IVs put shots onto the Soviet AT Guns but Vet + Gun Shield resulting in only a single crew killed on each gun.
- No unit kills on Turn 1 but the Zis-3 hiding in the woods made contact against on the Panzer IV and set it on fire. The tank crew held their nerve with the help of the Radio Network.
| Soviet VPs | Axis VPs |
|---|---|
| 0 | 0 |
Turn 2
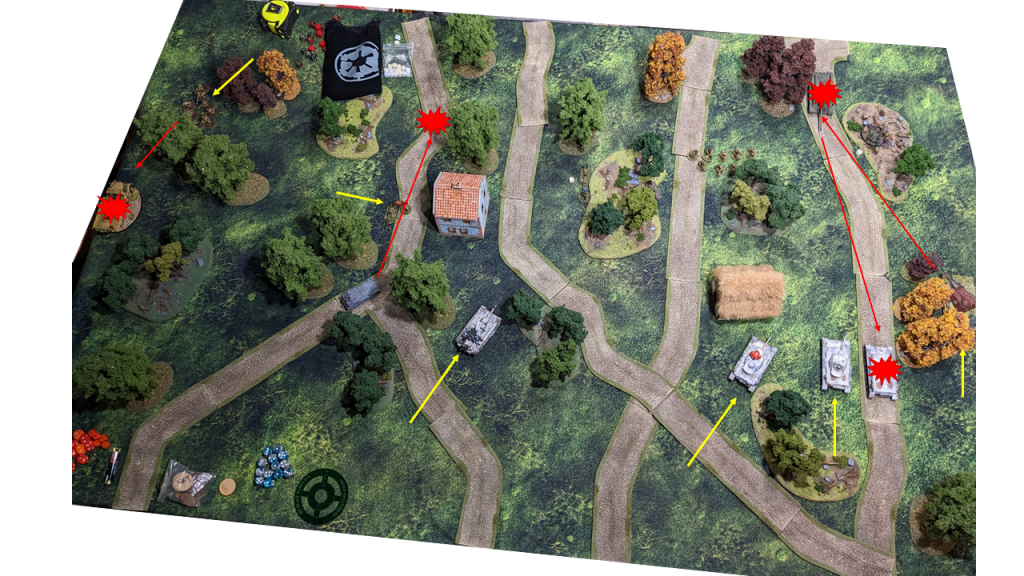
- The game truly began on Turn 2 with two Soviet and two Axis unit kills.
- The 250/9 blasted away with two Light Autocannon shots and killed the M-42 AT Gun as it moved to reposition.
- Joe brought in the first of his Reserves, a mighty ISU-122 Tank Destroyer. Unfortunately, it failed to cause any damage and only put a single Pin onto the Command Panzer IV before it was blown to pieces by the Panther.
- The 7/1 making a desperate flanking move, all alone on the right, failed to cause any significant damage on the Guards who immediately put two Panzerfausts into the soft-skin and knocked it out.
- After only a couple models removed in Turn 1, Turn 2 saw the total destruction of four units. The Axis continued to press forward into the grinder of the Soviet defenders.
| Soviet VPs | Axis VPs |
|---|---|
| 4 | 2 |
Turn 3
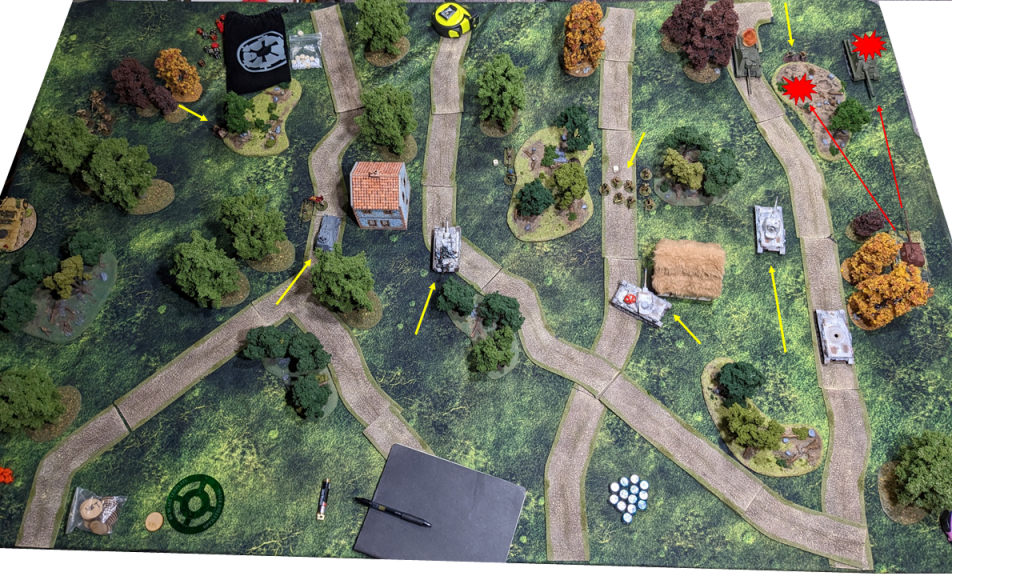
- First die of Turn, a second ISU-122 arrives from Reserve but misses the Panther!
- The Panther answers back and not only destroys the ISU with it’s main gun but also destroys the M-24 AT Gun! A massive swing for the Axis and the Panther continues to put the team on its back.
- On the left road the 250/9 advances and blasts away with point-blank MMG fire at a Soviet ATR and causing not a single wound.
- The StuG III follows suite with an Advance and six MMG shots into a Soviet ATR, also resulting in no damage…
- The Soviet Guards in the middle of the table advance up and fire their two Panzerfuasts at the Panzer IV behind the house. Both miss. A devastating turn of events for the Red Army.
| Soviet VPs | Axis VPs |
|---|---|
| 4 | 4 |
Turn 4

- The Zis-3 lurking in the back woods opens up and knocks out the StuG III who had been making slow but steady progress up the middle road.
- Panzer IV advnaces up firing away at ATRs and infantry.
- The 250/9 makes a break for it and advances down the road towards the Soviet table edge looking to escape next turn. However, it takes three Pins from three different ATRs!
- The Panther advances into the woods and fires no fewer than 18 MMG shots into a two-man Soviet AT Team. The machinegun fire kills one of troopers and the other flees the battle.
- Joe brings up the free Rifle Squad to serve the glorious role of roadblock in order to stop the Panther from existing the table.
| Soviet VPs | Axis VPs |
|---|---|
| 6 | 5 |
Turn 5

- Turn 5 begins with 11 Soviet Order Dice to only 4 Axis. The Soviet weight of numbers was starting to show.
- After taking numerous ATR hits last turn the 250/9, desperate to escape, fails its Order Test and is forced to move backwards!
- The Panther (who is single-handedly keeping the Andrew in this game) advances as forward as possible, unleashing a full barrage into the Free Rifle Squad. Somehow only 2 infantry are killed the remaining 10 are flipped to Reg after a passed Green check!
- The Panzer IV on the middle road, also looking to escape off the table, fails it’s Order Check and also backs away! After four turns of incredible Morale the Axis advance stalls out.
- No unit kills for either side.
| Soviet VPs | Axis VPs |
|---|---|
| 6 | 5 |
Turn 6
- Turn 6, possible final turn. Andrew needs to get a unit off the table to stay in the game.
- The Panzer IV on the middle road passed its Order Test and puts the pedal to the medal for a full 36″ Run up the road and off the Soviet table edge.
- The Guard Squad in the way passed their Tank Assault check and moved out the way of the speeding Panzer.
- The Zis-3, secures the title of Soviet MVP by knocking out the Command Panzer IV. Options were running out for the Axis.
- The 250/9 backs up again after a second failed Order Test and is Pinned by another ATR (five Pins total).
- The Panther, held in place by a swarm of Soviet Infantry fires and kills six of the squad acting as a road block. In a show of true Soviet courage the squad holds and passes their Morale Test.
| Soviet VPs | Axis VPs |
|---|---|
| 10 | 9 |
Turn 7

- It all came down to Turn 7.
- Andrew only has the Panther on the table. Joe stands with 13 Order Dice in the bag.
- Joe swarms the Panther with infantry making multiple attemps at a Tank Assault but they are unable to pass the Tank Fear tests. There is no chance for the Panther to move.
- The one and only activation for Andrew is to fire at the now very depleted Free Rifle Squad. When the gun smoke clears, the squad was finally eliminated.
- The game ends with one Axis unit in the Soviet Deployment Zone scoring an additional two VPs and putting the Axis over the edge for victory by the slimmest of margins.
| Soviet VPs | Axis VPs |
|---|---|
| 10 | 12 |
Soviets: 5 unit kills (2 VP each)
Axis: 6 unit kills (1 VP each), 1 unit in Soviet Deployment Zone (2 VP), 1 unit escaped off the Soviet table edge (4 VP)
Final Result – Axis Win
And it’s another victory by the slimmest of margins! After 10 games the Campaign is once again tied on points but the Axis maintain their lead on overall kill points.
The Post-Game
The Axis Conclusion
The Panther! My word! Not only did it survive the game and score VPs for ending in Joe’s Deployment Zone it also scored five unit kills! In the whole game I only killed six Soviet units and the Panther claimed five of those kills. Talk about a team captain. Turns out, reading the mission closely has a significant upside. I knew I needed to move and move fast using the roads to my advantage. I could not afford to get into any protracted battles at range with Joe’s defenders. The only question would be if my limited number of units could survive enough of the incoming fire to make into the scoring zone.
Although this was another Attacker/Defender mission it added a super interesting twist. The Complete Tactical Surprise mission rule turned what would have been a bog standard attack into a very engaging game. I did not envy Joe’s position as he was forced to make some very difficult command decisions. – Andrew
The Soviet Conclusion
Wow. Another interesting scenario and special rules to go along with it! The Complete Tactical Surprise rule is so interesting to play with and yet crippling for the player it affects, it’s just wild. The game started out with some casualties on my gunners and went bonkers from there. I feel like my deployment was pretty sound. I was able to flex AT Guns and ATR Teams over to my left flank where the Germans were pushing with half of their armor. With a few units dedicated to the remaining Axis forces in the middle and right, I threw caution to the wind and doubled down on stopping the armored punch of the Germans. This seemed to be the right move, as was firing with 5 ATR Teams, as the number of pins they put on Andrew’s forces enabled me to stay in the fight way longer than I should have. Along with him finally failing two Order Checks (he hadn’t failed one in something like three games) gave me enough time to get forces into place and stabilize my left flank. A final frenzied turn and it was all over. Once again, a crazy close game between us commanders.
Once again I let Andrew off the hook and allowed him to tie the campaign up (JK he was brilliant in this game)! That’s three times Andrew has tied this campaign up after falling behind. I will be spending a long time reflecting on my failure in the Gulag as both Marshal Malinovsky and Comrade Stalin are furious with me. This was my first time fighting an asymmetric battle between a Tank Platoon and an Infantry Platoon. It went better than expected for the Infantry Platoon I must say. Upon reading the mission I thought I would stand zero chance against the Axis Tank Platoon. This mission really felt stacked against the Soviet player though. The map, with its many roads crossing the table, and lack of hard cover for the defenders really made the defense difficult. Add to it the asymmetric forces and crippling rules for the defender and I’m not too disappointed in how it ended up. It goes to show just how balanced these missions are. Again thank you to my opponent for an amazing game! – Joe
| Soviet Campaign Score | Axis Campaign Score |
|---|---|
| 5 | 5 |
| 4-4-2 | 4-4-2 |
| Soviet Campaign Kills | Axis Campaign Kills |
|---|---|
| 40 | 48 |
Game 9 – Withdrawal Across the Danube | Game 11 – Operation Konrad III
