

Over 16 missions, Joe & Andrew will battle through the full campaign – each trying to secure victory in a desperate fight for control of Fortress Budapest.
With the Campaign tied, Joe and Andrew met once again at the historic Michigan Toy Solider to battle it out. Our two commanders are 1-1-2. Neither General has been able to secure that breakthrough win, will today be the day? Will the Soviet war machine blast a whole through the Axis line? Or will the defenders throw back the invaders? Let’s find out in Game 5 – The Atilla Line!
Advancing under the cover of darkness, Joe took command of the Forward Detachment Reconnaissance Party (p.153). That’s right, this game was played with the Flare! Night Fighting rules. Andrew built his defensive force using a Hungarian Generic Reinforced Platoon. The points were even for this game, 1k per player with a few additional force selection rules tossed in per the mission.
Our Commanders could score VPs by:
- Soviets:
- 1 VP per kill
- 3 VP per friendly unit within 12″ of the Hungarian table edge
- 5 VP for holding the Objective
- Axis:
- 1 VP per kill
- 1 additional VP per Armor 8+ vehicle kill
- 5 VP for holding the Objective
The Pre-Game
The Axis Strategy
A Night Fighting game? Oh wow, it’s been a long time since I’ve played using the Night Fighting rules. Of the four games we have played so far, I have been the Defender in three of them. Hopefully, the Night Fighting brings some variety to the Attacker/Defender mission format – it’s starting to get a bit tiresome.
The battlefield is something we have not seen before – a wall of impassible terrain running across the middle of the table (with a road going through it). This would force Joe’s attacking force to either cut down the middle or go wide on the flanks. I deployed my defenders accordingly. Covering the road was my Panzer IV and AT Rifle Team. On the Right two squads of Parachute Assault infantry (each with x2 Panzerfaust and an LMG), with the Heavy AT Gun backing them up. On the left, a single Parachute Assault Section and the venerable Zrinyi II. I wanted to keep both Tanks within range of the Objective to contest any Soviet units and keep the Infantry far enough forward to fire at any Soviet units moving around the flanks.
I took full advantage of the Hungarian Axis Support Army Special Rule to bring the Panzer IV along. I didn’t know what kind of armor Joe was bringing but I wanted that additional Heavy AT Gun. I have no idea how these Night Fighting rules are going to play out, let’s see if the Axis can hold off the Soviet advance once more! – Andrew
The Soviet Strategy
With yet another seemingly blind advance into hidden German/Hungarian defenses. I initially thought about taking another Tank War list, but at 1,000 points I wasn’t comfortable with what I could build. Taking the Reconnaissance Party gave me flexibility by way of mobility and with a free T-34/85, I felt good about the list and mission. The addition of the Night Fighting rules didn’t hurt either, as I figured it would be harder for Andrew to counter my recce scout cars and deal with lack of vision. My strategy was to pin half of the Axis units on one flank with my M17 MGMC, a Mounted Recon squad and a White Scout Car. Then hit the middle with the T-34/85 and a second squad and M3 to either threaten the middle or flex to either side to reinforce or commit to the breakthrough. Finally, I would stack the right with both armored cars, Jr. Lieutenant, the third Mounted Recon squad, M3 jeep, and the Forward Artillery Oserver. This thrust would punch through the flank and in tried and true Soviet fashion, exploit deep battle on the Hungarians! – Joe
The Game
Deployment
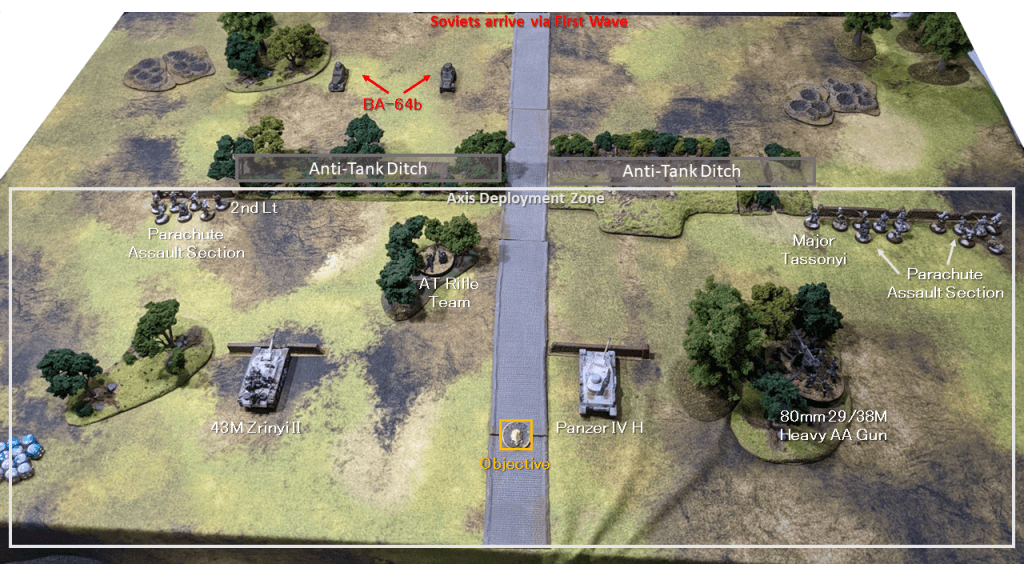
- Note on the terrain – the two groupings of craters are Anti-tank Minefields deployed by the Axis defenders. There is an impassive Anti-Tank Ditch that runs 18″ to the left and right of the road. The ditch provides no cover and does not block line of sight.
- Andrew had to deploy his entire force first.
- Each unit was allowed a 6″ section of wall/trench when it deployed to represent the defensive positions. These provided hard cover.
- The left flank was covered by a Parachute Assault Section, Zrinyi II SPG, ATR, and a 2nd Lt.
- The right flank was covered by two Parachute Assault Sections, a Panzer IV H, a Heavy AT Gun, and Major Tassonyi.
- The Soviets would arrive via First Wave. No units would start on the table, except for the two BA-64b Armored Cars that used the Set the Pace special rule for the Forward Detachment Reconnaissance Party Platoon.
Turn 1
- We will blame the Night Fighting for the lack of a Turn 1 photo. With Night Fighting rules in full effect, any unit wanting to Fire would first have to roll 2d6 to determine how far they could see. If the target was within visual range, continue to fire as normal.
- Joe moved his First Wave onto the table. On the left, a Mounted Reconnaissance Squad in a White Scout Car along with a Jeep mounted Lt and Forward Artillery Observer. Down the middle a T-43/85 and a second Mounted Reconnaissance Squad in a White Scout Car. On the right a third Mounted Reconnaissance Squad in a White Scout Car and a M17 MGMC AA Half-track (“The Meatchopper”) rolled into the deep woods in the far back corner.
- With Night Fighting in full effect, Andrew and Joe attempted to draw line of sight onto targets multiple times but no units were visible. Not a single shot was fired in Turn 1.
- Under the cover of darkness, Joe’s Soviet troops motored forward.
| Soviet VPs | Axis VPs |
|---|---|
| 0 | 0 |
Turn 2
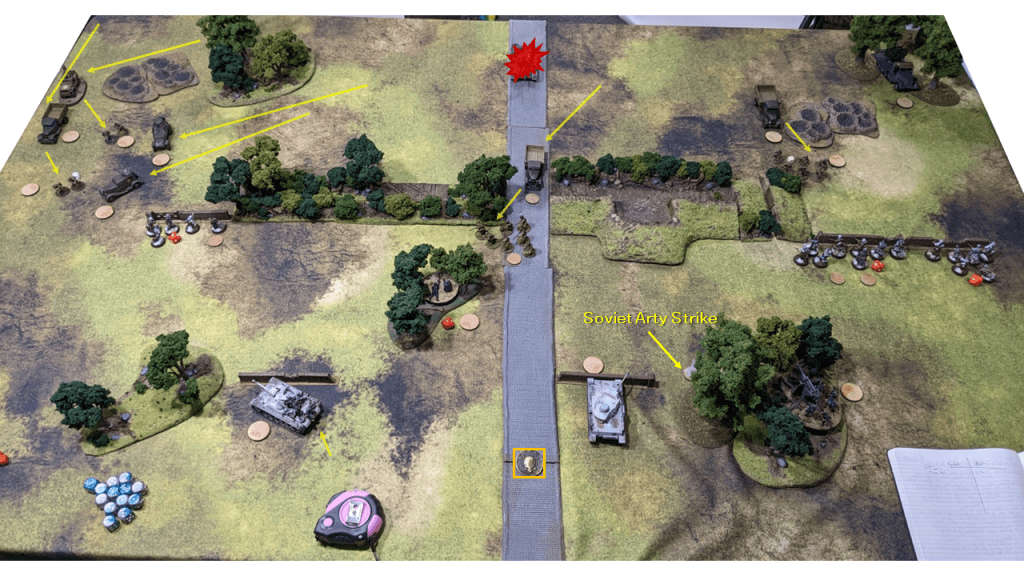
- Flair! No visibility restrictions for Turn 2. These Night Fighting rules are nuts.
- The Hungarian Heavy AT Guns lined up the first shot of the Turn, hit and destroyed the Soviet T34/85. This scored two VPs for Andrew – the first points of the game.
- It was at that moment that Joe realized his only remaining AT was HMGs.
- The Zrinyi II pivoted to cover the open left flank and landed a 3″ template right on top of an 8-man Soviet Mounted Reconnaissance Squad and killed six of the eight men. The two survivors passed their Morale Test to remain on the table.
- The White Scout Cars and BA-64s peppered the Parachute Assault Sections, put Pins across all three squads and scored a few kills.
- In a bold play, the middle Mounted Reconnaissance Squad disembarked and advanced toward the AT Rifle Team sheltered in the woods.
- The open line of sight from the Flair allowed the Soviet Forward Artillery Observer to call in their Arty Strike deep on the Hungarian right, hoping to hit the Panzer IV and the Heavy AT Gun.
| Soviet VPs | Axis VPs |
|---|---|
| 0 | 2 |
Turn 3
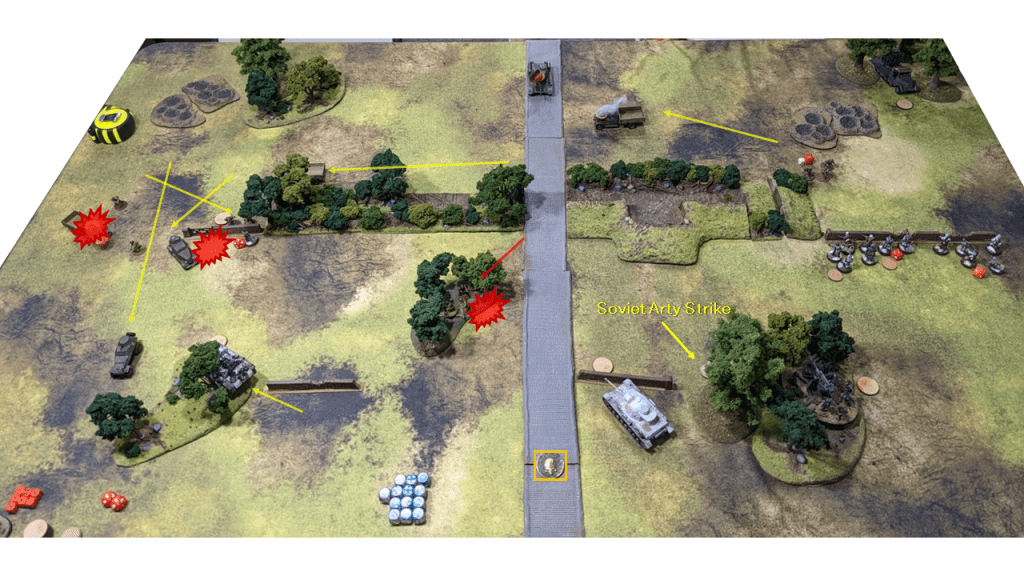
- No flair for Turn 3 but there was plenty of action! Any and all firing would require a roll for sight range.
- Delay on the Soviet Artillery Strike – but hey, at least it wasn’t a Miscalculation!
- The middle Mounted Reconnaissance Squad assaulted the AT Rifle Team in the middle woods, killing the unit. The ATR did bring two of the Soviets down with it.
- The left flank Parachute Assault Section is blasted off the table by some point-blank LMG fire from a BA-64b.
- The Zrinyi II pushed forward into the woods and destroyed a White Scout Car.
- All three Hungarian units holding the right flank (two Parachute Sections and Major Tassonyi) unload into the Mounted Reconnaissance Squad directly in front of them, forced the unit Down and killed half the squad – three men remain.
- The Soviet M17 MGMC AA Half-track opened up on a Parachute Assault Section but only dealt Pins.
- The Heavy AT in the back woods was unable to see any targets.
| Soviet VPs | Axis VPs |
|---|---|
| 2 | 3 |
Turn 4
- Flair! Regretfully, no photo for Turn 4. There was just a single kill – the Heavy AT Gun (now with unlimited line of sight) – destroyed a White Scout Car attempting to cross the road.
- This Heavy AT Gun was now two for two.
- Another Delay for the Soviet Artillery Strike.
| Soviet VPs | Axis VPs |
|---|---|
| 2 | 4 |
Turn 5
- Flair! Unlimited line of sight once again.
- The Soviet Artillery Strike, you guessed it, Delayed for another turn.
- Joe’s bad luck with the Forward Artillery Observer is officially the stuff of legend.
- A major turn for the Axis defenders who scored no fewer than four kills!
- The Panzer IV pivoted and blasted away the Soviet Jeep that had driven deep into the Axis Deployment Zone in the back left corner.
- Hungarian Heavy AT Gun knocks out the M17 MGMC AA Half-track tucked away in the back right woods. This Heavy AT has but the Hungarian defense on its back and is carrying the team – three for three on vehicle kills.
- Zrinyi II fires a massive 3″ template at the lone Soviet Forward Artillery Observer who has spent the last three turns running towards the Axis Deployment zone and turns him into a crater. Just annihilated.
- On the left flank defensive line, the Soviet LT and attendant charge and close assault the Hungarian Lt. Because he was defending an obstacle the combat was simultaneous. The Soviets cut down the Hungarian officer but he brought them both down with him! Tough Fighter ensured their mutual destruction.
- With Turn 6 as the possible final turn, the battle was incredibly close. Andrew’s Hungarians held the Objective, but Joe was pushing more units into the Axis Deployment Zone. Would it be enough?
| Soviet VPs | Axis VPs |
|---|---|
| 3 | 8 |
Turn 6

| Soviet VPs | Axis VPs |
|---|---|
| 4 | 9 |
- Turn 6 – the possible final Turn.
- No flair but at long last, the Soviet Artillery Strikes arrived!
- The off-board artillery rained down on the Hungarians. Three units look Pins – Panzer IV and two Parachute Assault Sections. The Heavy AT Gun took a direct hit and was blown into pieces. The Heavy AT reign of terror was finally at an end.
- The arrival of the Soviet Arty reminded Andrew that Major Tassonyi had the ability to call in an Artillery Strike himself! The only caveat is that the strike had to be targeted with 12″ of his position.
Turn 7
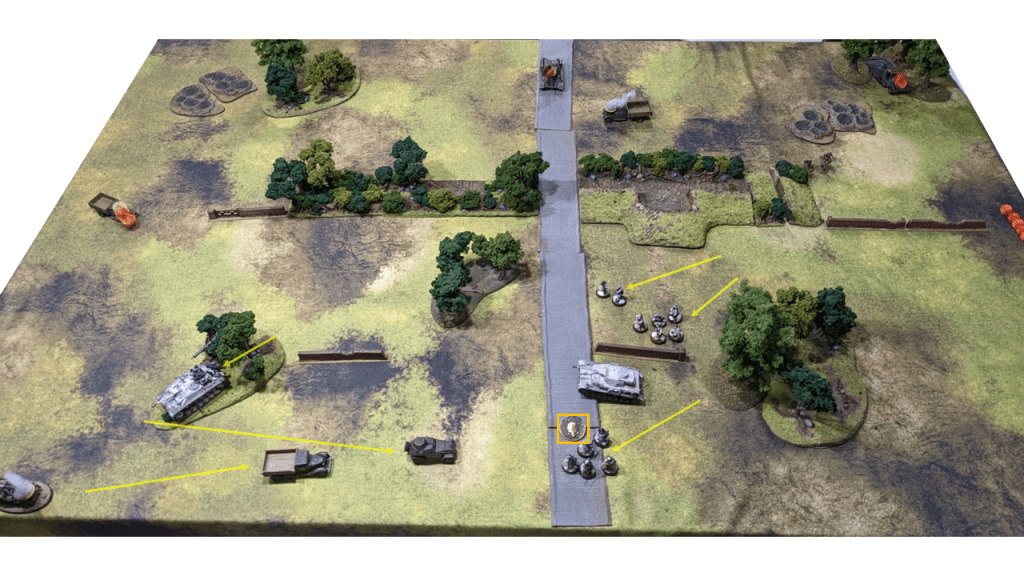
- Each Commander only had a handful of models left. Andrew and Joe scramble to try and secure the Objective.
- Andrew’s Panzer IV had just a single Pin from the Soviet Artillery Strike failed it’s Order Test! This stopped Andrew from taking a critical Heavy AT shot at Joe’s vehicles in the Defender Deployment Zone each worth a whopping 3 VPs.
- With the Panzer IV out of the game, Joe zipped his units as far forward as possible in an attempt to contest the Objective. Sadly for the Soviets, they didn’t have the moment to make it within 3″.
- The Zrinyi II pivoted but missed the BA-64b sitting in the Axis Deployment Zone. The Hungarian guns, at long last, had gone cold.
- At the end of Turn 7, the game score was:
- Soviet VPs:
- Killed 4 units – 4 VPs
- Ended the game with 4 units in the German Deployment Zone – 12 VPs
- Axis VPs:
- Killed 8 units – 8 VPs
- Killed 1 Armor 8+ unit – 1 VP
- Controlled the Objective – 5 VP
- Soviet VPs:
| Soviet VPs | Axis VPs |
|---|---|
| 16 | 14 |
Soviets: 4 Kills + 4 units within Axis Deployment Zone | Axis: 8 Kills + 1 Armor 8+ Kill + Control of the Objective
Final Result – Soviet Win
A Soviet win by the slimiest of margins! If Andrew had killed just one more unit, it would have been a Draw.
The Post-Game
The Axis Conclusion
I feel like I’m saying this after every game but that was unreal! Down the wire once again! Joe managed to sneak a win by just a single point! There are so many little things that could have flipped the win my way. Joe’s Artillery Strike killing my Heavy AT Gun, my Artillery Strike never arriving, my Panzerfausts both missing the BA-64b, my Panzer IV failing to activate on Turn 7, just so many little moments that lead to this narrow defeat.
The Night Fighting rules, especially the Flair! possibility made for a fun twist on the series of Attacker/Defender missions we’ve been playing. I won’t lie, the idea of going into another game set in the Hungarian Steppe dose not fill me with a ton of excitement at this point. But we are just one game away from our first (of many) city fights and the Campaign is going to take a dramatic turn. Joe may have the upper hand for now, but it’s not going to last! – Andrew
The Soviet Conclusion
Wow, Night Fighting rules are wild! This was such a fun mission! The only bad thing to say about it was the lack of cover on the Soviet side, specifically in the middle of the board. Andrew, as always, proved to be a very competent commander and tactician. His AT Guns always run hot and this mission was no exception! They rolled hit after hit after hit and decimated my center and left flanks. The recce add-on to the M3’s was vital in giving me the opportunity to win, even after the bloody Turn 5 for the Soviets.
This was a bloody game for me. Andrew took out eight units, over 60% of my army. This bloodbath was my largest loss of dice in my Bolt Action career, though overall I was happy with my performance. I didn’t make any boneheaded deployment or activation mistakes. As it goes with free units, mine did absolutely nothing except explode, and with it virtually all of my AT, which was horrible as Andrew brought two tanks! We are five missions in, I took a Forward Artillery Observer in three of them, only to miscalculate in two of the three games, then almost not coming on for the third game really makes me question taking them. The Soviet Army Speical Rule that gives you a reroll on the blast radius is okay, but for 100 points? Not sold on it being worth it. But regardless, with a bloody, and narrow victory for the Soviets, the march towards Budapest continues! I definitely recommend this mission for anyone to play. This was very fun and enjoyable for both sides and I am looking forward to what lies ahead in this fantastic Campaign: Fortress Budapest! – Joe
| Soviet Campaign Game Score | Axis Campaign Game Score |
|---|---|
| 3 | 2 |
| 2-1-2 | 1-2-2 |
| Soviet Campaign Kills | Axis Campaign Kills |
|---|---|
| 22 | 25 |
Game 4 – Flak Regiment 133 | Game 6 – Counter-Attack at Pestszentimre
