

Over 16 missions, Joe & Andrew will battle through the full campaign – each trying to secure victory in a desperate fight for control of Fortress Budapest.
The Campaign is tied. Our two commanders are 1-1-1. The Soviets continue their relentless armored assault on Budapest. Can the Axis hold the line once more? Or will the Soviet steel achieve the massive breakthrough they have been hoping for? Let’s find out in Game 4 – Flak Regiment 133!
Similar to two of our previous games. Joe was once again in command of the Guards Mechanized Brigade (p.152) and Andrew was holding a town. The German force was made from Heavy Anti-Aircraft Battery Reinforced Platoon (p.139) and contained three 88mm Flak Guns. Joe’s force had a slight edge in points – 1250pts v 1000pts – but Andrew would be Hidden, in cover at the start of the game. Joe would have to make a mad dash across the open ground if he wanted any chance at victory. A single Objective was placed in the middle of the road leading into the city, and the Germans would defend it at all costs.
Our Commanders could score VPs by:
- Soviets:
- 1 VP per kill
- 3 VP per friendly unit in the German Deployment Zone
- 5 VP for holding the Objective
- Germans:
- 1 VP per kill
- 3 VP per Armor 8+ vehicle kill
- 5 VP for holding the Objective
The Pre-Game
The Axis Strategy
Here we go again. Another desperate defense against a numerically superior Soviet attacking force. There was one big exception though – this time I had three 88mm Flak Guns. I didn’t know the exact force that Joe would arrive with, but I knew it was a Tank Platoon. Per the mission, I was allowed to deploy my units Hidden, in the cover of town, and with three Super-heavy AT Guns at the ready, I was feeling much more confident than in my previous defensive missions. Backing up the three 88s was a pair of Light Autocannons, two squads of Vet. Grenadiers (each with two Panzerfausts) and a free Reg. Air Observer – 1,000pts, 9 Order Dice. Not bad for a defensive force. My objectives were shockingly simple; destroy the enemy.
We setup the table to match the mission layout as closely as possible. Only three small woods (the creators are woods) for the Soviets to hide behind – the rest was open ground. If I could get just a few clean shots at Joe’s tanks with my 88s, I’d be in a great position for later in the game. I had to stop the Soviets before they made it to the town itself. If those Tank Rider Squads made it into the ruins and within my deployment zone, I’d be in serious trouble. – Andrew
The Soviet Strategy
With another mission basically starting blind to what is in front of me, I needed to change things up a bit. Knowing that the enemy would be dug into the town, I would bring 75mm Shermans to hopefully shred the defenders in buildings with HE. Along with the tanks, two Light Howitzers, a Heavy Auto Cannon, Artillery Observer, Katyusha and three units of Tank Riders would hopefully give me enough firepower to knock the Germans out of the fight. The plan was a tried and true, simple but effective. Use artillery to lay down covering fire while the tanks and Tank Riders advanced towards the Objective. But as we all know, things in Bolt Action don’t always go according to plan. – Joe
The Game
Deployment

- Note on the terrain – the two groupings of craters were played as woods.
- Joe had to deploy his force first. The Soviets are unaware of the German city defenders. He had the option to hold up to half his force in Reserve but chose to deploy all the Soviet units.
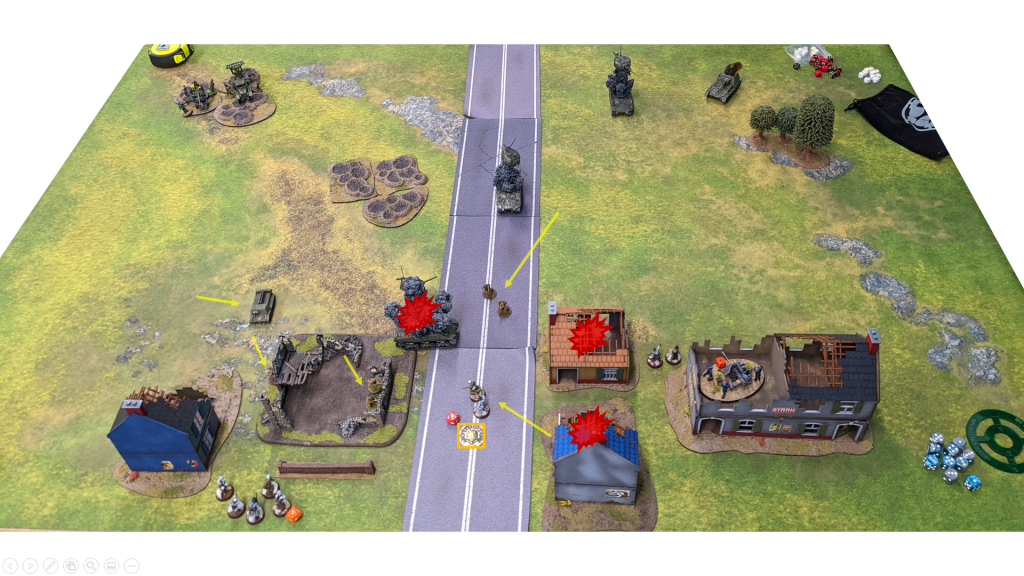
- Joe lined up his three Sherman 75mm tanks across the middle of the table. Each with a six-man SMG Tank Rider Squad aboard.
- Andrew had to deploy within the city itself. Each unit had the option to deploy Hidden and in Ambush – none of the units started in Ambush, but all started Hidden.
Turn 1

- First Order Die of the game, the right-flank 88 knocks out the right-most Sherman 75mm and forces the Tank Riders to bail and go Down.
- The second 88 hits and destroys the Sherman advancing down the road.
- The German defense was off to a blazing start!
- The Soviet attackers managed to put a few Pins on the 88 in the ruins and on the Light Autocannon on the right flank in the building.
- All three Tank Rider Squads disembarked (either by choice or from having their transport knocked out).
- Soviet Artillery Strike called in on the middle of the German defenders.
- German Air Strikes called in on the remaining Sherman 75mm.
| Soviet VPs | Axis VPs |
|---|---|
| 0 | 8 |
Turn 2

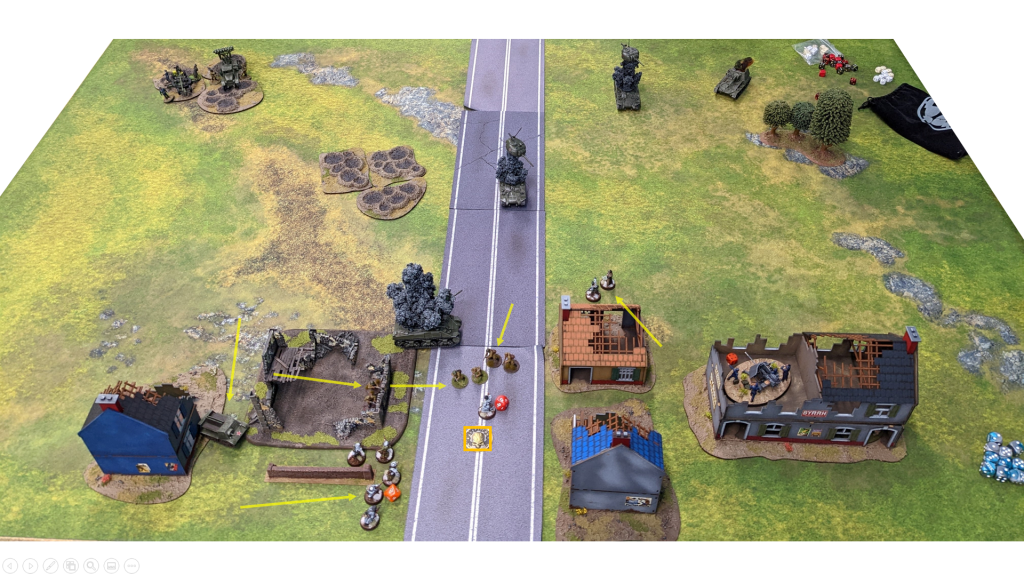
- The Soviet Artillery Strike miscalculated and scattered 17″ back towards the Tank Riders next to the road – killing one, causing two Pins, and forcing the unit Down.
- This is the third time in a row that Soviet Artillery has miscalculated. Joe may need to reconsider this unit choice.
- No German Air Strike arrival – the skies are clear.
- SU-76 fired indirectly on the 88 in the forward house next to the road. Hit on a 6, killing several of the gun crew.
- In response, the defenders directed a massive amount of fire back at the Su-76. It took two 88 hits right to the face. Both shells bounced off the armor (each roll needed a 2+ to Pen) in addition to another hit from the Light Autocannon. All that fire only resulted in three Pins total.
- The Katyusha hit the Grenadiers on the bottom floor of the building next to the Objective, killing two.
- The Soviet Heavy Autocannon hit and destroyed a German Light Autocannon on the left flank.
| Soviet VPs | Axis VPs |
|---|---|
| 1 | 8 |
Turn 3

- Second turn in a row with no German Air Strike arrival – the skies are clear.
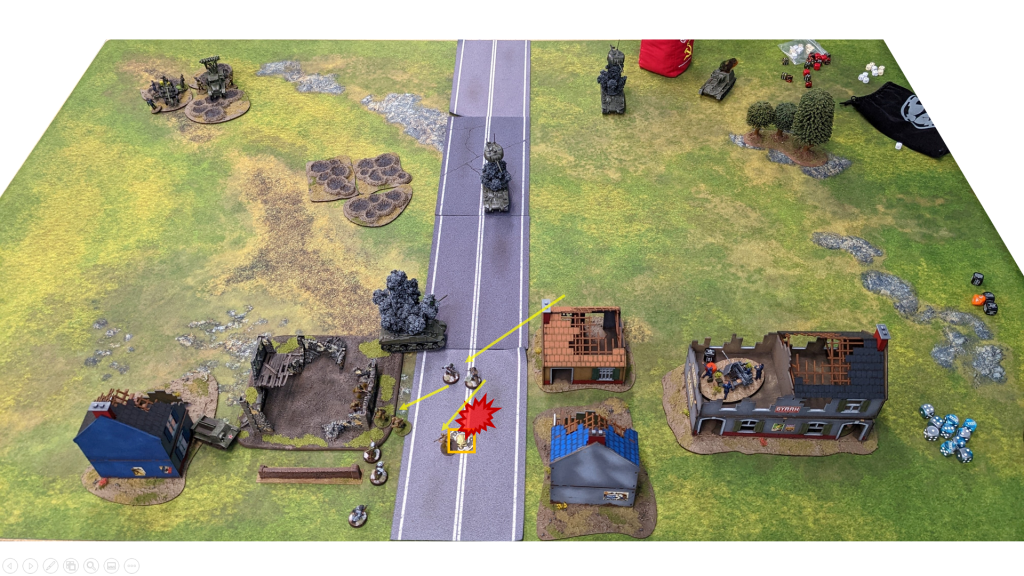
- The forward 88 once again hit the SU-76. This time the shot ignited the SPG on fire and it failed it’s -4 Morale Test.
- A three-man, three SMG, Tank Rider Squad advanced into the ruins next to the road, blasting away at the emplaced 88 scoring five hits against the lone remaining artilleryman. By the grace of the Gun Shield, he survived!
- But it was short-lived. The Soviet Heavy AC hit and destroyed the 88, killing the final crewmember before he could attempt a point-blank shot against the Tank Riders.
- The Soviet advance on the right flank was completely stalled. But on the left flank, two depleted Tank Rider Squads, the lone Sherman 75mm and the Komsomolets Artillery Tracker were all making a push towards the defenders.
| Soviet VPs | Axis VPs |
|---|---|
| 2 | 12 |
Turn 4

- The German Air Strike finally arrived! Andrew fully expected the attack plane to destroy that remaining Sherman but alas. It was not to be. On its attack run, the German Light Autocannon crew could not hold from firing, scored two hits, and shot their own Ju 87G2 out of the sky. Joe didn’t even get a chance to roll for his own flak defense.
- As the saying goes, “you get what you pay for”. The German Air Observer was a free addition to Andrew’s army list meant to represent a specific German Fighter Ace who scored several ground-attack kills during the Soviet attack. Needless to say, history did not repeat during the game.
- Joe tried to be slick with Arty Observer aboard a transport Jeep and sneak around the woods on the right flank. However, he advanced just a bit too far, right into the sights of an 88. The poor Jeep did not stand a chance and the Super Heavy AT Gun blasted the soft skin Jeep right off the table.
| Soviet VPs | Axis VPs |
|---|---|
| 2 | 14 |
Turn 5
- First Order Die, the final Sherman 75mm advanced to point-blank and annihilated the 88 in the house.
- In an immediate counterpunch, a squad of Grenadiers pilled out of their building, fired a volley of two Panzerfausts at the Sherman, hit with one, and blew the Sherman sky high.
- The Katyusha hit again and killed the Air Observer on the second floor of the house scoring another point for the Soviets.
| Soviet VPs | Axis VPs |
|---|---|
| 4 | 18 |
Turn 6
| Soviet VPs | Axis VPs |
|---|---|
| 4 | 18 |
- Turn 6 had the chance of being the final Turn and it was shocking to see that no units were destroyed!
- Soviet and German units collapsed left and right around the Objective. Both players knew that holding the Objective would secure victory.
- Soviet units moving on the Objective – three two-man Tank Rider Squads and the Komsomolets.
- German units moving on the Objective – Two Grenadier Squads (one with only one man remaining), and the Lt.
Turn 7
- Each Commander only had a handful of models left. Andrew and Joe scramble to try and secure the Objective.
- First Order Die, lone Grenadier is assaulted without a chance to counter.
- Two squads of Tank Riders attempt to break the remaining Grenadiers but they hold the line.
- German Lt. makes an all-out sprint to contest the Objective.
- With Turn 7 over, the game ended with:
- Objective:
- Contested (German and Soviet units ended the game within 3″ – 0 VPs
- Soviet VPs:
- Ended the game with 4 units in the German Deployment Zone – 12 VPs
- Killed 5 units – 5 VPs
- German VPs:
- Killed 6 units – 6 VPs
- Killed 4 Armor 8+ units – 12 VPs
- Objective:
| Soviet VPs | Axis VPs |
|---|---|
| 17 | 18 |
Soviets – 5 Kills + 4 units within Axis Deployment Zone | Axis – 6 Kills + 4 Armor 8+ Kills
Final Result -Draw
The Campaign remains tied with neither commander able to tip the balance in their favor.
The Post-Game
The Axis Conclusion
Another unbelievably close game! My 88s started the game blazing hot. I knocked out two Soviet Sherman Tanks on Turn 1 – it was really looking like a major German victory by the end of Turn 3. However, I simply could not remove those little Tank Rider Squads at the end. Joe was left with three units of just two men on Turn 7 and I threw everything I had at them but it wasn’t enough.
Overall I am happy with the defense. If the Air Strike had not been shot down by my own Autocannon I think we would have ended with a German victory. I still can’t believe that happened. To be fair, on the side of the coin, Joe once again rolled a miscalculation for his own Artillery Strike and it scattered back onto his own unit. Yikes!
Joe and I really had no idea what to expect with these Campaign games but let me tell you, being tied after four games was not anticipated. Not only that, but the overall kills are only separated by one! It couldn’t be any closer.
– Andrew
The Soviet Conclusion
Again, the game came down to the wire! Not going to lie, I was not looking forward to playing this mission. With Super Heavy AT Guns deployed Hidden and little cover to advance behind, I didn’t think I would have much of a chance. Andrew, as always was masterful with his deployment and was able to screen his intentions. Losing two Shermans on the opening shots pretty much confirmed my pre-game feelings of this being a mountain of an uphill battle. But the stalwart Red Army would not back down! With some lucky misses by the Germans and good shooting from our Guards, I clawed my way back into the game, eventually forcing an draw!
This scenario at first seemed pretty heavily favored to the Defender, and after playing it, I still think it is, but not as bad as I initially thought. The theme is spot on and the list options are good, but as the Attacker, you can only do so much in six turns. This is compounded by the fact that the Defender is Hidden and you have little cover. Something else is needed for the attacking player to balance it out a bit more. That being said, I definitely would play this scenario again. It was hard as hell and made me make difficult decisions, it was a blast to play. I cannot thank my opponent enough for a great game as always and a masterful defense. – Joe
| Soviet Campaign Game Score | Axis Campaign Game Score |
|---|---|
| 2 | 2 |
| 1-1-2 | 1-1-2 |
| Soviet Campaign Kills | Axis Campaign Kills |
|---|---|
| 18 | 17 |
