
Over 16 missions, Joe & Andrew will battle through the full campaign – each trying to secure victory in a desperate fight for control of Fortress Budapest.
With Joe’s victory in Game 11, the Soviet Bear once again had the edge. The Axis found themselves on the back foot and needed a win to bring themselves back in contention. After two massive Tank War games in the Hungarian hinterland outside of Budapest, Game 12 – Farkasreti Cemetery, zoomed in and focused on the brutal fighting on the outskirts of the city. Joe was tasked with breaking through the Axis defenses in the cemetery and Andrew had to hold the line at all costs.
Andrew built his defending force from the Budapest Pocket Defenders (Fortress Budapest) Theater Selector (quickly becoming a favorite) and Joe brought forward the dreaded Urban Assault Group (Fortress Budapest). Our battle-hardened commanders arrived at the home of Campaign: Fortress Budapest – Michigan Toy Solider – fully prepared for a vicious battle.
Played on a 4×4′ table with 750pts per player, this game had the makings of a close-up brawl. Four objectives were placed, two towards the Axis side and two toward the Soviets. In order to prepare for this game, Joe and Andrew both created some cemetery terrain using the Renedra Gravestones. It seemed like a disservice to this unique mission not to bring some special terrain. Andrew picked Forward Aid Station and Joe went with Big Push for the Siege Assets.
As is tradition, Joe opted for 100% First Wave. Andrew kept two 8th SS Cavalry Division Squads in Reserve with the hope to bring them on using the special deployment rules for the mission.
Our Commanders could score VPs by:
- Soviets:
- 1 VP per objective controlled
- 1 VP per Soviet unit that ends the game within 12″ of the Axis table edge
- Axis:
- 1 VP per objective controlled
- 1 VP per Soviet unit destroyed
The Pre-Game
The Axis Strategy
We’ve been looking forward to this mission for a while now. We even went forward and created some custom terrain (all the tombstones and grave markers), something we haven’t done before for one of these Campaign games. Although we have another Attacker/Defender mission the rules are wild. Both players have the option to bring Reserve units onto the table using the objectives themselves as the “jump-off point” – as opposed to a table edge. As the Defender, I have the advantage. My Reserve can enter via any of the objectives as long as they are not Soviet-controlled. Joe has to first capture the objectives and then he can bring on the Reserves. But something tells me that Joe will go with all First Wave anyway.
We need an Axis win to bring the Campaign back to even. The pressure is on to hold the line as the defense of Budapest gets more and more desperate.
– Andrew
The Soviet Strategy
To me, from the onset, it looked like quite an uphill battle. Having to slog through a large field littered with obstacles, and pushing through a large defending force would be no picnic. On top of facing off a cunning opponent, I would have to deal with the ‘Maze-like Battlefield’ mission special rule. This allowed Andrew’s forces to pop out of any objective as long as it was not enemy controlled. My plan would be fairly straightforward. Hit the ground running: and push up the board as fast as possible, somewhat recklessly as my time was limited. I would use the Guards Squads and Howitzers to lay down long-range fire, while the SMG Squads, with their large numbers, would close assault the SS Calvary Squads to secure the objectives. – Joe
The Game
Deployment

- No units on the table at the start of the game.
- The Soviet forces would arrive completely via First Wave.
- All but two units would arrive via First Wave for the Axis – two units of 8th SS were held in Reserve.
- Four objectives were placed in approximately the four corners of the table.
- The gravestones were played as open ground that provided light cover. The trees did not block line of sight and also provided light cover.
- The three small buildings and large church were all played as buildings but with so many Howitzers lined up to arrive, no units dared venture into a building.
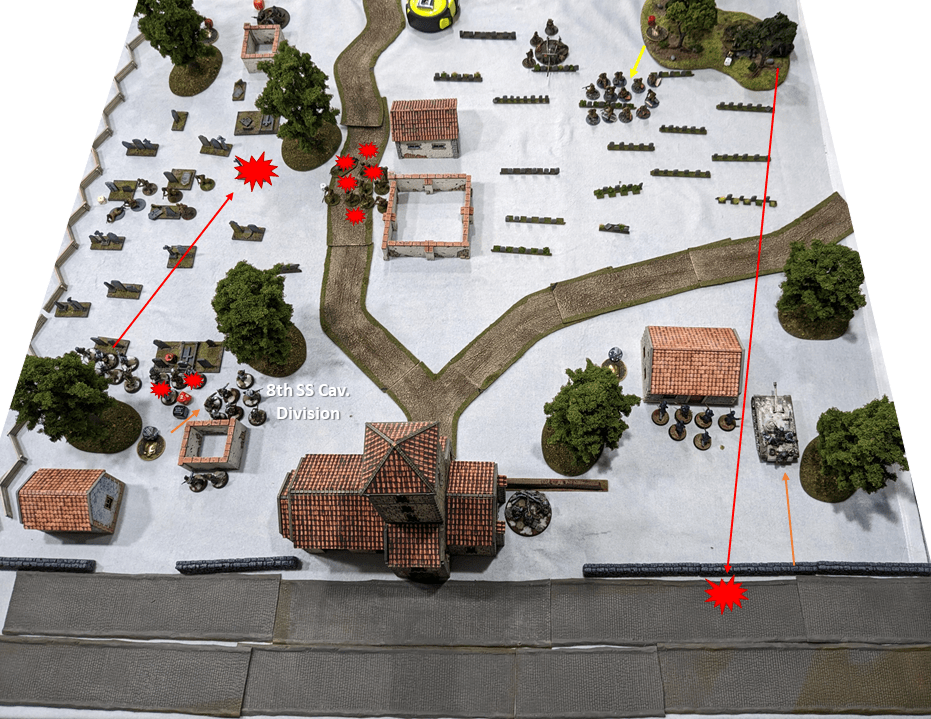
Turn 1

- Andrew’s Axis defenders arrive on the table:
- 8th SS Cav. Division – Advanced out of the objective via the special deployment rules for the mission.
- 2nd Lt ran onto the table.
- MMG Team ran up and behind a wall by the church.
- Hungarian Gendarmerie Squad advanced behind a building via special deployment rules.
- Light Howitzer ran up behind the back wall.
- Stuh 42 crept forward next to the Light Howitzer.
- Joe pushes the Soviet attackers forward:
- 12-man SMG Squad advanced into the cemetery with the 2nd Lt. close by.
- Light Howitzer hunkers down behind some low walls.
- 12-man SMG Squad (Big Push) ran up the middle road.
- Zis-3
- 12-man SMG Squad advanced into the woods along with the MMG Team and another Light Howitzer.
- Only one unit took a casualty, the Big Push SMG Squad lost one man from a lucky German LMG shot.
| Soviet VPs | Axis VPs |
|---|---|
| 2 | 2 |
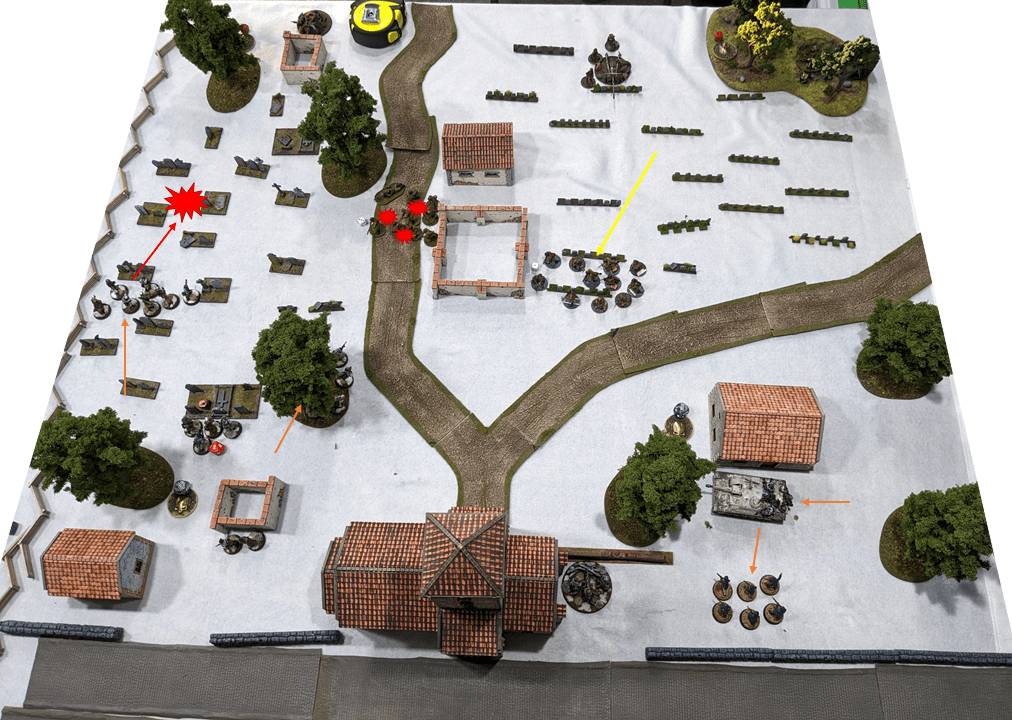
Turn 2

- Aggressive Soviet SMG Squad advances on the left and middle.
- Soviet Light Howitzers begin to range in on the German Light Howitzer and one of the 8th SS Squads in the cemetery.
- StuH missed with the Big Boom Boom but killed one of the MMG crew with its own MMG.
- German Light Howitzer begins to range in on the Zis-4.
- An 8th SS Squad arrives from Reserve and pours small arms fire onto the SMG Squad, killing five.
- One more 8th SS Squad held in Reserve.
- Soviet infantry starts to fall, but no unit kills on either side yet.
| Soviet VPs | Axis VPs |
|---|---|
| 2 | 2 |
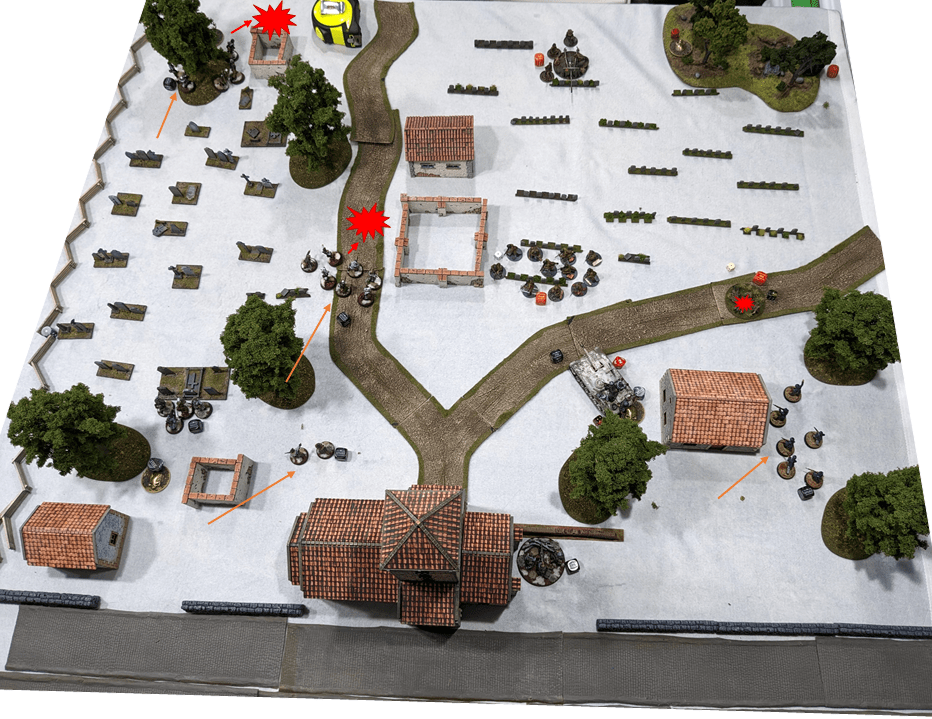
Turn 3
- First Order Die of the Turn, 8th SS Cav blasts the Soviet Lt off the table. With four SMGs, two ARs, and two rifles, it was just too much firepower. 1 kill point VP to the Axis.
- On a 5+ a Soviet Light Howitzer connects an indirect shot onto the German Light Howitzer and blows the gun to pieces.
- The 8th SS Squad with the LMG takes a hit from another Soviet Light Howitzer and two of the squad members are killed.
- Exposed on the road the Big Push SMG Squad takes fire from the German MMG Team, Hungarian Gendarmerie, German Lt., and the newly arrived 8th SS Squad who pop out from Reserve.
- The SMG Squad in the woods breaks cover and starts to advance through the gravestones on the right under the cover of the Zis-3.
| Soviet VPs | Axis VPs |
|---|---|
| 2 | 3 |
Turn 4
- Pushing the advantage on the left flank, the 8th SS advance and kill three more of the SMG Squad who, surprisingly, fails their Morale Test and break.
- SMG Squad on the right makes a massive run toward the middle.
- In a move to counter Soviet SMGs, the Gendarmerie fall back to make room for the Stuh 42 to pivot and advance towards the objective. The Stuh was once again unable to hit with the Big Boom Boom.
- 8th SS move up into the cover of a tree and cause even more damage to the Big Push SMG Squad stranded on the road.
| Soviet VPs | Axis VPs |
|---|---|
| 2 | 4 |
Turn 5

- Turn 5 begins with the Stuh 42 missing a point-blank Big Boom Boom shot against the SMG Squad among the gravestones.
- 8th SS Cav run through the cemetery on the left, looking to capture the back objective and take down the Light Howitzer.
- During the Run, the Howitzer popped its Ambush but somehow missed! With that, the fate of the Soviets was just about sealed.
- Soviet MMG Team breaks from the woods to add more units to the attack on the objective behind the Stuh.
- Light Howitzer in the woods lands a side-shot on the Stuh 42 but the shell bounces, causing two Pins.
- 8th SS put even more fire onto the Big Push squad – still caught in the open – reducing their numbers even further.
| Soviet VPs | Axis VPs |
|---|---|
| 2 | 4 |
Turn 6
- Left-flank SS Cav close on the Light Howitzer take it out – securing the back objective for the Axis.
- Center SS Cav Advance and destroy the Big Push SMG Squad.
- The right-flank Soviet SMG Squad was unable to get past the Stuh and contest the objective.
- The Gendarmerie advance around the building, killing a member of the MMG Team leaving only one operator behind, who failed his Morale Test.
- The game ended after Turn 6 with Axis control of three of the four objectives.
| Soviet VPs | Axis VPs |
|---|---|
| 1 | 8 |
Soviets: 1 objective (1 VP each)
Axis: 3 0bjectives, (1 VP each), 5 Soviet unit kills (1 VP each)
Final Result – Axis Win
The Campaign is once again tied! Unreal.
The Post-Game
The Axis Conclusion
Huh. I guess my Axis Defenders took the loss in Game 12 personally. No lie, I haven’t seen dice that hot in a while, that’s saying something! The pendulum of the Campaign has swung back to Axis favor – not in the lead but back to a draw. I did not envy Joe in this mission. His objective was a difficult one and he only had one direction to push; forward. I concentrated my LMG fire, sweeping across the massive Soviet SMG Squads, and hoped I’d be able to deal enough Pins and damage to brunt the assault. I never anticipated these results. I really thought the Soviet juggernaut was going to crash into my defensive line and sweep them aside.
In short, that is not what happened. In the many Attacker/Defender games we’ve played in this Campaign, this was by far the most decisive victory for the Axis defenders. I don’t think Joe made any errors in generalship. The Soviets just couldn’t catch a break and my defensive fire was blazing hot. Even with the StuH 42 missing every single shot with the Big Boom Boom, it didn’t matter. And that is just insane. The Soviet push was held back using nothing but small arms.
Taking a step back, this mission is fantastic. A super interesting and unique twist on Attacker/Defender and the option to bring Reserves into battle from an objective token instead of a table edge was both exciting and terrifying. We already agreed to play this one again but with a couple adjustments. It wouldn’t take much to balance this out into a Battle mission instead of Attacker/Defender.
And here we are. After 12 full games, the Campaign is tied. The Axis has the lead in overall Campaign kills and it’s certainly looking more and more likely that the tie-breaker will come into play at the end of Game 16. – Andrew
The Soviet Conclusion
In hindsight, I should have gone with the Operation Bagration Theater Selector, simply for the fact I could’ve taken some Transports and I wouldn’t have to take the two compulsory Full Strength SMG Squads. I was also too aggressive to start the game. Pushing up too far too fast at great cost and I knew better.
The table setup was amazing! The large crypts and fields of tombstones we built leading up to this game made for a really nice looking table. But IMO, this mission was not suited for Attacker/Defender. If this was a “battle” mission, with both sides moving onto the table to control the cemetery, I would have loved it. But as we’ve talked about before, six turns is not enough time for the Attacker to move across the field, neutralize the enemy, and capture the majority of objectives. Or keep the parameters the same, and give the Soviet player a points advantage (maybe 25%). But as always, my acute opponent played the mission masterfully. I thank Andrew for an amazing game and Michigan Toy Soldier for hosting! – Joe
| Soviet Campaign Score | Axis Campaign Score |
|---|---|
| 6 | 6 |
| 5-5-2 | 5-5-2 |
| Soviet Campaign Kills | Axis Campaign Kills |
|---|---|
| 48 | 53 |

Another great battle report, thanks.
LikeLiked by 1 person