
Today I am going to take you through the steps I used to paint my Bolt Action US Marines quickly and to a high standard. This article will focus on the plastic USMC from Warlord Games.
Paint Guide Highlights:
- We are only using brushes (no airbrush)
- Maximize a zenithal pre-shade/undercoat
- Significant use of Xpress/Contrast/Speed Paints
- Goal is speed painting
| Paints Used | |||
|---|---|---|---|
| Vallejo Model Color | Vallejo Xpress Color | Rust-Oleum | Citadel Contrast |
| White 70.951 | Xpress Color Medium | Earth Brown | Skeleton Horde |
| Light Green 70.971 | Wasteland Brown | ||
| Rojo Beige 70.804 | Hospitallier Black | The Army Painter | Monument |
| Carne Base 70.815 | Plague Green | Satchel Brown | Pro Acryl Flesh Wash |
| Chocolate 70.872 | |||
| Light Brown 70.929 | AK | Scale75 | |
| Sky Grey 70.989 | Terrains Dark Earth | Heavy Metal | |
| Khaki 70.988 |

Undercoats
Prime
After the minis are built and the mold lines have been removed the first step is to prime the minis. In the Paint Guide Highlights above I mentioned this would focus on speed painting. Nothing makes a paint job faster than ensuring you use the correct undercoat. Regardless if you are using a Contrast-style paint or traditional acrylics. When using Contrast-style painting I often use Rust-Oleum Camouflage Earth Brown spray paint as my primer. On its own this color is too dark of a basecoat for the Contrast-style paints to work as intended but that’s where the zenithal undercoat will come in. If you are wondering why I chose the Rust-Oleum Camouflage Earth Brown and not a black primer as the basecoat for a zenithal, it is because black, in my experience, is too dark of a color for infantry models and often makes the transition from the recess of the model to the raised points look slightly off. This dark brown primer will allow a little more of the Contrast-style paint pigments to show their true colors and will provide a more gradual color transition than if you were to prime with black.
Zenithal Undercoat
Now that the minis are primed it’s time to move to the next step of the process: the zenithal undercoat. I used a heavy dry brush (over brush) of Vallejo Model Color Light Green 70.971 to accomplish this. I did this all over the mini but removed just enough paint from the brush so that it would not cover the recesses. An over brush is very similar to a standard drybrush method of application of paint. However, you will want to remove a significantly less amount of paint from your brush before over brushing the mini. The application should leave a good amount of paint on the model covering most surfaces except the deepest recesses.
The next step is to carefully apply a drybrush of white. I used Vallejo Model Color White 70.951. When applying this drybrush you will want to remove most of the paint from your brush, be selective with where you dry brush, and only brush in a downward motion. Brushing in a downward motion will ensure your paint will only apply to the tops of the raised areas of the mini.
Going the Extra Mile
You can leave the undercoat as is at this point or if you want to add a little more contrast to your mini you can add a very thin layer of white to the upmost raised edges of the model using a traditional layering technique. For this step I focused on the shoulders, helmet brim, or any other part of the model that would be directly under the sun as if the mini were lit from above. This will create a solid white color rather than a more blended white that the drybrush method gives. Be very careful with the application of white paint. The thinner the brush stroke, the better.

Contrast-Style Paints
With our undercoats complete it’s time to add some color. When painting the mini be very careful to only cover the parts of the model you intend to with each color. When using Contrast-style paints it can be difficult to go back and touch up the base coat on a zenithal undercoat model.
Uniform
For the uniform I used Vallejo Xpress Color Plague Green 72.419 thinned with Vallejo Xpress Color Medium. I thinned this 3:2, three parts Plague Green to two parts Xpress Medium.
When applying this first layer of Xpress paint make sure to avoid the belt, any ammo pouches, straps, or anything else that is not meant to be the uniform color. Also for best results apply it in a thin layer. This will prevent too much paint from pooling in the recesses. If you notice pooling is starting to occur you can always use a brush to soak up some of the excess paint.
Webbing and Gear
Next up I painted all of the khaki areas using Citadel Skeleton Horde Contrast. I applied this to the covered helmets, ammo pouches, gaiters, and any uniform straps. I used this paint mostly because my LGS was out of the Xpress Color equivalent. However, this goes to show that any style of contrast paint will work with these steps.
Wood
For the firearms furniture (the wood parts) I used Vallejo Xpress Color Wasteland Brown 72.420 thinned 3:1 with Xpress Medium. If you apply this over any of the metal parts of the firearm that is okay. You can always go in with a gun metal or black paint and cover the metal parts if this is the case.
Metal
If you are careful and manage to not touch any of the gun metal parts when applying the Wasteland Brown to the firearms furniture you can use any black Contrast-style paint on the market for the metal parts of the gun. My personal preference is Vallejo Xpress Color Hospitaller Black 72.484. Again I thin this paint 3:1 using the Xpress Medium. I also paint any knife handles and wristwatches using this color.
Boots
Next up are the boots. For these I used Army Painter Speed Paint Satchel Brown thinned 3:1. I used the Xpress Medium for this and it worked just fine.
Final Bits
Now for the last bits of contrast-style paint. The belt, knife sheath, gun sling, and helmet straps. I mixed Army Painter Speed Paint Satchel Brown and Vallejo Xpress Color Wasteland Brown in equal parts. I also thinned this mix 2:1 using the Xpress Medium.
By this time you should have a mini looking similar to the one pictured above. It is now time to move on to the skin and other applications of traditional model paints.


Traditional Paints
Skin
I basecoated the flesh areas with Vallejo Model Color Rojo Beige. This may take two coats of paint but if you applied the zenithal drybrush steps to the flesh it’s possible to have one coat provide good enough coverage. After the base coat for the skin had dried I applied a wash of Pro Acryl Flesh Wash by Monument Hobbies.
Once the wash was dry I went back and highlighted the raised edges of the skin with the same color as the base coat, Rojo Beige. For the final skin highlight I applied Vallejo Model Color Carne Base 70.815 selectively to the raised edges of the arms, knuckles, checks, chin and nose.
Metal
As a highlight Hospitaller Black, I dotted metal on the firearms. I used Scale75 Metal N’ Alchemy Heavy Metal. Any dark metal will do though.
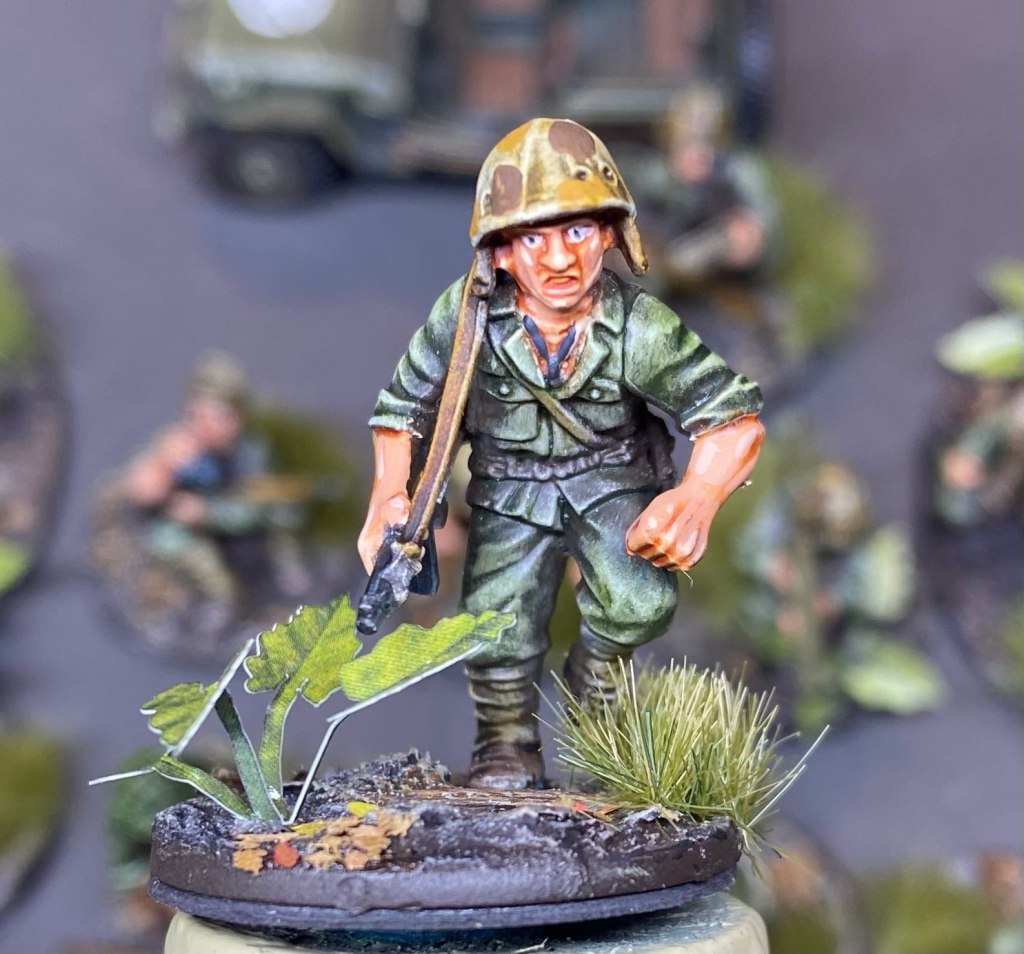
Camo
The last step for the paint is the camo dots on the helmet cover. I went with Vallejo Model Color Chocolate 70.872 for the dark brown dots and Vallejo Model Color Light Brown 70.929 for the lighter brown dots.
Varnish
Finally, spray or brush on your favorite matte varnish.

Basing
Bringing it home with the basing – one of my favorite parts of the hobby. With this step, we get to place our models into the environment they are fighting in. Unfortunately I forgot to take in-progress photos of these steps so bear with me as I do my best to explain.
My personal preference is to paint the mini separate from the base. This allows me to not have the boots of soldiers look like they are partially sunken into dry dirt and makes it so I don’t have to be as careful when drybrushing the base and have to avoid the mini. If you prefer to paint your models attached to the base that is fine too! These steps will still work.
Adding the Base Texture
Out of the various texture pastes from Vallejo, Citadel, and AK, I have found AK’s to be highly preferable for a few reasons. AK has many different texture pastes for all different environments and climates. While both Vallejo and AK offer texture paste in larger volumes and at a better cost than Citadel per ounce, AK’s beats out Vallejo in my opinion because in addition to more texture color options, AK’s particles in the texture are often smaller than Vallejo’s. I prefer this as I think it matches the 28mm scale better. But at the end of the day use the texture paste brand that is most readily available to you.
After all of that let us take an actual look at the material I used for the base. For the texture paste, I used AK Terrains Dark Earth which comes in a 250ml container. This should be more than enough for a 1,250pt. army. It may be enough for two or even more depending on how much you apply. When applying this I did try to make some variations in the ground texture by having some low points and high points. However, while doing this keep in mind if you have not glued your model to the base yet that you will want two flat areas to glue the model feet to after the base is complete.
Now before the texture paste was dry I did add some tiny bits of sticks that I found around my block. I pushed some of these deep into the paste to represent fallen branches that have been there for a while. Other bits of branches I pushed in slightly or just on top of the text paste to make it look like they had fallen more recently. Before adding stick bits to the base I always make sure to bake them in the oven at 400 degrees Fahrenheit for around 10-15 mins. This will ensure that any microorganisms that may be inclined to eat your acrylic paint are no longer around to do so.
Painting the Base
With the texture paste dry and holding the sticks in place, I then painted the wood bits with Vallejo Model Color Chocolate Brown. Then I drybrushed the whole base using Vallejo Model Color Khaki and I made sure to give the wood bits a hefty drybrush. Finally, I drybrushed Vallejo Model Color Sky Grey 70.989 over the whole base including the sticks.
Once this was dry I coated the sticks in Vallejo Express Wasteland Brown. This makes the sticks have the same acrylic finish as the mini and texture paste. Everything having the same finish helps make a cohesive-looking mini.
Leaves
From here I added some dry leaf basing material. To apply these I watered down PVA glue (Elmer’s Glue not Elmer’s School Glue) and dotted it randomly on the bases using an old brush. I then sprinkled the leaves on the bases. Let them sit for a minute or two and then while holding the bases over a surface you don’t mind leaf bits falling on, turn the base over and give it a few light taps with your finger. This should remove any excess leaves that were not glued to the base.
A note on the leaves: I bought mine from a no-name Amazon vendor just before the pandemic so I’m doubtful I will ever find the same ones once I am finally out. There are however Miniature Hobby Leaves that can be found on Shadow’s Edge Miniatures that look close enough to the leaves I have based on the pictures on their website. I haven’t ordered from them before or used their leaves so I can’t speak to them or any that I do not own but if you do some Googling for “miniature dead leaves” you will get plenty of options.
Plants and Grass
Moving on to the last bits – the plants and grass on the base. I’ve encountered no better tuft and plant base martial than those made by Gamers Grass. These are excellent. A lot of their tufts come on the sheet in all different shapes. This makes it so all of your grass patches are not identical. Also, I have not found another hobby supply maker that has plants as detailed and pre-colored as Gamer Grass. For the bases I used their Elephant Ear Laser Plants and for the tufts I used their Mixed Green 6mm Wild Tufts. I applied them to my liking on each base.
Finally, I glued my varnished models to their bases and sent them on patrol through the jungle.
Closing Notes
I hope you enjoyed the guide. If you have any feedback on the article or questions please let me know in the comments. I will do my best to respond in a timely matter.
Also as a personal addition to this article, I want to mention Kick-Ass Mail Order. Before I go any further I do want to call out that I am not affiliated with Kick Ass Mail Order and did not receive any compensation, monetary or hobby supplies, from them. I currently do not have LGS near me and when I did, the local store did not carry historical models. So I needed a good place to get my troops and the supplies to get them assembled and painted. Kick-Ass Mail Order carries the majority of the supplies I used in this article. They also carry what looks like 90%+ of Warlord Games’ Bolt Action kits. They also carry other 28mm WWII kits from Rubicon, Great Escape Games, Wargames Atlantic and several others. Plus they have tons of hobby supplies from a variety of companies. Their shipping is very quick in my experience. Being near Chicago might help with this but any time I order and reach the free shipping level I normally receive my box of goodies within three days. All this to say if you are looking for somewhere to purchase your Bolt Action models and hobby supplies state-side, Kick-Ass Mail Order is a great place to do it.
