
Imagine leading your squad through snowy forests, the freezing air biting your face. Each step is cautious, the serene landscape silent except for the crunch of boots in the snow. The cold seeps into your bones, fingers numb on the trigger, breath visible in the frigid air. Suddenly, a sharp whistle cuts through the air—incoming fire—and in a flash, the once-pristine landscape becomes a chaotic, frozen hell.
This is the atmosphere I aimed to recreate on my 6×4′ foot winter wargaming table. Inspired by the recent Polar Vortex 2024 winter theme and the release of Warlord Games Winter Americans Plastic set, I knew this project was a perfect fit. My goal was to capture the wintry landscapes of the Carpathian Mountains that span Romania, Ukraine, Hungary, Slovakia, and Poland. In this article, I’ll take you through my journey of building this immersive battlefield, exploring the design process, step-by-step construction, and the historical inspirations that drove this project.
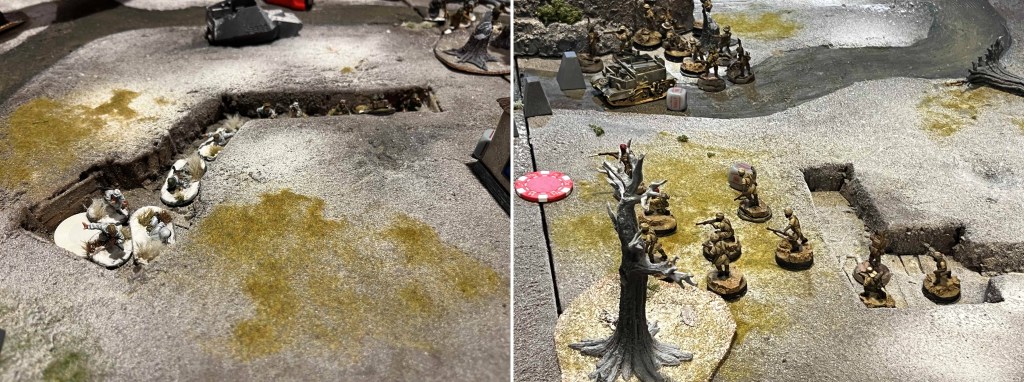
The board in action!
A Chilling Vision: Project Overview
The goal was to make a winter table with snow-covered trenches, Eastern European buildings, and rugged hills as easily and quickly as possible with the materials at hand. Historically, the Carpathian Mountains have been the site of numerous battles, particularly during the World Wars. From the Siege of Przemyśl to small unknown firefights, the harsh winter conditions often played a critical role in this area, making this theme both challenging and historically rich for wargaming.

The Carpathians are as beautiful as they are historic. Ancient mountain ranges that have been the barriers against invaders – from the Huns and Magyars to the major offensives on the Eastern Front in WW2
For this project, I used 2’x2′ pink foam insulation boards, plywood boards, spray paint, Latex Black & Latex Brown Paint, flocking materials, wood glue, and tools such as a box cutter, hand sander, and plenty of elbow grease.
Inspiration, Planning and Design
Now, I’ll admit—I’m not much of a planner. Projects like this just pop into my head. I go with what I think will look cool and the resources I have. So building this table was like constructing a plane while flying it.
Still, I did some planning. I knew the basis would be the 2×2′ foam boards (I’ll get into why I think these are the best later). I wanted to represent the foothills of the Carpathians, a rural area I know and love, with forested mountains, large rock formations, and cold winters. I aimed to make the board historically accurate for WWI and WWII since I play both Bolt Action and Blood and Valor. Key elements included winter warfare and trenches while keeping things practical. Huge mountains and deep ravines wouldn’t work well with static models, so I chose function over form where possible.
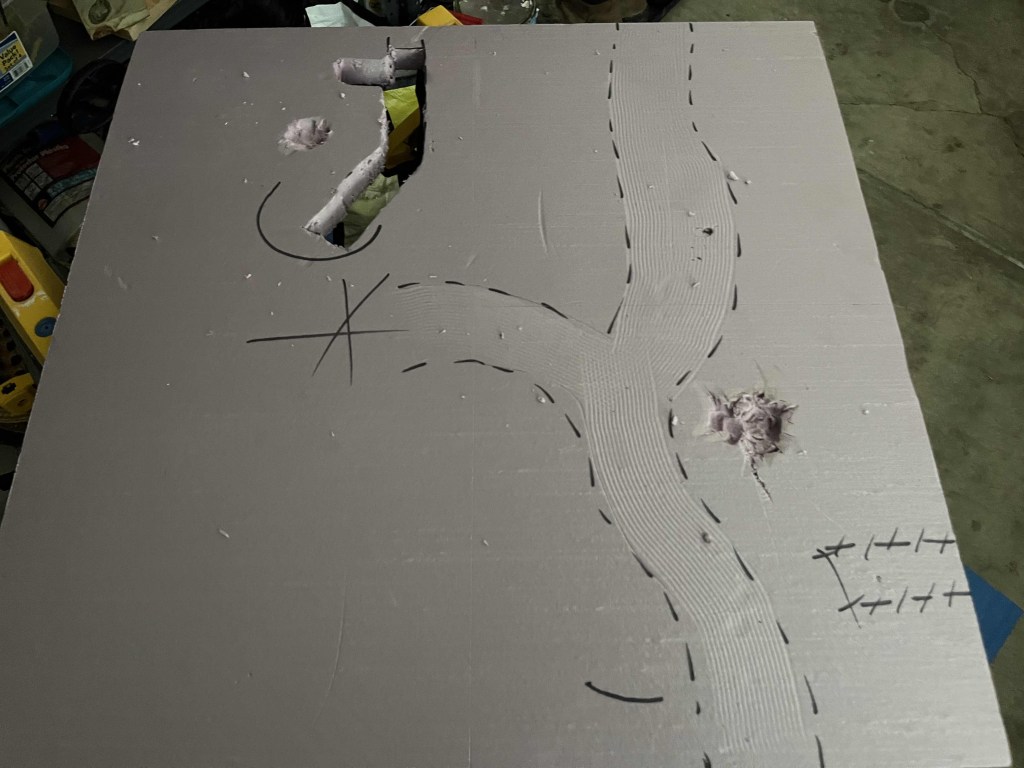
The planning stages- tracing out roads and digging out trenches and craters.
As a visual person, my planning began once I had the foam boards laid out. I sketched modular roads, ensuring they could be rearranged in various combinations. Next, I imagined where slit trenches and gun pits could go and drew those out with Sharpie. Once this was done (and some trenches already cut), I began to see the final product and planned the placement of houses, fields, and rock formations. With all that in mind, I set to work!
Why Pink is Best

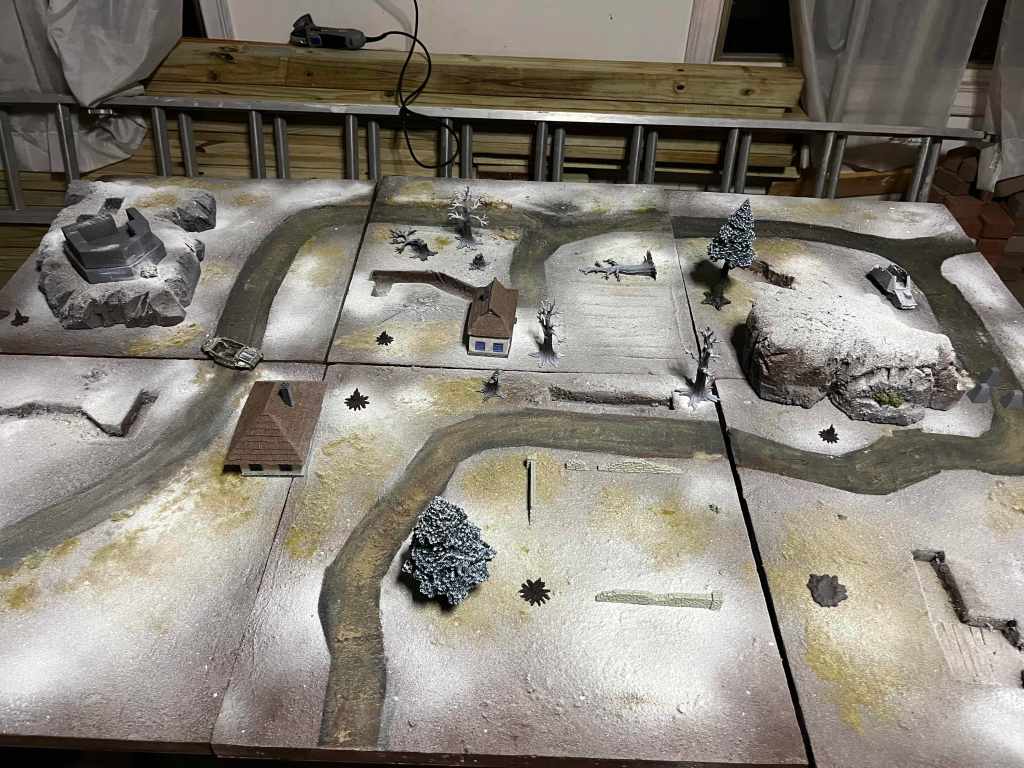
Laying it all out and planning the roads
I want to take a minute to talk about what I believe is one of the best board-building materials: 2×2′ pink foam insulation boards. First, pink foam is incredibly dynamic and easy to carve, perfect for creating slit trenches. These 1″ thick boards provided the right height for 28mm models. They also allow the table to be modular, enhancing replayability while maintaining a unified look. Lastly, the 2×2′ foam boards are light and relatively compact. These are easy to store and transport, making them ideal bring the board to tournaments and game days. The one drawback is slight gaps between the boards, but I haven’t found them to be an issue. Mats might be even more maneuverable and light, but they have no ability to add verticals depth. Plus I always found above-ground trenches to be bad imitations.
With pink boards in hand, I cut out the trenches using a knife, these were the perfect height for 28mm Bolt Action minis. Then, I glued the foam to 2×2′ plywood boards. For roads, I used an electric hand sander to imitate the natural depression that dirt roads create. I used wood glue to attach broken and cut popsicle sticks inside the trenches to represent retaining walls. Then I glued and clamped extra foam boards together to create rock formations. Repurposing out-of-production Verlinden Atlantic wall bunkers, I added concrete fortifications to the Romanian border. I handcrafted a separate foam rock formation with a trench that fit the bunker.
With the foam all carved up, I covered everything with glue and different grits of sand for texture. I didn’t want it too gritty, as uneven ground can be a pain for top-heavy models. Afterward, I applied a thick layer of Latex Black Paint to seal and prime everything.
Painting

Throwing down the latex paint. Black underneath and then brown on top
Everything up until now has been labor intensive, taking a couple of months to complete. Now, I’m quite a lazy painter so I settled on a thick layer of black, then brown paint and then spray painting everything. I did so with various shades of brown and gray. Once dried- I added back some color through flock and some green bushes.
Scatter Terrain & Additional Details

Flocking the table and laying down grass to add color
No board would be complete without extra bits. I knew I wanted a rural setting- so I planned to only have two or three buildings, some forest, stone fences, rock cliffs and fallow fields to fill in the areas not covered by roads or trenches. For trees I used Monster Fight Club snow-themed trees which are very good but expensive. I opted to not use their mats and instead made thin corkboard mats that I flocked and painted to match the board. For buildings, I grabbed some solid Eastern European looking houses from Games Plus and a few stone fences and destroyed tree stumps from Warlords’ long out-of-print Winter Battlefield set. This set comes with foxholes too but since I had all my trenches those went to Giuseppe and his Battle of the Bulge Board in exchange for painting up some wrecks! Needing still something to give the board some flavor I salvaged a few failed resin casts. I had a fun time making these into wrecks- even blowing them up with some fireworks (which didn’t work to great) before priming and spraying them as well.
Let it Snow!
Finally the snow!
Once that was done – I agonized over the most important part of the winter board – the snow.
I looked at just about every snow material out there, from white flock, to plasters, to putties and name-brand basing textures. Despite considering all of them – my desire for something quick and easy won out. I ended up using a very nifty “spray-on snow” that came from the dollar store. After finding out it needed to sit overnight to dry (I blasted through two of these cans) covering the whole table and most of my terrain in a light snowfall. It did the trick! Allowing everything to look wintery in record time. With that, the table was done to the degree it needed to be ready for a tournament the next day.
Lessons From the Front: Challenges and Learnings
This is the first board I have done in a long time. And looking back one of the biggest challenges is balance. The balance between looking beautiful and at the same time being modular to make a new battlefield as needed is rough. Static dioramas look incredible, but as wargamers we need practical. So planning out dirt roads, muddy trenches and rugged cliffs while leaving enough space for armies to maneuver was always something I had to keep in mind.
The other hardest aspect of a winter table- is that by design- the colors are very muted. This makes for a board that isn’t as visually striking as your autumnal French town or sandy Japanese airfield. It relies on buildings and forests to bring some color. Despite the big cliffs and trenches- I felt the board needs a big centerpiece – a real head-turner that makes you go “Wow that’s something special!” – I’m not sure what it is yet -maybe a beautiful wooden Orthodox church.
The last takeaways are universal though: your biggest pressure will always be time- there are a million little things you can always add. Be patient but also know your limits. Taking the time to let each layer (whether glue or paint or snow) dry properly before moving on to the next step ensures a more polished final product.
At Winters End

Overall creating a winter-themed wargaming table was a rewarding experience that brought the harsh beauty of the Carpathian foothills to life on the tabletop. From initial planning to final detailing, every step was a labor of love. I hope this guide inspires you to embark on your own terrain-building adventures. If you’ve created a themed wargaming table, share your stories and photos with us at Chicago Dice!

Sick. Awesome work and a great read. We need more winter tables for bolt action. I hope winter gets more representation with the new start set.
LikeLiked by 1 person