
Over 16 missions, Joe & Andrew will battle through the full campaign – each trying to secure victory in a desperate fight for control of Fortress Budapest.
Now this is a real treat. Game 14 of Campaign: Fortress Budapest is the legendary Supply Drop mission. Unlike the many campaign missions, Supply Drop is a true “battle” scenario that can be played by any two Bolt Action forces in any theater. Both Joe and Andrew have played this mission, or a variation of it, many times and were incredibly excited for a chance to play it again. Supply Drop has been used in various tournaments and events over the years and is an undisputed member of the Bolt Action Scenario Hall of Fame.
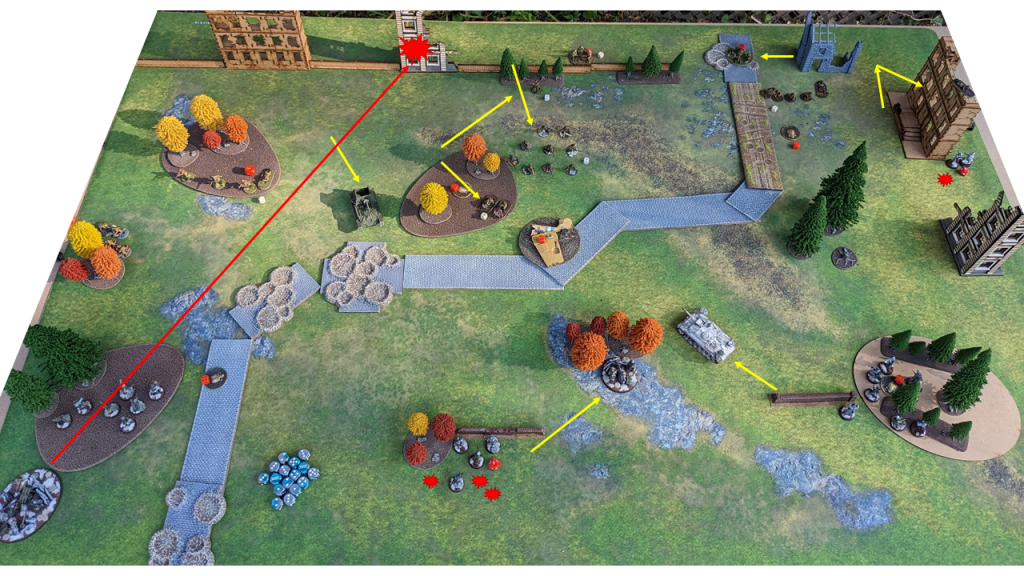
Played on the full 6×4′ table, our Commanders brought forth 1,000pt forces. Andrew used the Budapest Pocket Defenders (Fortress Budapest) Theater Selector and Joe once again picked Operation Bagration (Armies of the Soviet Union). In a surprise turn of events, Game 14 did not take place at Michigan Toy Solider, instead the Soviet Boss hosted the battle at his home, thus providing a chance to play the game outdoors during a lovely Michigan-summer afternoon. Armed with a cold beverage in hand, Andrew and Joe faced off for another titanic clash.
As is tradition, both Commanders opted for 100% First Wave. There would be no Reserves.
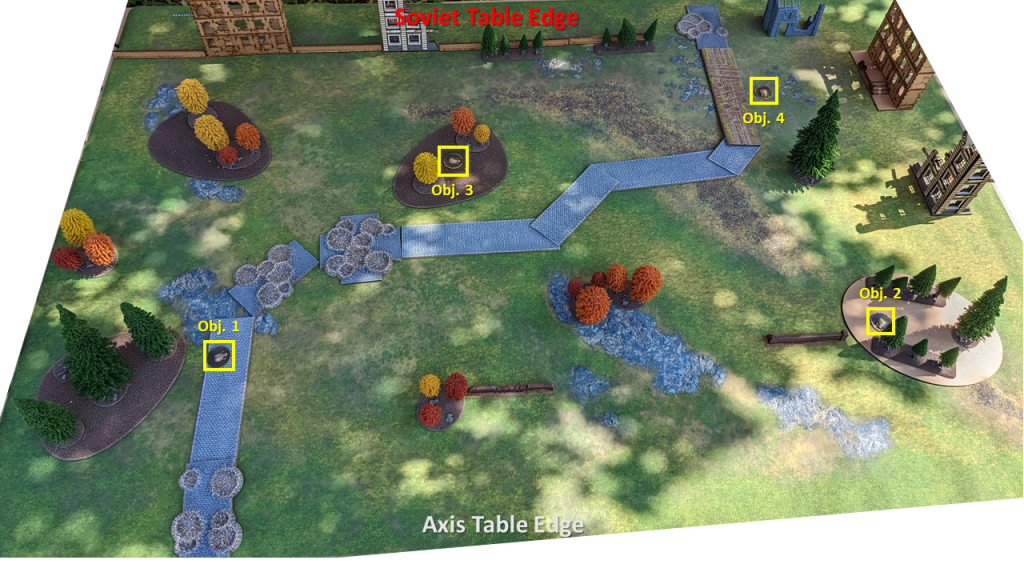
To setup, d3+3 objectives were rolled (4) and alternately placed on the table. Objective scoring would take place at the end of the game. To secure victory you had to win by two.
- Soviets:
- 2 VP per supply cannister objective controlled.
- 6 VP for controlling the glider crash.
- Axis:
- 2 VP per supply cannister objective controlled.
- 6 VP for controlling the glider crash.
The Pre-Game
The Axis Strategy
I am so excited. Not only are we going to play the legendary Supply Drop, but we are also playing outside! I’ve only had the pleasure of playing outdoor tabletop wargames a handful of times and it really is an incredible way to spend an afternoon. Once we got the table setup in Joe’s backyard we realized we were both already winners – after all, this was outdoor Bolt Action Time!
Joe’s Soviets had the “preferred” table edge with the multiple ruins and walls but my Budapest Pocket Defenders come with d3 Defensive Barriers and those two walls made a huge difference. I’m not sure what I would have done without them! This is a tricky mission to plan for. Each objective has the possibility to be worth 4 VP (instead of the base 2 VP) and the battlefield can change quickly. With that in mind, I wanted to secure the two objectives on my half of the table as fast as possible. I would hold Obj. 1 with minimal units and then swing up the flank past Obj. 2 with my Pioneers. But after that? Who knows!
Nothing more you can do except wait for that Glider crash at the top of Turn 4! – Andrew
The Soviet Strategy
Supply Drop. This mission was one of, if not the first mission Andrew and I played together when we first started to square off. We both absolutely love this mission. It gets so chaotic and crazy and then a glider crashes in the middle of the table! But this game carried more weight than normal. A Soviet win here would all but secure my victory in the Campaign, as it would put me up by two with only two missions left to play. I went with an infantry/artillery heavy list, as to try and overwhelm the Axis forces. I would use the long-range heavy firepower of Heavy Autocannons, machine guns, and Howitzers to cover the advance of my large infantry squads, who would move up the table and gain control of the objectives. An SU-76 would be there to deal with Andrew’s beloved StuH-42 and any other tricks up his sleeve. The plan was simple, but as any good plan in Bolt Action goes, it rarely goes accordingly. – Joe
The Game
Deployment
- Four objectives placed at the start of the game. When an infantry unit first moved within 3″ they must stop and search to discover what kind of supplies were hidden at the objective.
- The Axis forces placed two Street Barricades in their Deployment Zone per the Budapest Pocket Defenders Special Rule.
- No units started on the table; all would arrive via First Wave.
Turn 1
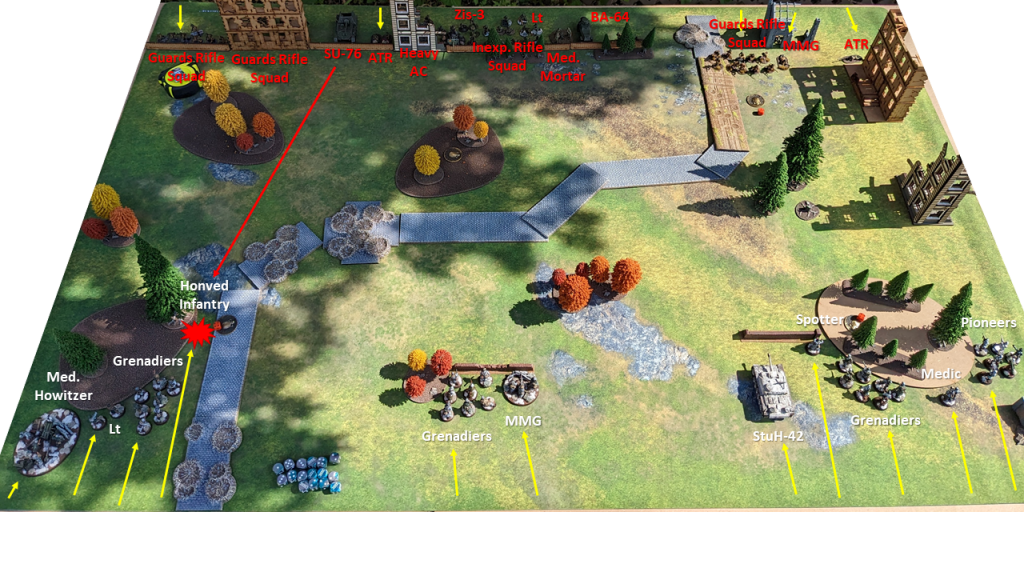
- The Hungarian Honved Squad rushed up the left flank to search the first objective – Medic. This objective is now worth 4 VP instead of 2.
- A unit of German Grenadiers ran to the woods on the right flank and discovered Food in the objective. This objective is now also worth 4 VP.
- In direct answer, a squad of Soviet Guards Rifles moved up the path to also discover Food in their objective! Only one objective remained to search.
- In the opening shop of the game, the SU-76 rolled onto the table and blasted a shot at the Honved Squad. The shell connected, killed four, put on 3 Pins and the survivors fled the table. First blood to the Soviets!
| Soviet VPs | Axis VPs |
|---|---|
| 4 VP | 8 VP |
Turn 2

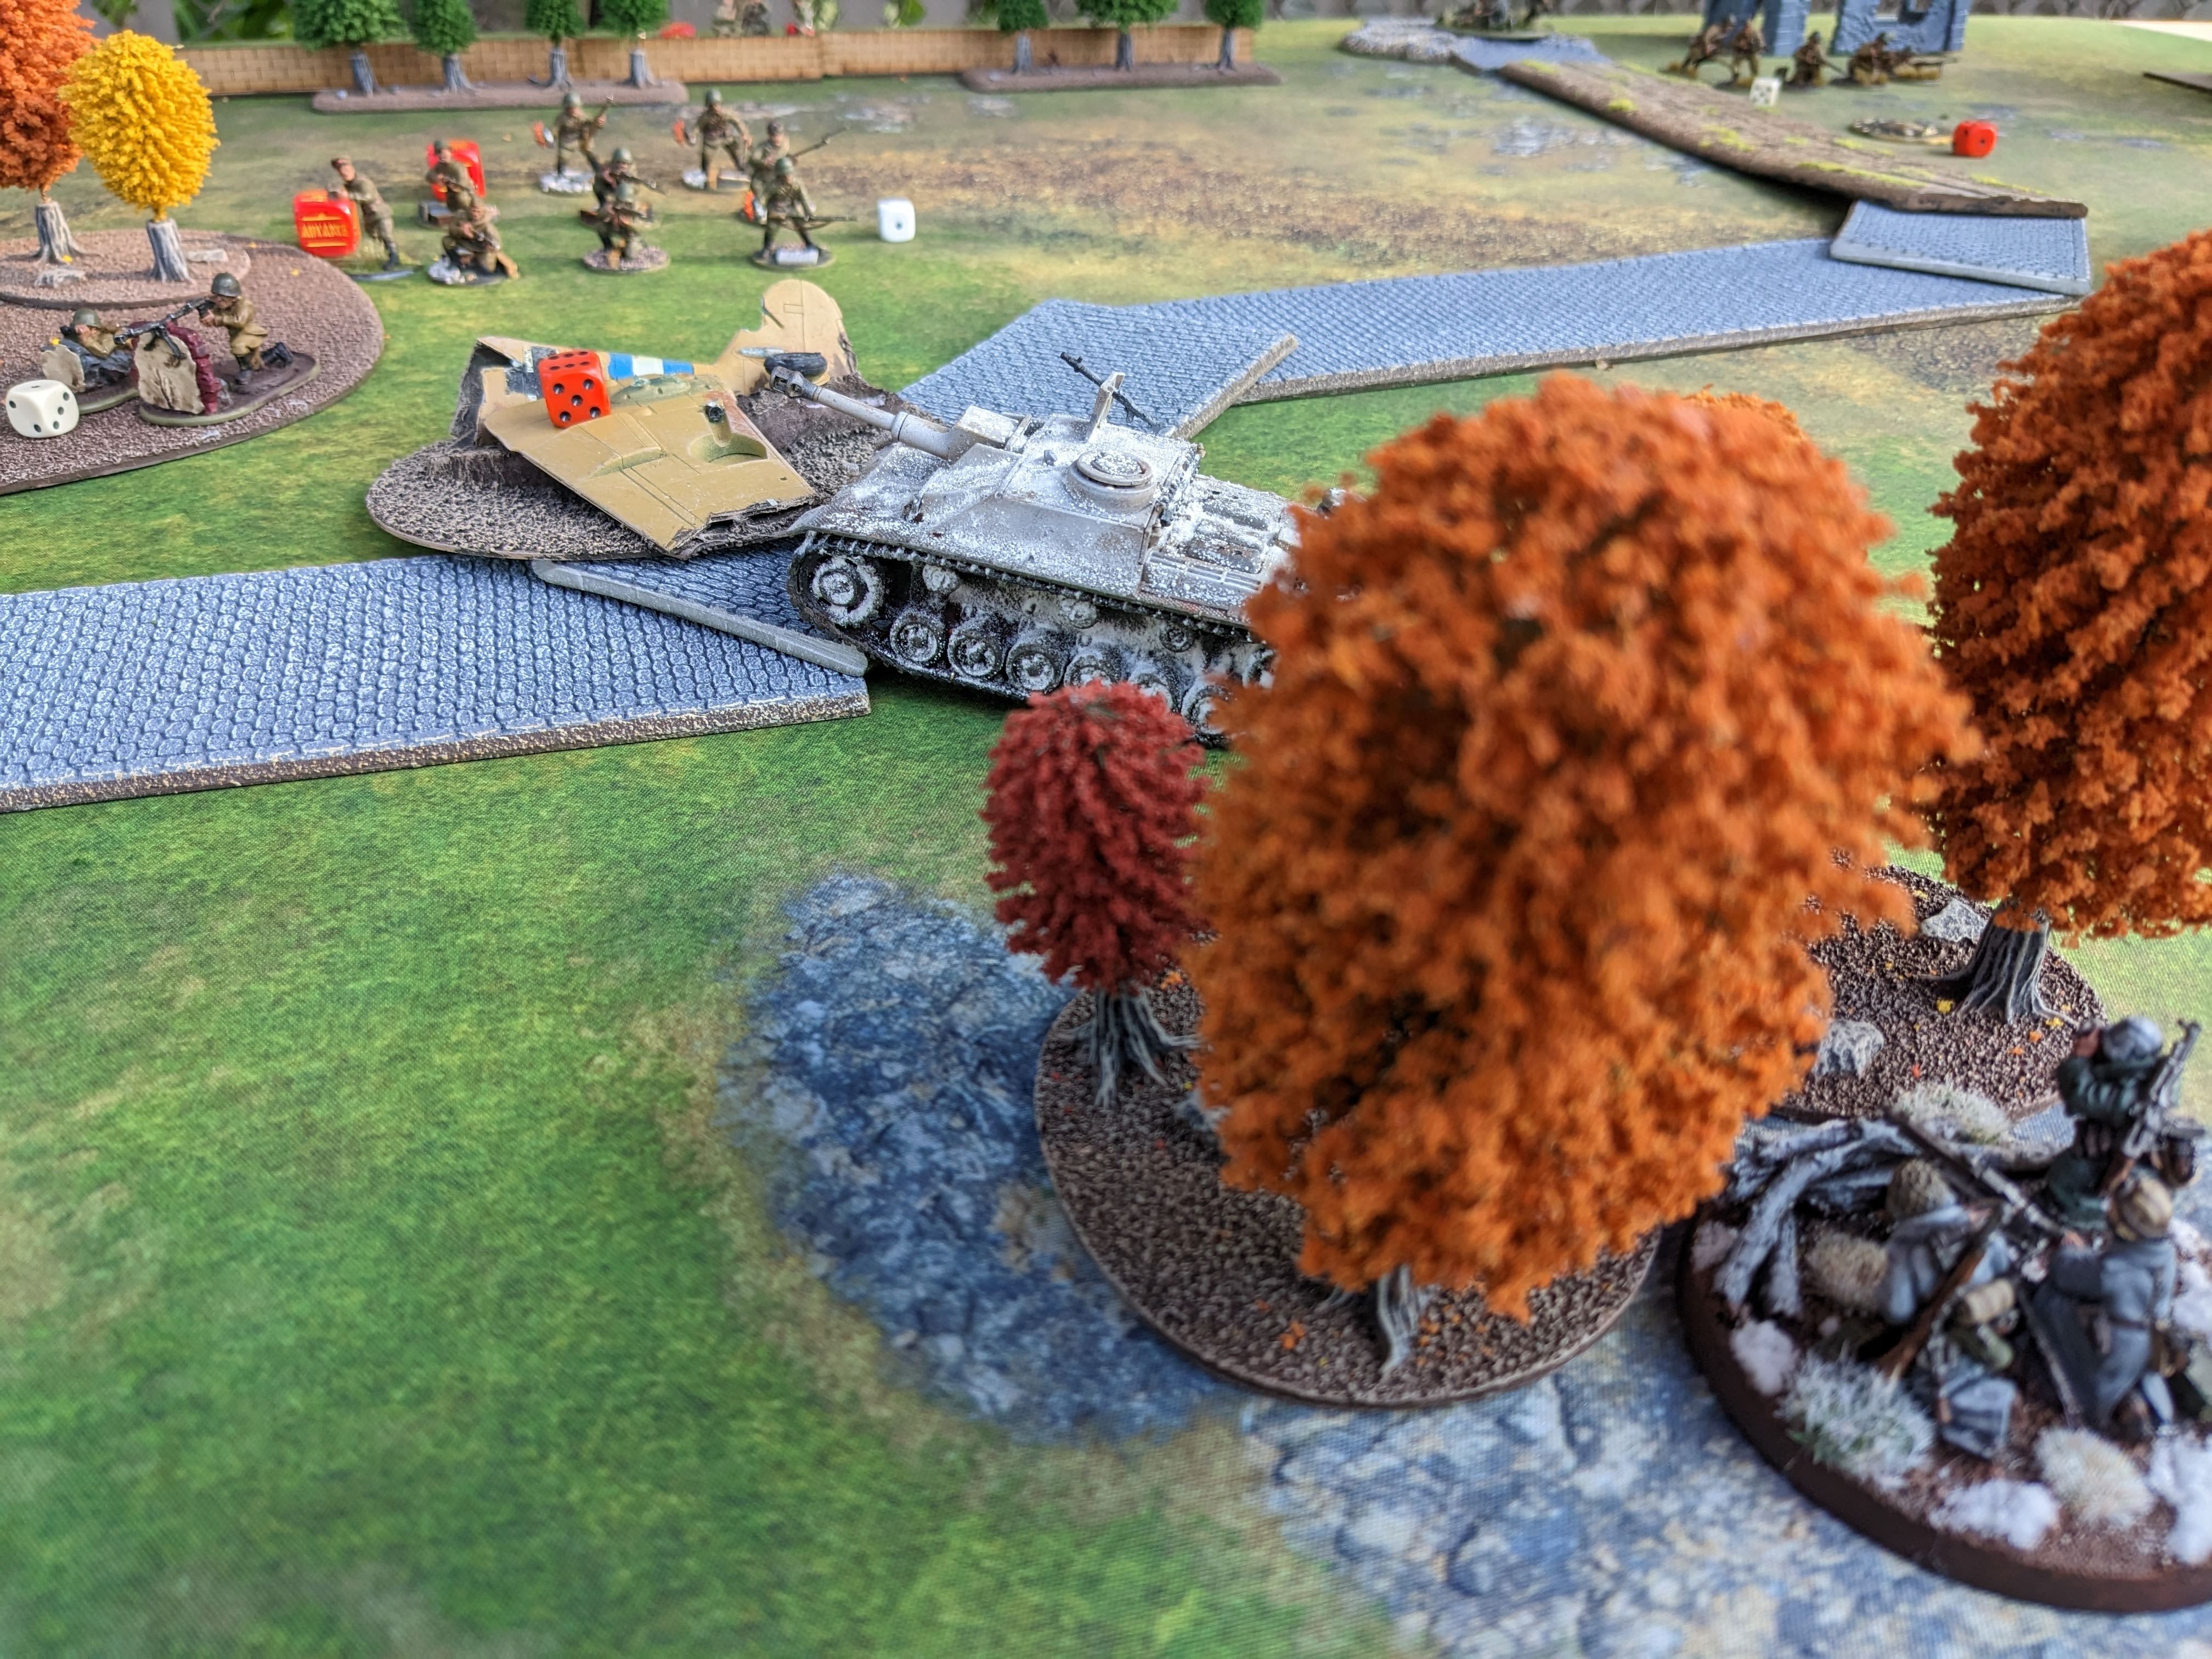
- StuH-42 opens the turn with an advance to the low wall and fires on the Guards Rifles in the open. The Soviets go Down but still take a hit. Three die, 1 Pin.
- Soviet Heavy AC blasts two 1″ HE shells at the right flank Grenadiers, killing two.
- One of the Soviet ATR Teams scrambled up towards the last objective, searches it and finds more Food. With this, now all objectives have been searched and all are worth 4 VP instead of 2.
- On a wild indirect shot, the German Med. Howitzer hits and destroys the Soviet Zis-3.
| Soviet VPs | Axis VPs |
|---|---|
| 8 VP | 8 VP |
Turn 3
- In direct follow-up to Turn 2, the StuH again fires at the Guards Rifles. They hit the dirt but still take a hit. They are up to 4 Pins.
- On the deep right flank the Pioneers and Soviet ATR jockey for position on the ruins. The ATR manages to kill one of the Pioneers, who remain out of range with their SMGs and Flamethrower.
- German MMG puts long-range fire onto the Soviet Med. Mortar behind Hard Cover. The MMG kill some of the Mortar crew.
- Grenadiers on the right flank send LMG shots into the Soviet MMG Team and mange to kill one of the weapon crew.
- In the center, the Grenadiers behind the wall pop out of Ambush and kill five Guards Rifles on their Advance into the woods.
| Soviet VPs | Axis VPs |
|---|---|
| 8 VP | 8 VP |
Turn 4
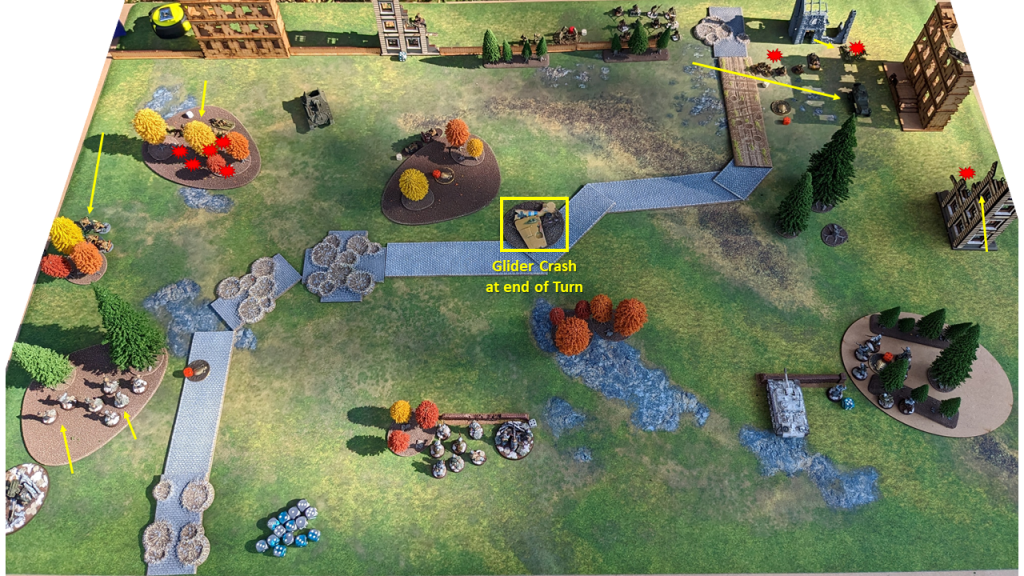
- Glider crash! The Glider crashed down 38″ off the right flank. This newly arrived objective is worth 6 VP. During the crash, the impact put two Pins onto the Soviet ATR Team by the middle woods.
- The Axis Med. Howitzer connects against the Soviet Heavy AC and kills three of the crew leaving one man behind with 1 Pin – he holds. This Howitzer has carried the Axis force today.
- The SU-76, holding position, misses a shot against the Grenadiers behind the wall in the middle.
- StuH-42, also holding position, hits the Soviet MMG Team with its own MMG, leaving one crewman alive.
| Soviet VPs | Axis VPs |
|---|---|
| 8 VP | 8 VP |
Turn 5
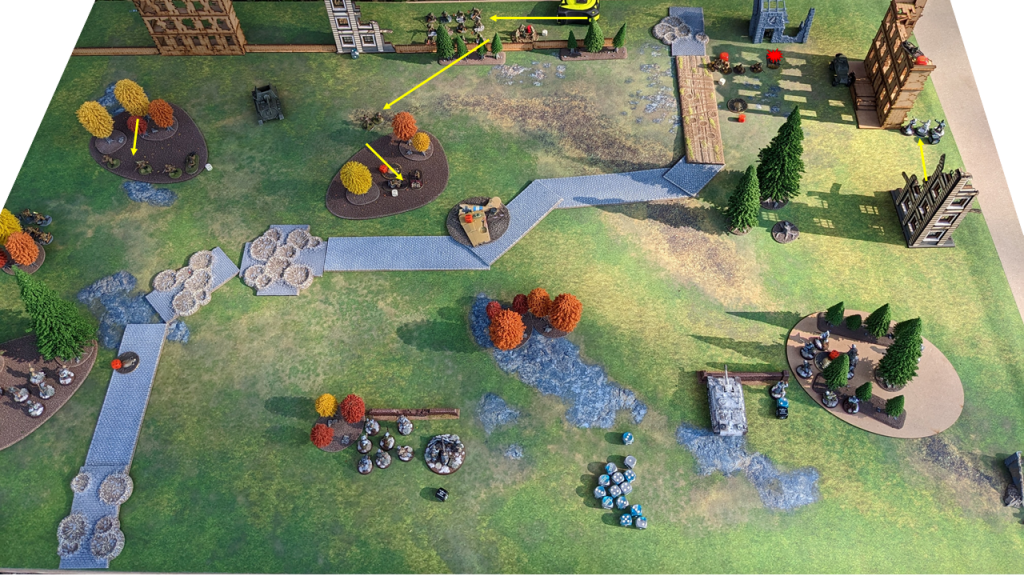
- Axis Med. Howitzer finishes off the last crew member of the Soviet Heavy AC.
- Pioneers advance up and attempt to flame the Soviet ATR Team but miss.
- StuH advances and open fires of both the Soviet LT (kills the buddy) and the ATR Team in the center woods but misses.
- SU-76 advances and kills three of the center Grenadiers behind the wall.
| Soviet VPs | Axis VPs |
|---|---|
| 8 VP | 8 VP |
Turn 6
- StuH-42 pushed up towards the Glider Crash, missed the SU-76 and killed one of the Green Rifle Squad (who went Down).
- The SU-76 advanced and returned fire at the StuH but missed.
- Pioneers attempted to fire at the BA-64 but fail their Order Check and go Down.
- The BA-64 fires its LMG at Point Blank against the last two Pioneers who fall to the small arms fire.
- The game ended after Turn 6.
| Soviet VPs | Axis VPs |
|---|---|
| 8 VP | 8 VP |
Soviets: Controlled two 4 VP objectives, contested the Glider Crash.
Axis: Controlled two 4 VP objectives, contested the Glider Crash.
Final Result – Draw
Joe maintains the Soviet Campaign lead!
The Post-Game
The Axis Conclusion
Joe is a hero for both suggesting and hosting this lovely afternoon of backyard Bolt Action. What a great game! Supply Drop is a certified classic and I expected nothing less than a good time.
I won’t lie, I got real excited when both objectives on my side rolled for bonus VPs. Not to minimize the game, but if Joe hadn’t rolled both of the objectives on his side as four-point objectives as well, that could have very well been it. Of course Joe and I don’t want to see a game decided at the end of Turn 2, but there was a real chance for that to happen. Losing the Honved Squad on Turn 1 was unexpected and really impacted my ability to push the middle objective. I had to shift my strategy to more defensive than I anticipated and put too much hope on the lone Pioneer Squad on the deep right flank. Those Pioneers did manage to pull a handful of Soviet units to counter them but there was no chance of the Pioneers ever contesting the deep right objective.
The Med. Howitzer was the real MVP who scored both of the unit kills. For all the units that took casualties, the kill count was shockingly low! Only two kills per side. That’s very uncharacteristic for this Campaign. We’ve been averaging nine total kills per game so this was a relatively bloodless battle.
Sadly I was not able to secure the win. The Soviets remain ahead by one Campaign Point and just a single overall kill. Game 15 is going to be make-or-break for the beleaguered Axis defenders. – Andrew
The Soviet Conclusion
I will never not love this mission. It’s just too good; too much fun. Andrew’s HE was on point this game. Multiple hits and Pins really slowed me down and reduced my strength. My gunline, which was behind Hard Cover mind you, was torn apart by his Howitzer and StuH-42. My big guns didn’t really show up post-Turn 1. This basically threw my plan out the window, and the damage was done. My squads were reduced and pinned. With my offensive strength reduced, I turned to getting to the middle at all costs. With both flanks engaged with Axis forces, I was forced to throw my Inexperienced Squad, Lt and a lone ATR Team into the middle to try and gain control of the glider crash. As a last ditch effort I threw my vehicles in to try and clear out the Axis forces, but to no avail. Once again, the game ended in a Draw. I feel like I was a bit too concentrated early on in the game with forcing Andrew off of one of his two objectives. I should have waited and gone all in on the middle, where the prize would have all but sealed a win in the Campaign for the Soviets. But this Draw just makes the next two games even more important. Thank you to my opponent for another great game! – Joe
| Soviet Campaign Score | Axis Campaign Score |
|---|---|
| 7.5 | 6.5 |
| 6-5-3 | 5-6-3 |
| Soviet Campaign Kills | Axis Campaign Kills |
|---|---|
| 59 | 58 |

I think the result of a draw, just makes the result of the campaign more thematic. Great stuff.
LikeLiked by 1 person
It’s certainly incredibly exciting! But at this point in the Campaign, it would be more thematic to have crushing Soviet victories! hahaha
This campaign is really coming down to the wire. Total slugfest.
LikeLike